
Looking for information on creating backup schedules? See: Backup policies (schedules)
Manage jobs
Job types
The Jobs page contains information about current and historical job history. On the menu pane, you will see sub-menus for Backup, Replication, Seeding, Conversion, System, and Agent type jobs.
To view job history:
1. Click Jobs on the left-hand navigation menu. 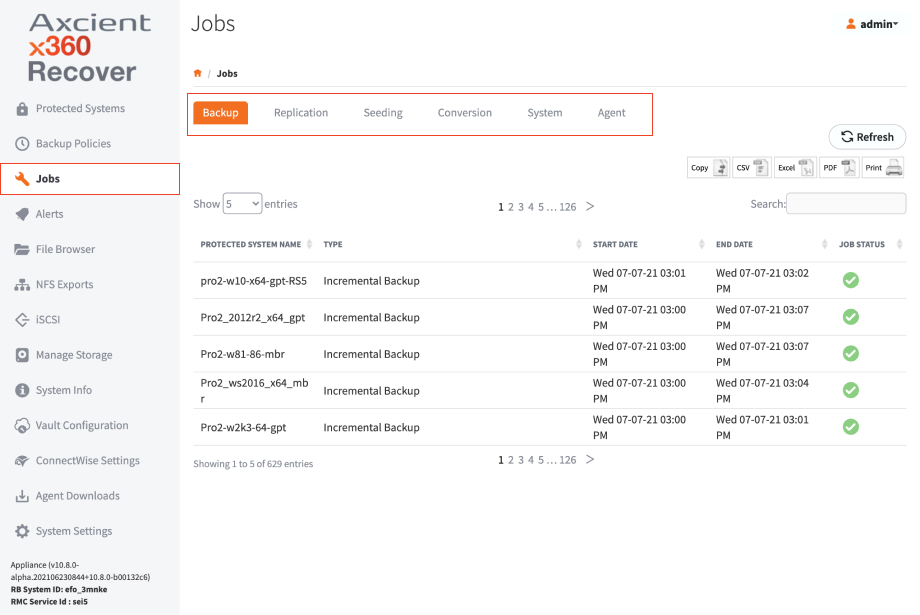
2. Use this page to view job history. For example:
- The Backup tab contains information about local backup jobs on the appliance.
- The Replication tab shows details of recovery points being replicated to the off-site vault.
- The Seeding tab shows the progress of full image seed jobs being written to USB disks.
- The Conversion tab shows the progress and status of disk export jobs on the system.
- The System tab shows the status and progress of system jobs, like system updates and protected system migrations.
You can also set the historical retention period for Jobs metadata by clicking on System Settings in the left-hand navigation menu and then going to the Jobs Auto Delete Settings page.
Status indicators
Use the Job Status column to understand the progress of each job. Different status indicators include Completed, Failed, Missed, Running, Paused, Error, and Waiting Ingestion (for Replication jobs).

Status info
In-progress jobs will have a green circle icon followed by an Action icon.
Backup jobs can be paused (and resumed)
Replication, seeding, and conversion jobs can be cancelled while the snapshot is still in transit. Once transmission is completed, the green In Progress icon will remain until the snapshot has been consumed and committed in the vault. Hovering over the icon will display Waiting for Ingestion. System jobs generally cannot be paused or cancelled.
NOTE: When performing USB seeding of a protected system base image, the subsequent incremental backups will be replicated to the vault immediately. The Replication Jobs menu will display all of these snapshots in a Waiting for Ingestion status until the seed drive arrives at the vault, gets imported, and is consumed. When the base image has been received, the incremental backups will be processed in turn.
Cancel a running job
1. On the protected system, stop the agent service.
2. Delete the old VSS shadow copies.
3. Open the command prompt and type diskshadow
4. Delete shadows all
For Desktop systems
1. Open command prompt and cd to C:\Program Files (x86)\Replibit
2. Type dir to display files and run efsvss-20**-r2-x86.exe
3. Start the x360Recover agent service.
The appliance will check in with the agent and fail the job, usually within a minute.
Manage snapshots
About snapshot actions
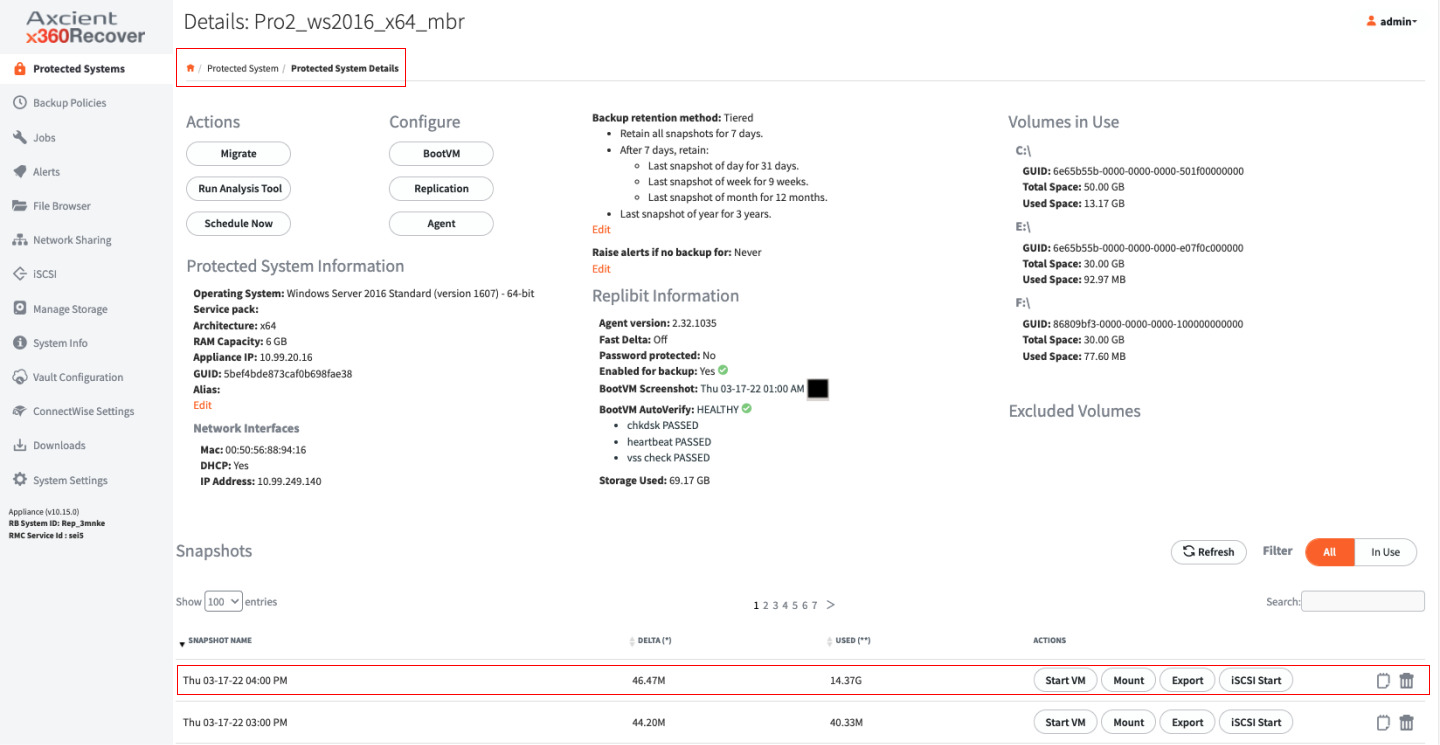
For each recovery point, there are a series of action that can be performed b y selecting one of the buttons under the Actions column.
About Start VM
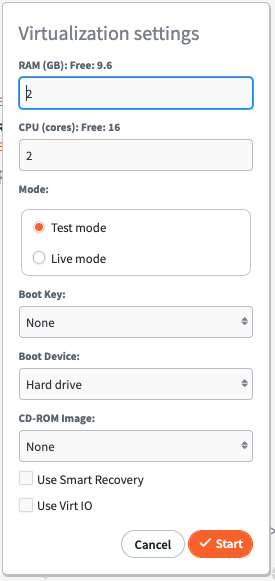
1. Selecting Start VM will virtualize the chosen recovery point and boot the Protected System from that point in time on the Appliance. There are a number of customizable options available when virtualizing a Protected System.
2. Set the amount of RAM and number of CPU (cores) that will be available for the virtual system.
3. Select Mode: Test Mode or Live Mode.
- Test Mode boots the virtual machine in a private network for testing. Any changes made to the virtual machine hard disk images will be destroyed when the system is shutdown.
-
Live Mode boots the virtual machine on the same LAN as the Appliance management interface. The selected Recovery Point will be marked as Persistent and any changes made to the virtual machine disk volumes will not be lost when the system is shutdown. After running in Live Modeyou may shut down the system and perform a Bare Metal Restore or Disk Export of the VM from this persistent snapshot to retain all data changes made while your Protected System was virtualized on the Appliance.
- Live mode is intended to be used as an emergency recovery method for Protected Systems that have become damaged/lost and need to be restored to service urgently or when other recovery methods would cause unacceptable downtime.
- You should perform a recovery of any system running in Live Mode back to physical and virtual hardware as soon as possible in order to re-establish redundancy.
4. Select a Boot Key to send that key stroke to the virtual machine after BIOS POST completes and enables access to the virtual BIOS or Windows Startup menu during system boot.
5. Select Boot Device and CD-ROM Image to allow for booting of the Protected System from a CD image for diagnostic or testing purposes. For example, to perform startup repair when performing a Live Mode system recovery.
6. In the Password field, enter a password if an Encryption passphrase was entered when installing the Agent.
For information on configuring and using Virt-IO drivers, refer to the Using VirtIO in a VM article.
When a virtual machine is running, the snapshot actions will change. Start VM will become Stop VM, and an additional button, Terminal, will be present in the Actions list for the chosen recovery point. Other actions will be grayed out.
If you select Terminal, this will open a new browser window displaying the running virtual machine console. Please ensure that your web browser is configured to allow popups before starting a VM or selecting Terminal.
About Mount

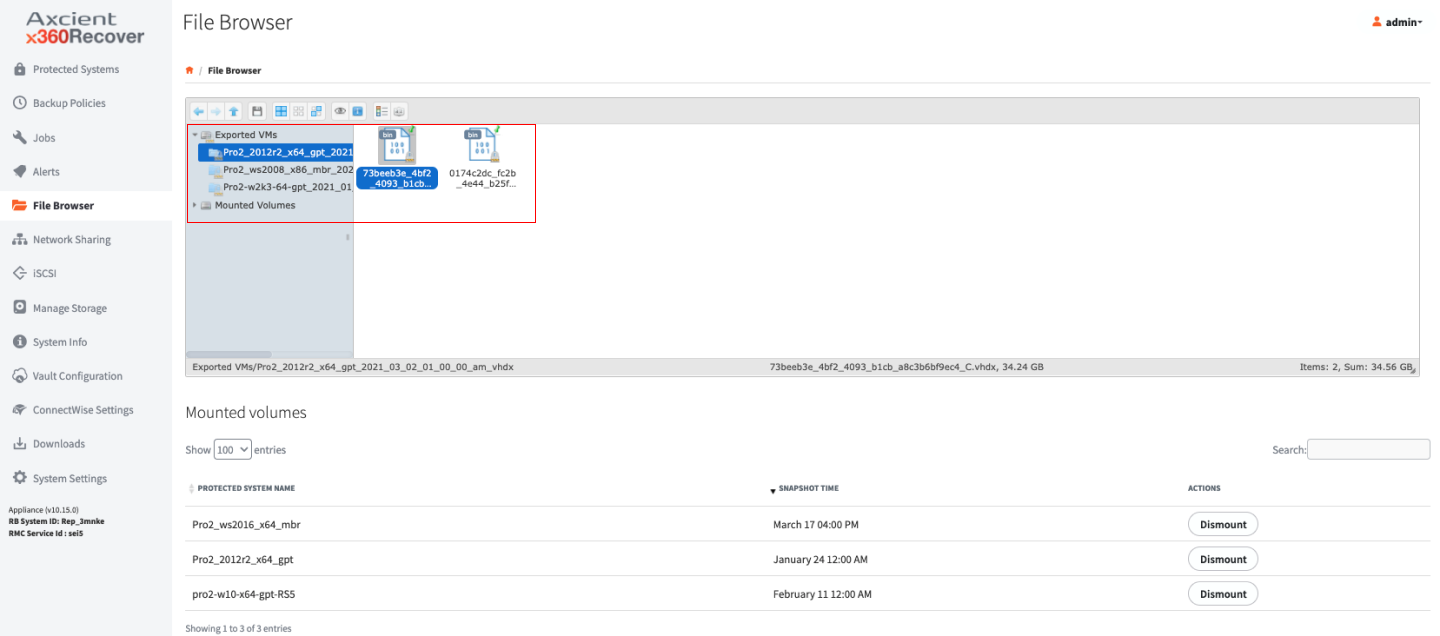
1. Selecting Mount will mount all of the Protected System’s disks that were selected for backup on the Appliance or Vault and make them accessible from the File Browsertab of the menu.
2. If an Encryption Passphrase was entered during the Agent installation, you will be prompted to enter the Password.
3. To use the Mount option for individual file recovery, select the desired recovery point and click Mount, then browse down using the File Browser to the file(s) you would like to recover. Download the files you are looking for by right-clicking them from the right side window.
For instructions on performing bulk recovery of files or folders, refer to the Recovering Files and Folders article.
For instructions on recovering complete systems, refer to the Bare Metal Recovery article.
About Export
2. Select the Volumes you would like to Export.
3. Select your desired format from the available radio buttons:
- VMDK (VMware)
- VDI (VirtualBox)
- VHD (Hyper-V Gen1 or Xen)
- VHDX (Hyper-V Gen2)
- RAW (KVM)
4. If you entered an Encryption Passphrase during the installation of the Agent, you will be prompted for it in the Password field.
5. After selecting your desired format, and entering your password (if necessary), select the Start button to begin the export process.
You can monitor the progress of the Export from the Conversion tab on the Jobs Menu Pane.
About Start iSCSI
Start iSCSI presents the disk volumes of the selected recovery point as iSCSI Targets, which you can access by remote systems capable of running an iSCSI Initiator (For example, Microsoft Windows iSCSI Initiator is located in Control Panel under Administrative Tools).
You can utilize iSCSI for bulk recovery of files or direct virtualization of Protected Systems on third-party hypervisors like VMware or Hyper-V.
For instructions on performing bulk recovery of files or folders, refer to the Recovering Files and Folders article. For instructions on recovering complete systems, refer to the VM Recovery article or the Hyper-V Recovery article.
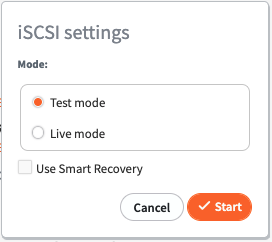
1. In the iSCSI Settings section, select to enable iSCSI for a recovery point in Test Mode or Live Mode.
Similar to Start VM, when the recovery point is exported in Test Mode, it is then destroyed when iSCSI has stopped; any changes made to the disk volumes are lost.
When started in Live Mode, a persistent recovery point is created and any changes to data are retained.
Persistent recovery points created by Start VM and Start iSCSI are interchangeable. For example, a virtual machine recovered using Live Mode virtualization may be shut down and then exported via iSCSI in Live Mode, preserving the data changes that have been made to the disks so that they can be recovered to new physical or virtual hardware.
2. If an Encryption Passphrase was entered during the installation of the Agent, enter it in the Password field.
3. Click Start.
4. To connect to the exported targets from a Windows system, launch iSCSI Initiator from Control Panel -> Administrative Tools.
5. From the iSCSI Initiator Properties screen, enter the IP address of the Appliance or Vault in the Target field and click Quick Connect. Disk LUN’s should be enumerated in the Discovered Targets field.
6. Select each LUN and click Connect to mount it.

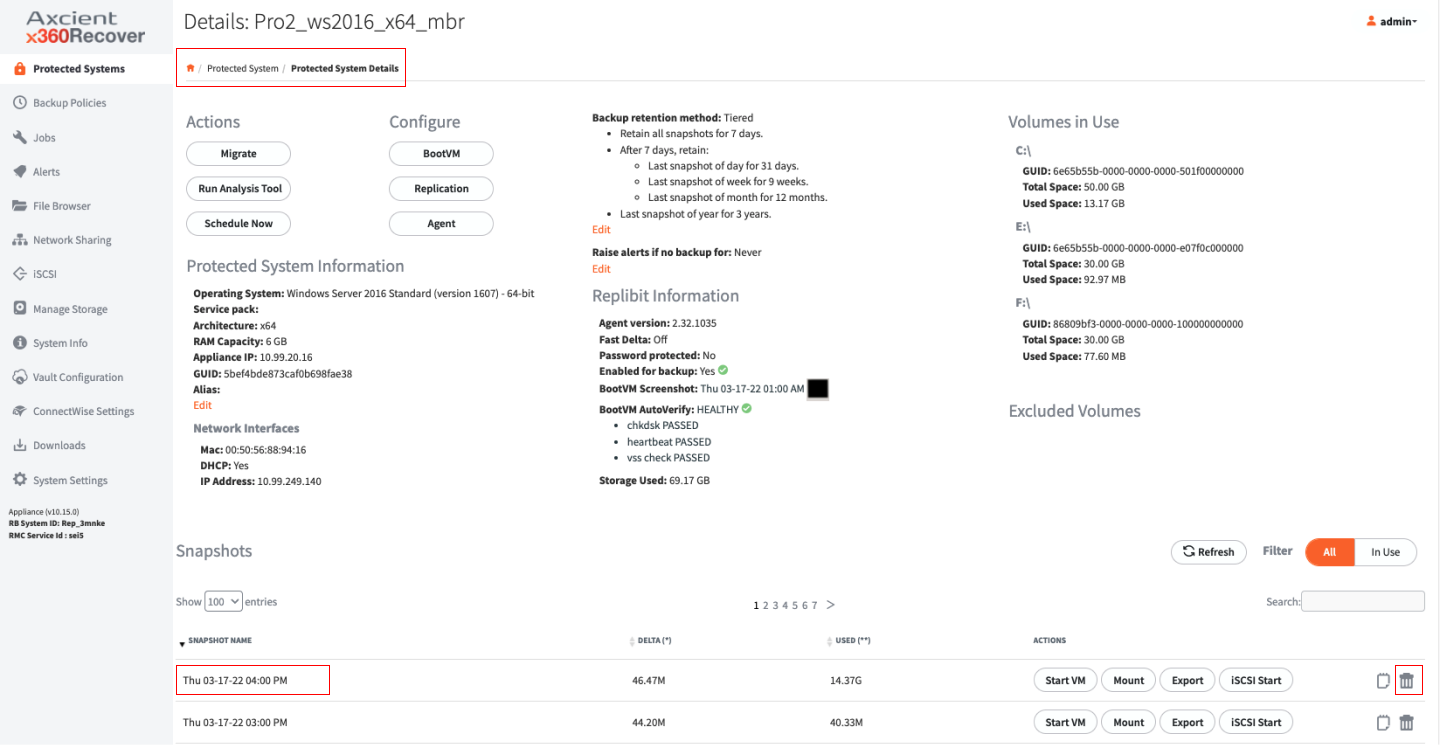
How to delete snapshot
Expanding the Used Snapshots section on the Protected Systems Details page will display all recovery points that are currently in use (for example, Mounted or running as a VM) and provide the appropriate option to close it if possible (for example, Dismount or Stop iSCSI, and so forth).
Snapshots in use by Running VM’s, Mounted, being Exported, or currently exposed as iSCSI targets will be listed as in-use.
NOTE: Snapshots in use by Export cannot be closed from the Used Snapshots view. You must wait for the Export process to complete before the snapshot will be closed automatically.
Manage volume backup exclusions
See which volumes are excluded from backup (and why)
With the release of x360Recover v 10.10.0 (along with agent release 2.30), the UI on the protected system now displays the list of volumes being excluded from backup (for whatever reason) - along with an explanation of why this exclusion occurs.
Being able to see which volumes are excluded (and why) should make it easier to explicitly configure volumes you wish to be backed up. (You can now use agent orchestration - without having to physically log in to a protected system to examine the disk configurations.)
Excluded volumes are listed on the top-level Protected Systems page (in the Volumes column):
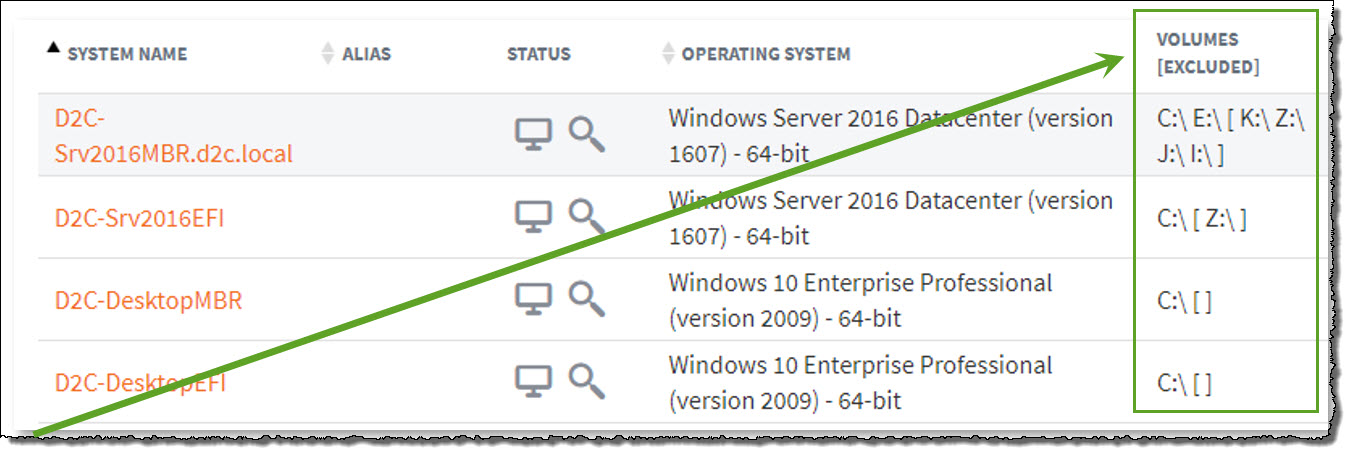
Excluded mount point names are shown in brackets in the volumes column.
In the example above:
- volumes C and E are included in backups
- volumes [K, Z, J and I ] are excluded from the current backup configuration.
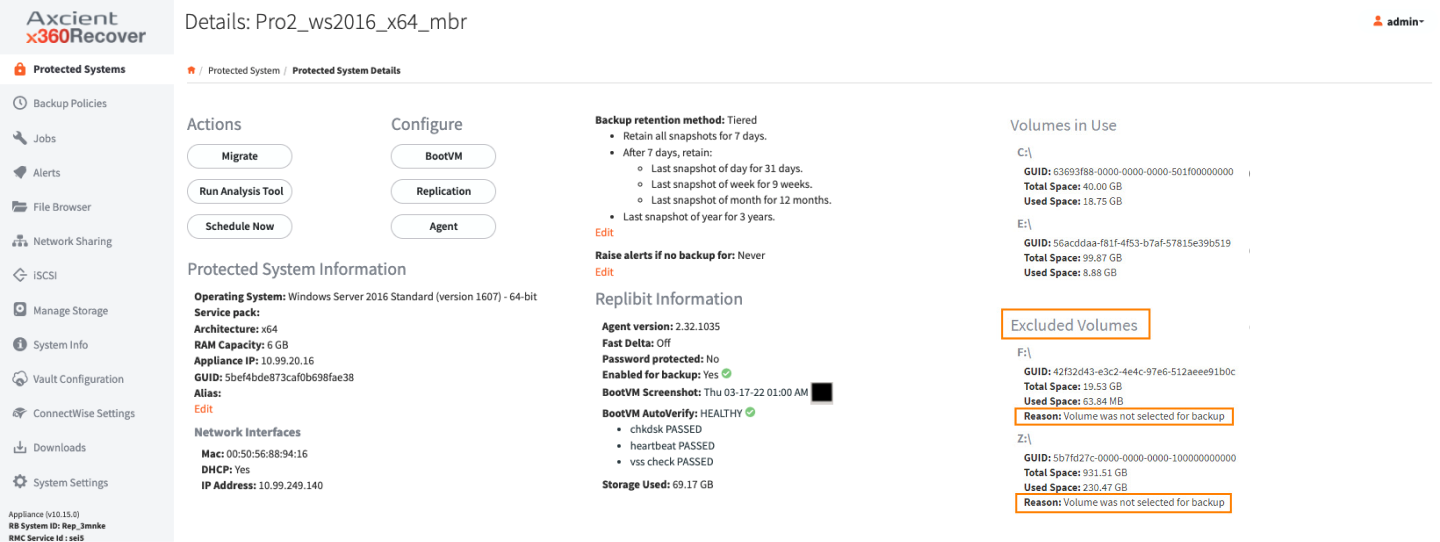
Where do I see why this volume is excluded from backups?
On the Protected System Details page, the display shows (a) volumes included in backups, as well as (b) volumes excluded from backups..
Excluded volumes display more detail, including a reason (in clear English) why this volume is not included in the backup:
Reasons why a volume might be excluded from backup
There are many possible reasons a volume might be excluded from the backup, such as
- unsupported format
- explicitly not included by the configuration
- automatic exclusions (for example, appliance iSCSI mounts or Recovery Center virtual disks).
Examples:
|
The volume is conflicting with another volume. This may occur if two volumes exist with the same UUID, or if the agent volume tracking identifies that one volume is the same as another. For example: an appliance iSCSI exported virtual disk mounted on the system |
|
The volume is excluded by default because it is a removable (USB) device. This reason is only applicable to Agent 3.x. (Agent 2.x does not exclude USB disks by default) |
|
The volume is excluded by default because it is a Local Cache repository. If there is a locally-attached volume configured as the LOCAL_CACHE_PATH for the agent, the volume will be excluded automatically unless specifically included in the BACKUP_VOLUMES config value |
|
The volume is excluded by default because it is a Recovery Center virtual disk. By default, the agent ignores virtual disk mount points created by Recovery Center |
|
The volume is excluded for backup. The volume has been explicitly excluded from backup in the agent configuration |
|
The volume is failed. The disk volume may still present on the system but is failed and inaccessible to Windows and the agent |
|
The volume is incompatible. The file format of the volume is incompatible with the agent and cannot be backed up. |
|
The volume is not selected for backup. If BACKUP_VOLUMES is set, any volume not explicitly included will be excluded for backup. |
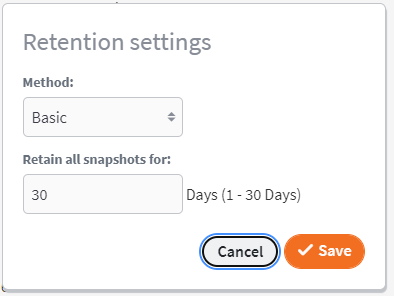
Manage snapshot retention settings
What is snapshot retention and what does it mean to me?
A snapshot retention policy is a means to purge old data. This policy is necessary to prevent our storage system from becoming full, while ensuring we keep sufficient point-in-time backups to meet client needs and SLA agreements.
The configured snapshot retention policy is used to control which recovery points will be retained on the device, how long those recovery points will be retained, and when the remaining recovery points will be automatically purged to conserve disk space.
- A snapshot retention policy can control the automatic cleanup of certain recovery points on both appliances and vaults, and can apply to both private Cloud and Axcient Cloud.
- Snapshot retention settings can be set entirely independently on each device.
- Snapshot retention settings can be different on appliances and vaults, and can be customized to fit the needs of partners and clients.
Default retention settings
For a complete discussion of retention settings, please refer to Snapshot retention settings for x360Recover
Tiered versus Basic snapshot retention modes
Tiered snapshot retention
Tiered retention is the modern standard and we recommend it for all use cases and environments.
- Tiered retention (sometimes referred to as Grandfather-Father-Son) is a process by which recovery points are removed differently, based on various time frames (tiers).
- Recently-created granular recovery points are more frequently retained, while fewer older recovery points are kept.
Note: We recommend tiered retention for all use cases and environments.
Tiered retention involves granular recovery points with recent time frames (so fewer recovery points are retained for older backups.)
Tiered retention also allows you to specify the number of daily, weekly, monthly, and even yearly recovery points for a given protected system, with intervening backups automatically removed and consolidated.
- For a complete discussion of retention settings, please refer to Snapshot retention settings for x360Recover
Basic retention is deprecated.
We do not recommend the use of basic retention in any environment.
- Basic retention retains all snapshots less than a given number of days old.
- Snapshots older than the set retention period are discarded.
- Basic retention does not use storage efficiently, so significantly more storage is required for a given length of recovery retention.
- For a complete discussion of retention settings, please refer to Snapshot retention settings for x360Recover
Storage license retention
Storage licensing is a special x360Recover license mode in which protected systems are licensed by the amount of storage they consume on the appliance - rather than by the number of individual servers and workstations being protected.
Storage licensing includes
- endpoints backed up on a given appliance (within the licensed storage amount)
- storage within the Axcient Cloud for either a three-year or ten-year period.
Retention settings for endpoints licensed under this licensing mode may be set to any value on the appliance but are restricted (and locked) to a fixed retention policy on the Cloud vault (depending on whether a 3-year or 10-year license is assigned.)
|
Three-year storage license fixed retention policy (vault only)
After seven days:
|
|
Ten-year storage license fixed retention policy (vault only)
After fourteen days:
|
Data retention safety rules
One major goal of a retention cleanup mechanism in a disaster recovery system is to efficiently optimize storage space. Optimizing storage with tiered retention generally allows for larger numbers of older recovery points from which to recover files or perform wholesale disaster recovery.
But the primary goal, of much greater importance, is to ensure that sufficient historical recovery points are retained to recover from any disaster situation.
And to ensure that successful recovery experience, Axcient has added additional caveats and conditions to our retention cleanup rules. We prefer to err on the side of expanding the data available for recovery rather than focusing solely on optimizing storage.
The following rules modify and extend the pure retention schema detailed above:
The value of each tier is calculated as Plus 1
Whatever value you enter for daily, weekly, monthly, or yearly, the retention engine adds one to it.
Why do we do this? Because calculating retention based on keeping the last recovery point is somewhat counter-intuitive. Determining in your head what your oldest snapshot will be is tricky.
For the most extreme example of this, consider yearly backups. If you set your schedule to retain one yearly snapshot, intuitively (in most people’s minds) that implies that you retain a whole year of data that you can roll back and recover. The last yearly snapshot will presumably be from one of the last days in December, from last year. But - if today is Jan 1, that ‘yearly’ snapshot is from last week!
- The bottom line is that retaining one extra daily or weekly snapshot has almost no impact on your overall storage usage. And retaining that extra monthly or yearly snapshot ensures that you really have that whole month or year of data history.
Note: Adding +1 to the value does not apply to values of zero or -1.
Backup interruption detection
The start of the Keep All retention period is based on the most recent snapshot.
If no new backups are taken, no snapshot cleanup will occur.
- For example, your appliance has the Keep Allsnapshots set to thirty days.
- On Friday evening, something happens to your production environment, all your systems are down, and no backups occur over the weekend.
- On Monday, your client calls for assistance with recovering their environment.
- On your appliance, you still have all the original snapshots from thirty days prior to the last backup taken which was on Friday.
End-of-the-week oddities
End of the week snapshots have the following potential peculiarity:
- The ISO year may consist of either 52 or 53 full weeks.
- A week always starts on a Monday and ends on a Sunday.
- The first week of an ISO year is the first (Gregorian) calendar week of a year containing a Thursday. For example, if January 1 is a Thursday, the start of the week would be December 27 of the previous year.
FAQs
Q: What happens during the retention passes if there have been no backups today?
A: The retention time window starts yesterday. Essentially, if backups stop occurring, retention cleanup will stop occurring.
Q: If a system clock is improperly set to the future, and then a snapshot is created, what happens when the clock is set backwards to the correct date/time?
A: The "retain-all-starting-date" is either the date/time of the newest snapshot, or the current date/time, whichever is older. (This ensures that a "parked" system will not start "losing" snapshots.)
Q: Are ALL snapshots newer than the "retain-oldest-mark-date" marked for retention?
A: Yes.
Q: What happens if I disable the "effective-number-of-periods" by setting it to zero?
A: The pass will be skipped without doing anything. No end of period snapshots for that type of period will be marked for retention.
Q: How is the oldest snapshot for a day interval determined?
A: The latest snapshot is chosen from all snapshots included in the date interval between 00:00 and 23:59 of the day of the year determined by the date parameters according to the date data type.
For example: To determine the last snapshot of the daily period, we select all snapshots that relate to the time between 2021-04-28 00:00:00, 2021-04-28 23:59:59. The oldest snapshot will be the one that is closer to the end time of the current day period.
Q: How do I determine the oldest snapshot for a week?
A: The oldest snapshot for a week interval is determined by selecting the latest snapshot for all snapshots included in the date range between 00:00 on the first day of the week and 23:59 on the last day of the week, as defined by the date parameter set according to the Python date data type "isocalendar" function.
Q: When a protected system is configured for replication, are snapshots deleted that have not yet been successfully transferred to all configured vaults and ingested into ZFS?
A: No, snapshots that have not yet been successfully transferred to all configured vaults and ingested into ZFS cannot be deleted and will not be removed by retention cleanup regardless of what settings the user has chosen for retention.
Q: Do retention policies vary based on the license type?
A: Protected systems licensed on an appliance using Storage Licensing have a fixed mandatory retention policy on Axcient-hosted vaults. (The actual policy is dependent on the Storage License selected (3-year or 10-year), with changes to retention settings on the vault locked out. Appliance retention settings may be selected at will.)
Q: Are there any situations were retention cleanup on vaults is blocked?
A: Retention cleanup on vaults is blocked for a protected system while network recovery back to an appliance is in progress. While the job is active, retention cleanup will not occur and snapshots will not be removed.
Q: How efficient is the retention cleanup algorithm?
A: The retention cleanup algorithm should use a reasonable amount of memory (< 1 GB) and take a reasonable amount of time (< 5 seconds) even for a protected system that has 10,000 snapshots.