
Table of Contents
x360Recover Analysis Tool (AT) Requirements to run ATWhere do I find the AT results? BootVMAutoVerify About tiered testingWhat is the difference between AutoVerify and Cloud AutoVerify?Configure AutoVerify View AutoVerify ResultsAutoVerify Global MonitoringPossible AutoVerify failure reasons RAID (Redundant Array of Inexpensive Disks)How does RAID work?RAID levelsZFS RAID vs. Typical RAIDWhy you shouldn't use RAID with x360Recover ZFS pool:x360Recover Analysis Tool (AT)
The x360Recover Analysis Tool helps determine Windows VSS readiness.
If you need to submit a AT to Support:
When you open a support ticket for a backup issue, you may be asked to run the x360Recover Analysis Tool (AT).
The AT collects the x360Recover Backup Agent configuration and logs. The RAT also includes information about Windows (including event logs) and the overall health of the system (including Microsoft VSS) and saves that information for an engineer to review when identifying potential issues.
AT collects the following information:
- Log files and diagnostics related to Axcient agents and apps
- x360Recover backup agent settings and logs
- OS system information
- Volume properties
- VSS settings
- The results of a Read-Only CheckDisk
- The results of a VSS Test Snapshot
- The results of a Verify-Only SFC scan (Server 2008+)
- VSS Event Information
Requirements to run AT
In order to run this tool, the following are necessary:
- Access to an installed x360Recover backup agent, the Recovery Center, or Axcient Direct Restore
- Outbound port 2525 must be open to the internet (Used to automatically update tickets with results.)
A x360Recover support ticket ID is optional and can be obtained by creating a ticket at https://axcient.com/partner-support/
AccessRAT
How to run AT from the appliance or vault
1. From the web interface, click the Protected Systems tab on the left navigation.
2. Click on the System Name of the troubled protected system:
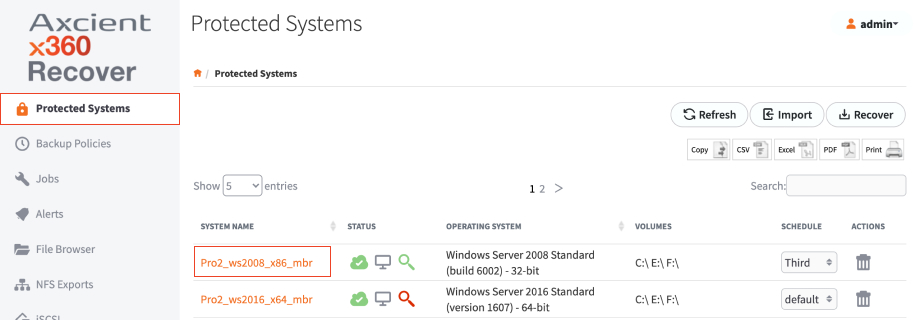
3. In the Protected Systems Details page, click the Run Analysis Tool button.
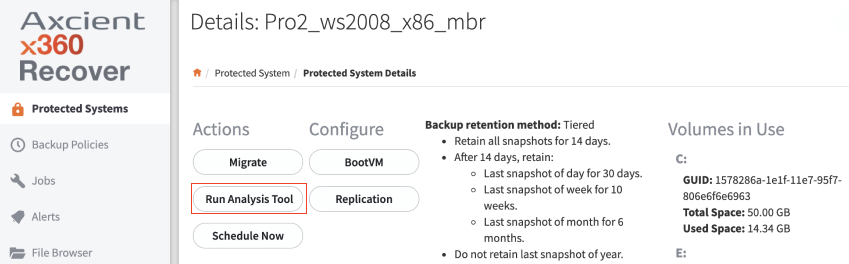
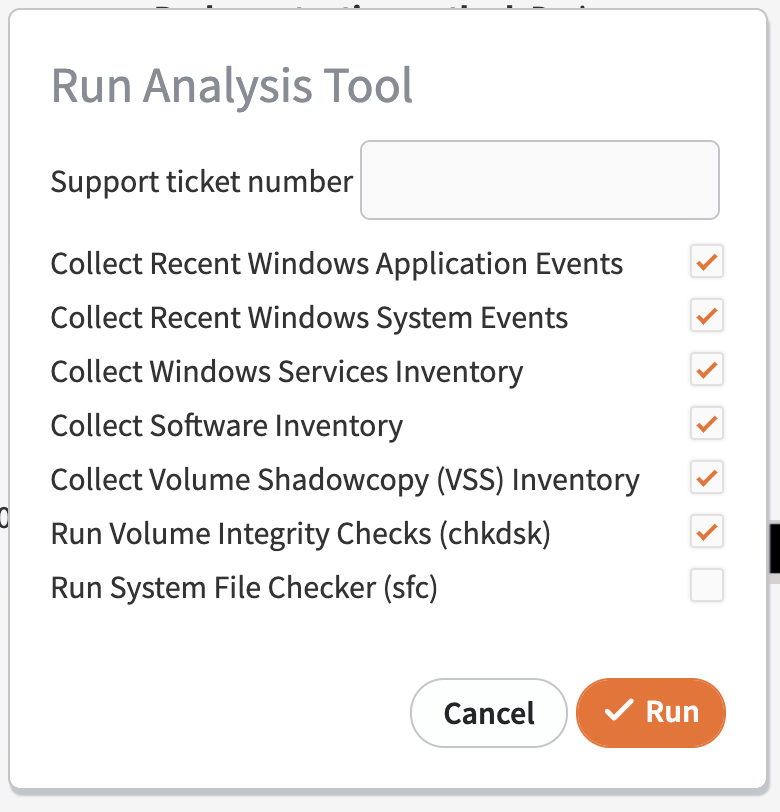
The Run Analysis Tool option will open in a popup window.
Enter the Support ticket number if you are submitting the analysis results to Axcient Support. The results from the AT will then be automatically sent to that support ticket number.
Where do I find the AT results?
1. To check the status of the Analysis Tool's progress, select the Jobs tab in the left navigation and then click the Agent tab at the top of the screen.
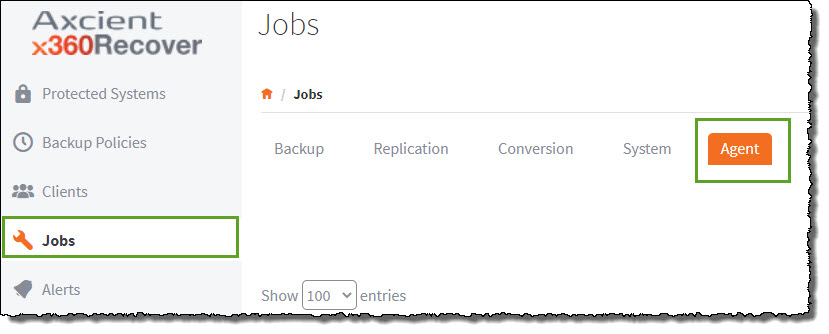
2. On the right side of the screen, a green indicator will appear under the Job Status column while the analysis is taking place.
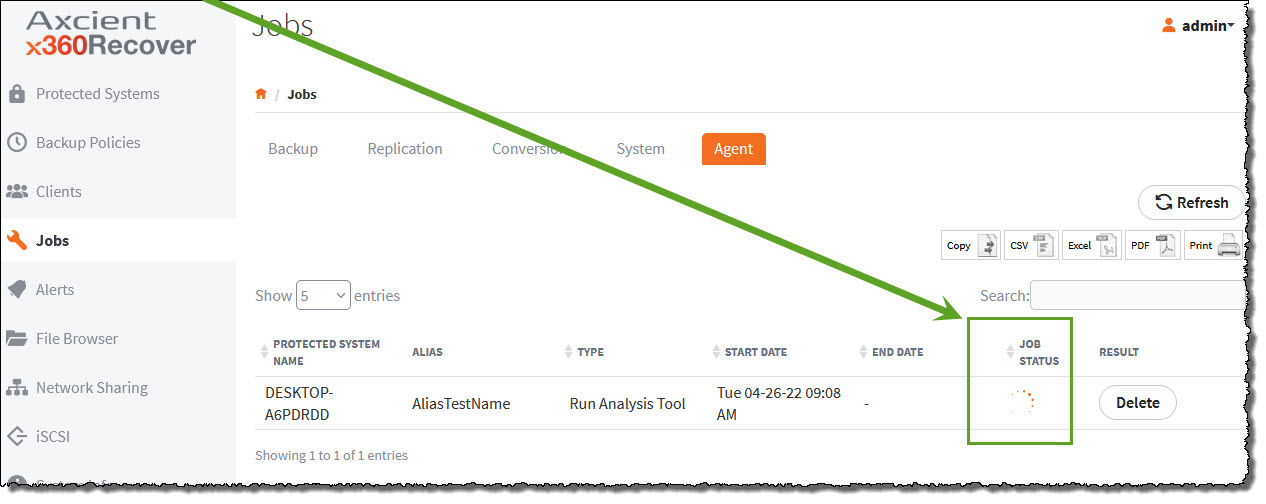
3. When the analysis is complete, a green check mark will appear under the Status column.
4. To see the results of the analysis:
(a) Click the green download icon under the Result column or
b) If you run the AT from an appliance or vault, you can view the completed analysis results in
<Agent Folder>\AnalysisTool\<date-time>
When the AT is run, the AnalysisTool folder is created in the current directory of the running system.
BootVM
The Boot VM Report provides a visual quick reference to the status of the latest Boot VM test for all Protected Systems managed by the Global Management Portal. With the details in this report, you can quickly verify that all Protected Systems are bootable.
The Boot VM report is currently only available on the Global Management Portal, but will be integrated in x360Recover Manager in an upcoming release.
BootVM details
How to enable:
To properly utilize the Boot VM Report, the Boot VM Check feature must be enabled for each individual Managed System (Appliance and Vault).
If the Boot VM Check feature is not enabled for a Managed System, the image column will display as NA.
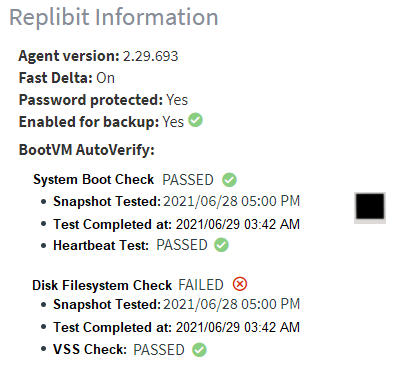
Within the Boot VM Report, the AutoVerify column displays results of the AutoVerify check, which alerts you of possible issues with Protected Systems before they fail. With this advanced notification, you can ensure you have valid backups and the resources necessary to repair potentially bad data on the source system.
To view BootVM report:
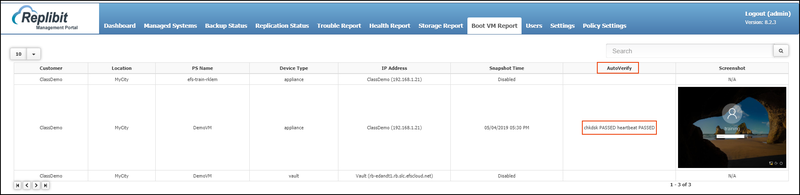
- In the GMP, click the Boot VM Report tab. The Boot VM page displays.

- Use the columns to view the details of each Protected System boot process:
- The Customer column identifies the Customer to whom the Protected System is registered.
- The Location column identifies the geographic location of the Protected System.
- The PS Name identifies the device name.
- The Device Type section displays the type of device that is protecting the Protected System.
- The IP Address column lists the IP address of the Protected System.
- The Snapshot Time column displays the time of the latest Snapshot.
- The AutoVerify column displays the results of the chkdsk test and the heartbeat test. chkdsk confirms the integrity of the file system. If chkdsk fails, a full backup of the Protected System might be triggered (if one has not already been performed recently) in an attempt to self-heal the failure. Heartbeatconfirms that the system was able to fully boot the operating system, start services, and accept commands to perform additional testing (for example, chkdsk.)
- The Screenshot column displays the captured image of the boot process to help you ensure the Protected System image was able to boot properly.
Note
Full scans generated by AutoVerify will occur no more than once every 30 days.
AutoVerify
What is x360Recover AutoVerify?
AutoVerify is an enhancement to x360Recover's nightly BootVM check feature which provides validation of the recoverability of backup snapshots.
- AutoVerify is now part of the BootVM check operation on all x360Recover appliances and is reported within x360Recover Manager and the Global Management Portal (GMP) on v8.3.0 or greater.
- When nightly BootVM checks are enabled for each protected system on the local x360Recover appliance, each selected protected system will automatically boot the latest backup snapshot and perform AutoVerify operations to ensure that the recovered backup is healthy.
- By design, BootVM checks capture a screenshot of the protected system for manual review after it has successfully booted.
- AutoVerify extends the BootVM check functionality by automatically performing additional operations to ensure the recoverability of the snapshot. If the AutoVerify operations identify any data consistency issues within the snapshot , the operation will fail and the appliance will be notified.
Under specific conditions, AutoVerify will raise an alert on the Alerts tab and attempt to ‘self-heal’ backup consistency issues by requesting a new full backup to synchronize the protected system with the appliance. (Note: Self-healing full backups are disabled in the initial release.)
AutoVerify also provides details of protected system health status to the Axcient support team via telemetry, to enable us to proactively monitor and respond to support requests.
Benefits of AutoVerify
- The enhanced backup validation provided by AutoVerify operations allows for a high level of confidence in the integrity and recoverability of your backups. This will reduce the time spent manually fixing issues that might occur during a recovery fail over.
- Being alerted to possible issues with protected systems before they fail ensures that you have good backups and allows you to repair issues with bad data on the source system.
- You can lower the cost of ownership by automatically detecting, alerting and fixing backup consistency issues. Instead of manually reviewing BootVM screenshots on a daily, weekly or monthly basis, rely upon new automated validation and alerting.
- Reduce the time spent reviewing BootVM checks and provide faster identification of possible backup issues.
- Prior to AutoVerify, BootVM checks ran for a fixed 10-minute interval and then captured a screenshot before moving on to the next system. This could lead to either wasted time spent waiting after the VM is up, or in some cases, grabbing a screenshot too soon and returning an inconclusive check. AutoVerify proactively monitors the progress of the checks and will not exit while checks are running and the VM is responding to monitoring. (A maximum of 90 minutes is allowed for all AutoVerify tests to complete.) Once all checks are passed, AutoVerify will immediately exit and begin testing the next protected system. This provides a much more efficient boot check process and returns definitive results as to the status of the protected pystem snapshot in most cases.
- More memory may be used during Boot VM checks. Prior versions used a fixed 2GB of RAM for running checks. BootVM checks now dynamically allocate 1/4 of available RAM (with a minimum of 2GB and a maximum of 12GB) to the virtual machine to ensure there are sufficient resources to complete all tests.
About tiered testing
Axcient hosts tens of thousands of protected systems across multiple international data centers, making it challenging to perform complete AutoVerify testing on a nightly basis for every endpoint.
During the AutoVerify process, a number of tests are performed on the protected system to validate its data integrity. These tests include:
- capturing a screenshot of the login page
- performing a heartbeat check to the testing services running on the VM
- verifying Microsoft Volume Shadowcopy Services (VSS) are functioning
- performing a full checkdisk scan on all data volumes.
We've chosen to implement Cloud AutoVerify testing on a tiered basis. This ensures that we limit the load and reduce the impact on other operations (such as Direct-to-Cloud backups, appliance to vault replications, Virtual Office recovery, and so on.)
Lighter operations will be performed more frequently, while heavier operations will be performed less frequently.
NOTE: In the preview release of AutoVerify included in 10.11.0, this feature will initially be turned off and hidden until a feature flag is set for individual vaults.
- Testing frequency controls will remain hidden and locked in their default state until a later release.
- Initial settings for Cloud AutoVerify will include a system boot test with heartbeat test and screen capture (to be run once every 24 hours) with a full checkdisk validation running at least once every 7 days.
- Once the Cloud AutoVerify feature flag has been enabled for a vault, configuring nightly boot checks for Direct-to-Cloud protected systems will be unlocked:
What is the difference between AutoVerify and Cloud AutoVerify?
Cloud AutoVerify (for Direct-to-Cloud vault endpoints) brings all of the functionality of AutoVerify to Axcient-hosted vaults for Direct-to-Cloud endpoints. (Until v10.11, AutoVerify checks on vault endpoints could only be performed on self-hosted private cloud vaults.)
Note: Cloud AutoVerify is enabled only for Direct-to-Cloud endpoints on Axcient hosted vaults. AutoVerify testing for appliance-based protected systems can and should be performed on the appliance. Data replicated from an appliance to the vault is identical and there is no reason to perform redundant boot testing in the cloud for these endpoints.
Cloud AutoVerify will initially be monitored directly on the vault.
AutoVerify operations
As of x360Recover v8.3.0, BootVM AutoVerify performs the following operations to validate each protected system snapshot status:
Heartbeat
The appliance verifies basic communications with the running virtual machine, and if not established, fails the check. This operation confirms that the system was able to fully boot the operating system, start services, and complete plug-n-play device discovery
Check Disk (chkdsk)
A Windows ‘chkdsk’ operation (using a Windows utility that checks the integrity of a file system) is performed on each volume within the protected system.
- ‘chkdsk’ may fail due to the following conditions:
- Corrupted or incomplete backup snapshot on the BDR appliance.
(A new full backup will likely resolve the issue) - File system corruption on the source protected system disk(s).
(‘chkdsk’ should be run on the protected system to fix the disk problem)
- Corrupted or incomplete backup snapshot on the BDR appliance.
- If chkdsk exits with specific errors codes that indicate possible data consistency issues, the appliance attempts to resolve the issue by performing a new full scan of the protected system and an alert is generated on the appliance. Alerts generated by AutoVerify are automatically closed after the full scan completes.
- Note: Full scans generated by AutoVerify will occur no more than once every 30 day
Note: ‘Self-heal’ full backups are disabled in the initial release
BootVM checks automatically allocate RAM dynamically to the virtual machine during testing. One quarter of available RAM is allocated to the VM, with a minimum of 2GB and a maximum of 12GB, in order to ensure sufficient resources to complete the AutoVerify operations.
BootVM checks end automatically. The appliance monitors the status of the AutoVerify operations and the virtual machine will be shut down as soon as all checks are complete. Note: Maximum virtual machine run time is 90 minutes, and the AutoVerify operation will fail if not completed by then.
Configure AutoVerify
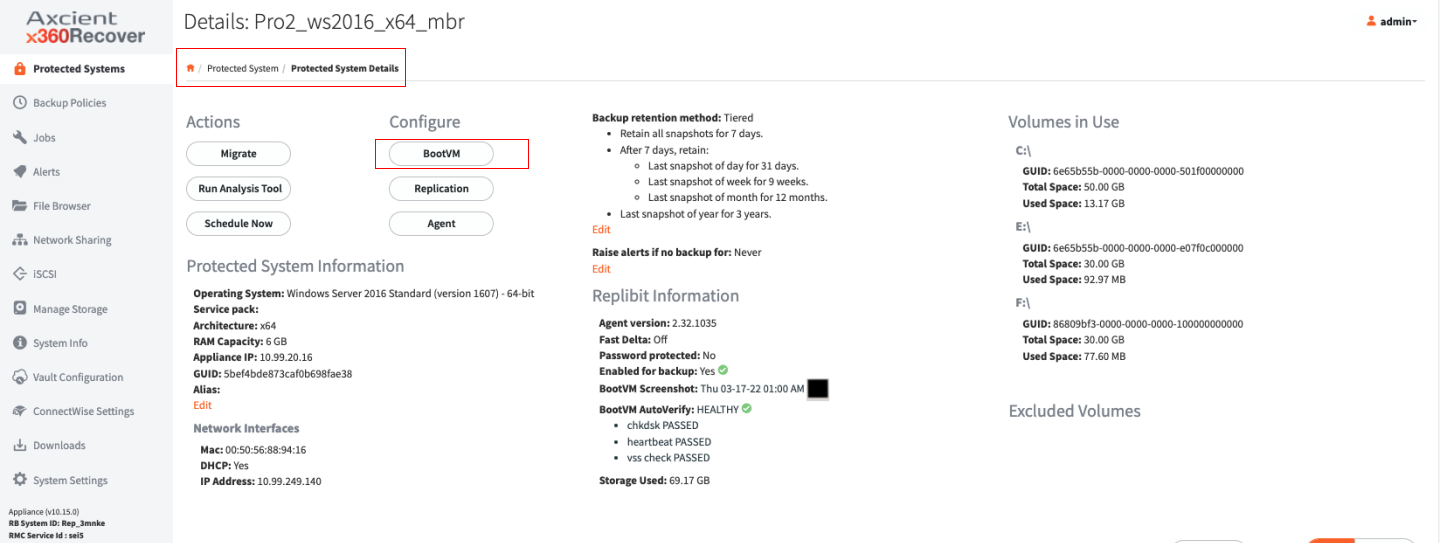
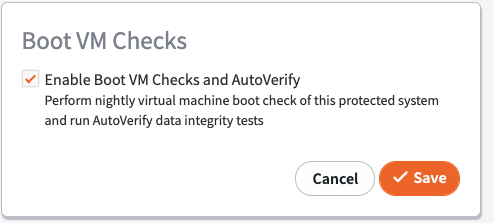
From the appliance's Protected System Details page, click BootVM under the Configure column.
Then, click the check box to enable boot checks.
View AutoVerify Results
Based on the new tiered testing structure, results are broken up into multiple parts, showing the different testing intervals.
In this initial preview release, two sets of tests are performed independently of one another:
- Basic boot VM testing is performed once every 24 hours, (daily). This test includes a simple heart beat check, to confirm our communication services are alive and running within the VM. This test also includes a screenshot of the login screen.
- Advanced testing is performed once within every 7 days, (weekly). This test ncludes Microsoft VSS service testing and full checkdisk validation scanning of all protected system volumes.
Results of the most recent AutoVerify checks can be found on the Protected System Details page:
Clicking on the AutoVerify results provides BootVM AutoVerify complete details on all operations: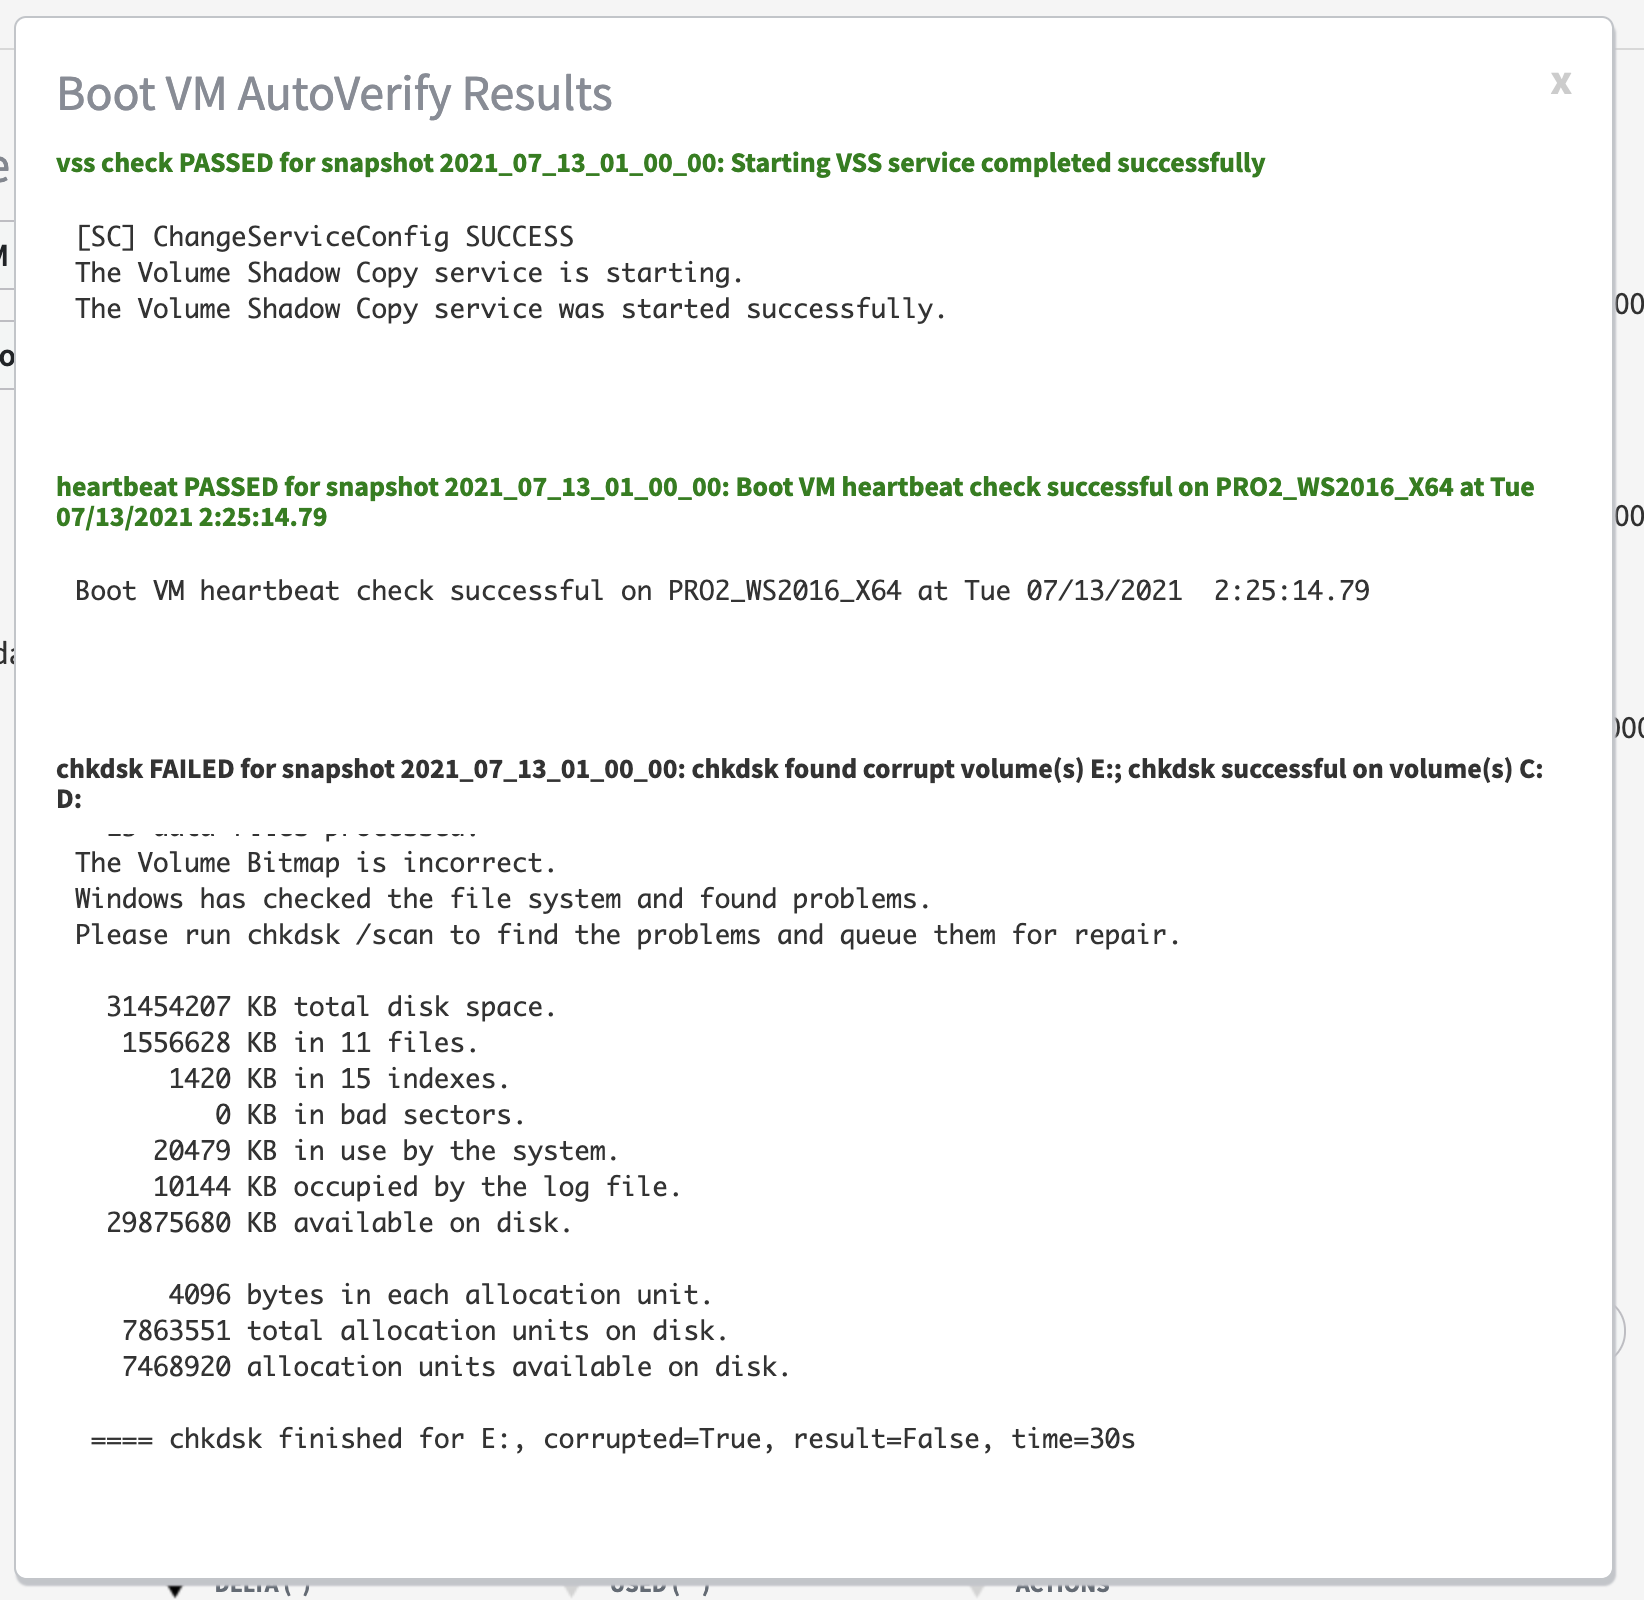
AutoVerify Global Monitoring
In addition to appliance-level alerting, AutoVerify has been integrated into x360 Recover Manager reporting. This means you can easily see AutoVerify operations across all of your appliances and protected systems.
A summary of AutoVerify operations exists in two places:
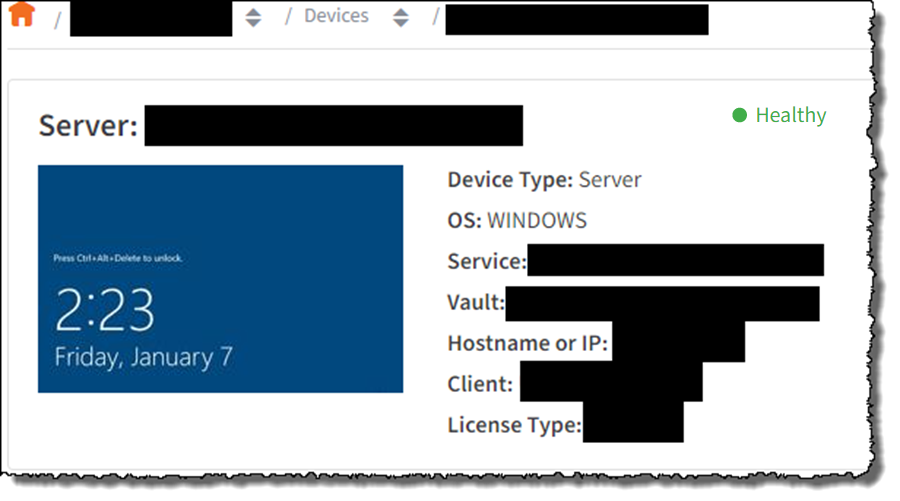
1. On the Devices page:
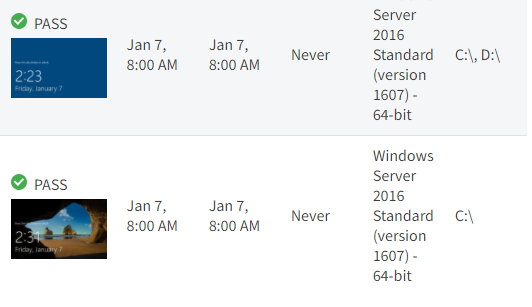
2. On the Backup summary report:
Possible AutoVerify failure reasons
AutoVerify failed to initiate
In this case, the x360Recover BDR was unable to perform a test for the protected system.
Possible causes might be:
- Failure to inject communications drivers into snapshot
- Failure to delete an existing snapshot clone
- Snapshot is already virtualized and running
Examine the protected system on the BDR and test the StartVM feature. If the failure reason is not obvious, contact Axcient Support for assistance with further troubleshooting.
DeleteHeartbeat failed
The heartbeat check verifies that the Virtual Machine communication driver is able to connect to the running operating system.
Possible reasons for failure:
- The protected system image is corrupt or otherwise unable to boot as a VM
- Heartbeat communication service was blocked by antivirus scanner
- Startup of the operating system took too long and the operation timed out.
- Long running pending Windows updates can cause timeouts.
1. Examine the protected system on the BDR and test the StartVM feature.
2. If pending Windows update installation is causing long delays, reboot the source protected system to allow the Windows update installation to complete, and then run a new incremental backup of the system.
3. If the protected system will not boot, exhibits a blue-screen crash or has other errors, contact Axcient support for assistance in troubleshooting the underlying Boot VM failure.
- Some antivirus scanners (notably SentinelOne) will sometimes block the execution of the heartbeat communication and control service. If AutoVerify Heatbeat checks are failing, try adding an antivirus scanning exclusion for %systemroot%\system32\axecomsvc.exe on the protected system. Note that this service is only installed within the virtual machine image during an AutoVerify operation and is not otherwise present on the machine.
chkdsk failed
The chkdsk test is the most complex to troubleshoot, as it can fail for a variety of reasons.
( chkdsk is a Windows utility that checks the integrity of a file system.)
The backup image data could be corrupt on the BDR, or the source protected system could have file system errors.
In rare cases, the Volume Shadow Copy services (VSS) may not start within the Virtual Machine. (Chkdsk requires a VSS snapshot to check the running file system. VSS failures will cause a failed AutoVerify check. In this event, the state of the file system is essentially unknown because the chkdsk results will be invalid.)
To troubleshoot chkdsk failures:
- First, examine the detailed output from chkdsk and identify the specifics of the failure. Identify the failing volume(s) and perform a chkdsk (without /f) on the source protected system to determine if the problem lies with the backup or the protected system.
- If the problem is the source system, perform a chkdsk of the affected volume(s) (WITH /f) and schedule a reboot, if necessary, to complete the repair.
- After repairing the file system and verifying that chkdsk completes without reporting errors, perform a full backup scan of the protected system by selecting Schedule Now and choosing Full from the Details page on the appliance.
- If the source protected system tests clean, attempt to repair the problem by performing a full backup scan of the protected system to synchronize any differences between it and the backup image. Select Schedule Now and choose Full from the Details page on the appliance. Note: A full scan may already have been triggered automatically by AutoVerify. Check the jobs log before starting another full scan.
- Verify that the protected system is running at least agent version 2.23. Previous agent versions have a known bug that can sometimes cause false chkdsk warnings due to incomplete NTFS metadata. If it is necessary to upgrade a protected system manually to agent 2.23 or higher, run a new incremental backup.
If subsequent AutoVerify chkdsk tests fail, open a ticket with Axcient support for assistance.
If you see the following message in the chkdsk output: The volume is in use by another process. Chkdsk might report errors when no corruption is present then the VSS services were unable to start. In this case, please open a support ticket with Axcient support.
DeleteRAID (Redundant Array of Inexpensive Disks)
What is RAID?
A common question: What is RAID, and what do all those RAID numbers mean?
RAID stands for Redundant Array of Inexpensive Disks.
At its core, RAID is a mechanism to provide some level of redundancy to a disk storage system, so that the loss of a single disk doesn’t result in the total loss of all data being stored.
For example, if the hard drive in your workstation dies, you would lose all of your data, including the running operating system, installed applications, and all of your personal files. Using RAID pools instead of single disks is a means of preventing this type of data loss. In a RAID setup, if a single disk were to fail, your data and applications would remain accessible, although at a slight performance penalty. You can then replace the failed drive and the missing data can be reconstructed from the remaining disks.
How does RAID work?
A RAID pool consists of multiple physical disks, grouped together using either software or dedicated hardware controllers, and presented to the computer system as a single logical disk.
RAID works by distributing data across multiple disks, along with additional parity data. In the event that a disk within the RAID set is lost, this parity data can be used to calculate the missing data from the lost disk. It’s not magic, just math.
There are several different types or ‘levels’ of RAID. Each have their own formula and algorithms for performing this process, and each have different characteristics, both pros and cons.
DeleteRAID levels
There are four types of RAID levels commonly in use: RAID0, RAID1, RAID5, and RAID6.
(RAID2-4 technically exist, but their characteristics make them unsuitable for most use cases.)
RAID0
RAID0 (RAID-Zero) is the simplest form of RAID, and since it does not provide any redundancy, you could argue that it is not really RAID at all. RAID0 simply spans all of the physical disks together into a single large logical drive. The size of the resulting logical drive is equal to the sum of all drives within the storage pool. Note: Drives within a RAID0 pool can be of any size, and do not have to match the size of other disks within the pool.
There is no parity, and the loss of any single physical disk within the pool will result in the destruction of all the data in the pool.
So why use RAID0? Performance! Since data is evenly distributed across the pool, all the physical disks are written to simultaneously. Since the logical bus speed is much faster than the physical storage device speed, adding many disks to a RAID0 pool can level this performance gap and provide much higher total throughput than a single disk. (More about this later.)
DeleteRAID1
- RAID1 (RAID-One) is the lowest level of RAID to provide redundancy.
- Sometimes referred to as ‘mirroring’ RAID1 works by pairing two (or more, but this is uncommon) disks of equal size together and writing all data changes concurrently to both drives simultaneously. Both drives contain exactly the same data, so losing one disk implies that you have only lost one copy, and your data can safely be accessed using the remaining disk.
- With RAID1, the total size of your storage pool is equal to the size of a single disk within the pool, and all disks must be of the same size. (Technically, you can have different sized disks, but the resultant pool size will be the size of the smallest disk in the pool.)
- RAID1 writes the same data to all disks simultaneously, so there is no performance benefit for write operations. However, since the data on all disks is identical, multiple read operations can be distributed across physical storage devices, doubling the performance when reading the disk.
RAID5
- RAID5 (RAID-Five) is the first complex level of RAID, sometimes referred to as Distributed Data Guarding.
- RAID5 requires at least three or more physical disks. While a RAID5 pool can contain as many disks as you like, it is recommended not to exceed 10 disks within a single pool.
- RAID5 works by "striping" data across all drives sequentially. A stripe of data consists of one block of data for each physical drive within the pool, plus one block of parity data containing a simple checksum of the data blocks. Each block within the stripe is written to each successive physical disk.
Since the parity data makes for one more block than there are physical drives in the pool, the data is distributed in a rolling fashion across all drives. In the event that a disk is missing, the lost block can be calculated by subtracting the checksum from the remaining blocks. In this fashion, RAID5 provides redundancy for the loss of any single disk within the storage pool.
Because data is written to multiple physical disks simultaneously, and the parity calculation is lightweight, RAID5 provides for nearly as much improvement to performance as RAID0 while still providing data redundancy for the entire pool.
Like RAID1, disks within a RAID5 pool all have to be the same size. Read and write operations both require accessing all of the disks within the pool, so their performance is equally affected by adding additional disks to the RAID set.
The total size of the logical disk created with a RAID5 pool is equal to the sum of all drives in the pool minus 1 drive. In other words, there is one drive's worth of parity data within the pool evenly distributed across all drives.
For example, the total size of the logical disk created with three 2TB disks in a RAID5 pool would be 2 x 2TB = 4 TB
DeleteRAID6
- RAID6 (RAID-Six) is the most complex level of RAID commonly used, and it is sometimes referred to as Advanced Data Guarding.
- RAID6 requires at least 4 or more physical disks. Similar to RAID5, you can add as many disks to a RAID6 pool as you like, but it is recommended not to exceed 12 disks.
- RAID6 stripes data across all disks similarly to RAID5, but uses a more complex algorithm to distribute parity information. With RAID6 you can sustain the loss of any two disks within the pool without losing data redundancy.
- RAID6 provides a higher level of redundancy than RAID5 at the expense of storage density and performance. Like RAID0 and RAID5, adding more disks to the pool increases performance, but since the parity calculation is heavier and there is twice as much parity data, the total performance is substantially lower.
- The total size of the logical disk created using RAID6 is equal to the total size of all disks, minus 2 drives of parity data. (e.g. (4) 2TB disks in RAID6 = 2x2TB=4TB)
RAID 10/50/60
Wait, what? You said there were only four types of RAID!
That’s correct, but multiple RAID pools can be combined to increase performance.
Remember when we discussed RAID0? Why would anybody want to use RAID0 when you multiply the chances of a disk calamity with each drive you add to the pool?
Well, what if each one of those ‘disks’ you add to the RAID0 pool is self-redundant?
As the name implies, RAID10/50/60 is a combination of RAID1/5/6 with RAID0. For example, if you create two RAID5 pools, each with four 2TB drives, then create a RAID0 spanning the two resulting logical drives, you end up with a storage pool that is both double the size and double the performance of the individual RAID5 logical disks, and still self-redundant!
In this configuration, the resulting logical disk is 12TB (4-disk RAID5 = 3x2TB = 6TB, and then the resulting 2-disk RAID0 = 2 x 6TB = 12TB) and can sustain the loss of up to two disks, one disk from each of the RAID5 sets, without losing data integrity.
In this configuration you also gain the full benefits of the RAID0 performance boost by spanning together two RAID5 logical disks.
DeleteZFS RAID vs. Typical RAID
x360Recover is built using the ZFS filesystem to manage backup data and snapshots.
ZFS has its own unique built-in RAID system that is similar to (but somewhat better) than typical RAID. ZFS RAID has its own labels for each of the various levels of redundancy, but since each is functionally similar to its equivalent typical RAID counterpart, we’ll refer to each of those levels using the common terminology. (such as RAID0/1/5/6 and so on.)
There are many highly technical differences between ZFS and typical RAID.
For example, ZFS RAID stripes don’t have to align with the number of disks within the pool, saving storage space when disk writes don’t come out to an even number of blocks.
The primary functional difference, however, is that ZFS performs internal data integrity grooming. The pool is periodically scanned, and if bad or corrupted data blocks are discovered, they are self-corrected by recovering the bad block from parity and then written to a new physical location on disk. Bad physical sectors are also marked so as not to be reused in the future.
For this reason, x360Recover recommends using the native software ZFS RAID present within the system when creating storage pools, rather than utilizing hardware RAID controllers.
Saving the cost of an expensive hardware RAID controller actually provides BETTER data protection for your customers data!
DeleteWhy you shouldn't use RAID with x360Recover ZFS pool:
ZFS is actually not just a filesystem; it's a suite of tools and a volume manager with RAID capabilities.
Instead of mixing ZFS RAID with hardware RAID, it is recommended that you place your hardware RAID controller in JBOD mode and let ZFS handle the RAID. ZFS cannot use its native capabilities to protect the data when using a hardware RAID controller, as it is not able to perform automatic self-healing unless it controls the redundancy of the disks and the data. ZFS prefers direct, exclusive access to the disks, with nothing in between that interferes.
If utilizing iSCSI, do not carve out LUNs on the SAN. Present raw LUNS to x360Recover and use x360Recoverto build your RAID5 or RAID6.
In all environments, using RAID0 in your x360Recover ZFS Pool in any fashion is not supported for production. This coincides with the pop-up message stating RAID0 is not supported in production when creating your x360Recover storage pool.