
Bare Metal Restore (BMR) is the process of recovering an entire protected system image back onto a newly repaired or replaced device, either physical or virtual.
With bare metal restore, (as the name implies), there is no need to first load an operating system before beginning the recovery. Using the Recovery Wizard, you can simply write the protected system image directly back to the recovered system.
PREREQUISITE: We recommend that you remove existing partitions on the destination disk before performing BMR: [Click to learn more]
Before beginning a bare metal restore, we recommend that you first inspect the destination disk and remove any existing partitions. This will ensure that you have a successful recovery.
STEP 1. After booting the x360Recover BMR ISO, run GParted from the desktop.
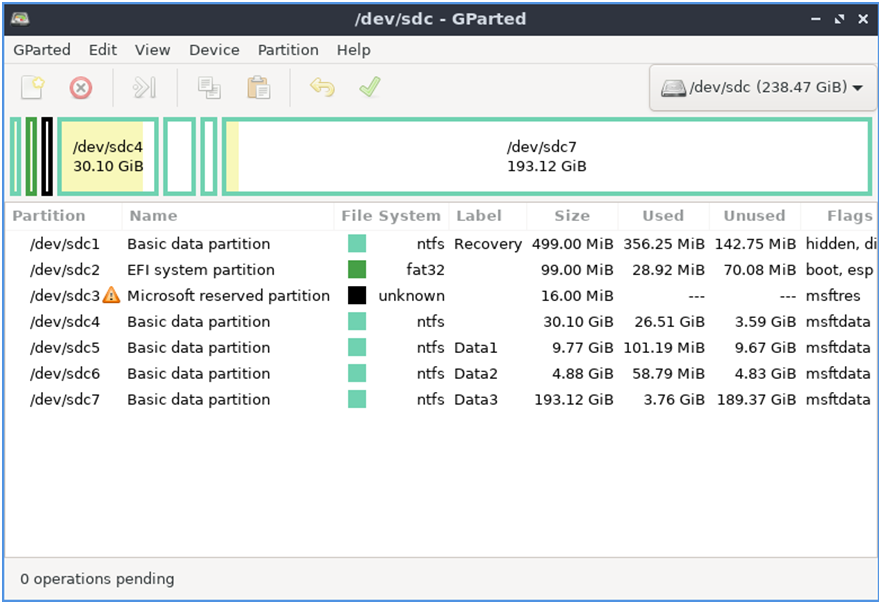
STEP 2. Select each disk you intend to overwrite with the recovery from the top right dropdown menu.
NOTE: You must remove any locked partitions (such as LVM groups or swap partitions) because the system will block these locked partitions from being overwritten:
- To delete locked LVM partitions, first select the partition and click Partition -> Deactivate
- To delete locked swap partitions, first select the partition and click Partition -> SwapOff
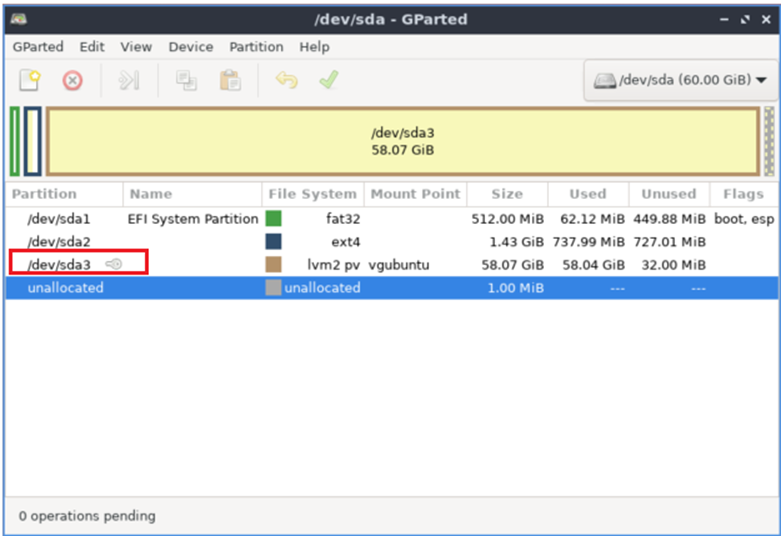
STEP 3. To remove the chosen partitions, select each partition, one at a time, and click the red-circle-x icon on the toolbar.
Then, after all desired partitions are removed, click the green check icon to save these changes.
STEP 4. Once the selected destination disk(s) have been cleared, open the Recovery Wizard,and proceed with the bare metal restore operation
Delete|
Ways you can perform bare metal restore with x360Recover: Our x360Recover Bare Metal Restore Wizard offers several options for performing different types of recovery, depending on where your data is located:
|
|
Where to... How to... |
Tools, requirements and limitations of BMR
1. Tools for BMR
The Axcient x360Recover Bare Metal Restore utility is a Linux Live CD for performing system recovery, diagnostics, troubleshooting, and general digital forensics. The utility supports (a) legacy MBR (Master Boot Record) and (b) modern UEFI (Unified Extensible Firmware Interface) system architecture and contains:
- A wizard helps you recover protected systems from an x360Recover appliance or vault, directly back onto your replacement hardware. Protected systems may be recovered onto either physical or virtual machine hardware.
- A driver Injector utility helps inject critical device drivers into an offline Windows operating system to allow it to boot properly after it has been recovered to dissimilar hardware.
Also included in the x360Recover Bare Metal Restore utility are tools for disk partition recovery and editing, file system repair, antivirus scanning, offline Windows registry editing, and disk cloning/imaging.
Delete2. Minimum requirements for BMR
In addition to a DVD or USB containing the x360Recover Bare Metal Restore tools image, your target protected system must have:
- 2GB+ RAM
- Hard drive(s) of sufficient size to contain the original protected system data
IMPORTANT NOTE: Bare metal restore from local cache (for Direct-to-Cloud systems) requires extended hardware CPU instruction set support for encryption and hashing functionality.
REQUIRED INSTRUCTION SET:
| SSE2 | SSE3 | SSE4.1 | AES | AVX |
To support these instructions, your CPU must be
- Intel Broadwell design or newer, or
- the AMD equivalent, circa 2011.
When performing a bare metal restore using local cache, be aware that there are additional memory requirements. Local cache requires approximately1GB of RAM for every 4TB of local cache (total size). This is in addition to the core 2GB (approximate) required by the Live CD environment.
Delete3. Limitations of BMR
1. Unlike a typical file and folder restore operation, bare metal restore operations have no access to an existing operating system on the target device. So, you have to bring your own. Download the latest x360Recover Bare Metal Restore tool
2. The x360Recover Bare Metal Restore wizard operates from a Linux Live CD environment. If your system hardware is not supported by Linux, your system may not be recoverable using our bare metal restore tools.
3. Some motherboards leverage onboard ‘RAID’ controllers that are really only software-driver driven RAID. This means they are only supported by Windows-specific drivers. These onboard ‘RAID’ controllers are not supported by Linux in RAID mode and must be configured in SATA/IDE mode to be visible to the Linux operating system. (Examples of such controllers are Dell Perc S3xx series, Intel Cxxx series, and HP SmartArray B120/B320 controllers. Most white-box ‘servers’ with on-motherboard so-called RAID controllers fall into this category.)
DeletePerform common/shared steps in BMR
The following steps are needed for any x360Recover bare metal restore recovery, whether you are accessing your data from an appliance, from a Direct-to-Cloud (D2C) local cache, or from an exported virtual disk.
Common steps in BMR
REMINDER: Before beginning a bare metal restore, we recommend that you first inspect the destination disk and remove any existing partitions. This will ensure that you have a successful recovery. After booting the x360Recover BMR ISO, run GParted from the desktop.Select each disk you intend to overwrite with the recovery from the top right dropdown menu. (NOTE: You must remove any locked partitions (such as LVM groups or swap partitions) because the system will block these locked partitions from being overwritten. To delete locked LVM partitions, first select the partition and click Partition -> Deactivate. To delete locked swap partitions, first select the partition and click Partition -> SwapOff.) To remove the chosen partitions, select each partition, one at a time, and click the red-circle-x icon on the toolbar. Then, after all desired partitions are removed, click the green check icon to save these changes Once the selected destination disk(s) have been cleared, open the Recovery Wizard,and proceed with the bare metal restore operation.
COMMON STEP 1.
Download the x360Recover bare metal restore ISO image and create a bootable DVD or USB.
- Download the latest x360Recover BMR tools on the Axcient Download page.
- Instructions on creating a bootable USB image: Create a Bootable USB Flash Drive
COMMON STEP 2.
After you have created your bootable DVD or USB, you can boot your new physical or virtual device from the bare metal restore image.
Note: You may have to reconfigure BIOS settings or press a key to select boot media to direct the system to boot from your USB or DVD image.
On boot, you should see the x360Recover Recovery Bare Metal Restore boot menu:
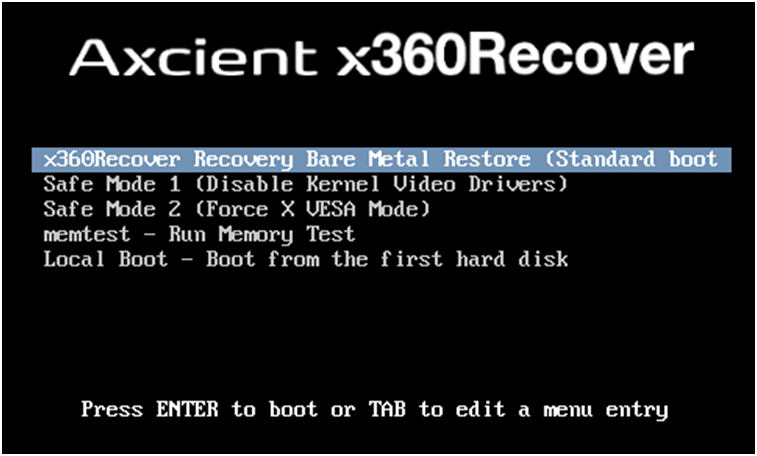
For most hardware, you should select the Standard boot option.
TIP: If you have trouble with video drivers on the system, try one of the safe mode options to try to resolve the issue.
COMMON STEP 3.
After the system finishes booting, the Linux desktop will load.
The Linux desktop shortcuts for the most used utilities include:
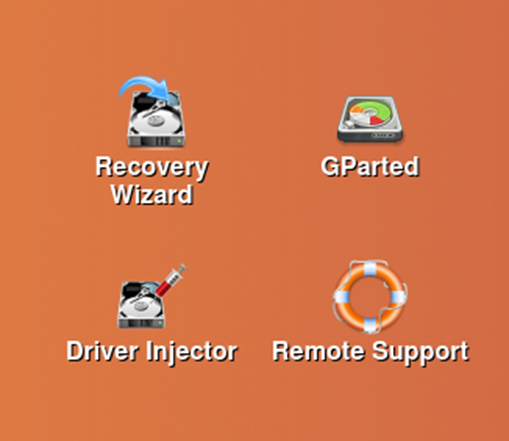
- The Recovery Wizard performs the actual data recovery.
- Driver Injector installs critical drivers into an offline system image for recovering to dissimilar hardware
- GParted resizes/moves partitions, allowing restores to a smaller target disk than the original source
- Remote Support delivers screen sharing sessions with Axcient Support
Start by launching the Recovery Wizard.
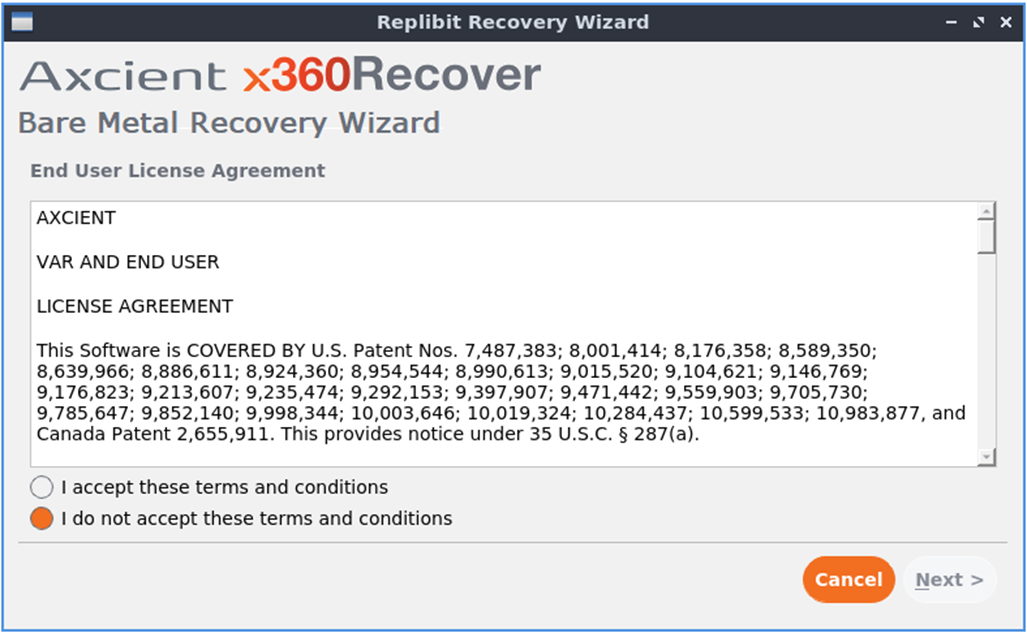
COMMON STEP 4.
Accept the End User License Agreement (EULA) and click Next to choose your recovery path option.
You can now proceed to the BMR option of your choice:
- Perform BMR from an appliance
- Perform BMR from a vault with local cache
- Perform BMR from an exported virtual disk
It’s now possible to perform a bare metal recovery to a target drive that is physically smaller than the original protected system drive. NOTE: There must be enough space on the target drive for the actual data IN-USE on the system to fit.
Recover to a smaller target drive
To perform a recovery of a source disk that is larger than the target device, follow these steps:
1. Select your recovery type and complete the wizard up to the Drive Mapping step.
A warning will appear, noting that you are trying to target a disk that is smaller than the original physical disk.
2a. Open GParted and resize or move all partitions or volumes into a space no larger than the target disk. (Leave all extra space empty on the right side of the disk display)
2b. Locate the source disk that you wish to modify before cloning. Hint: This is usually easy to locate, based on the size of the disk and the presence of the partitions on the drive. Flip through the disks available in the top-right selector until you find your drive:
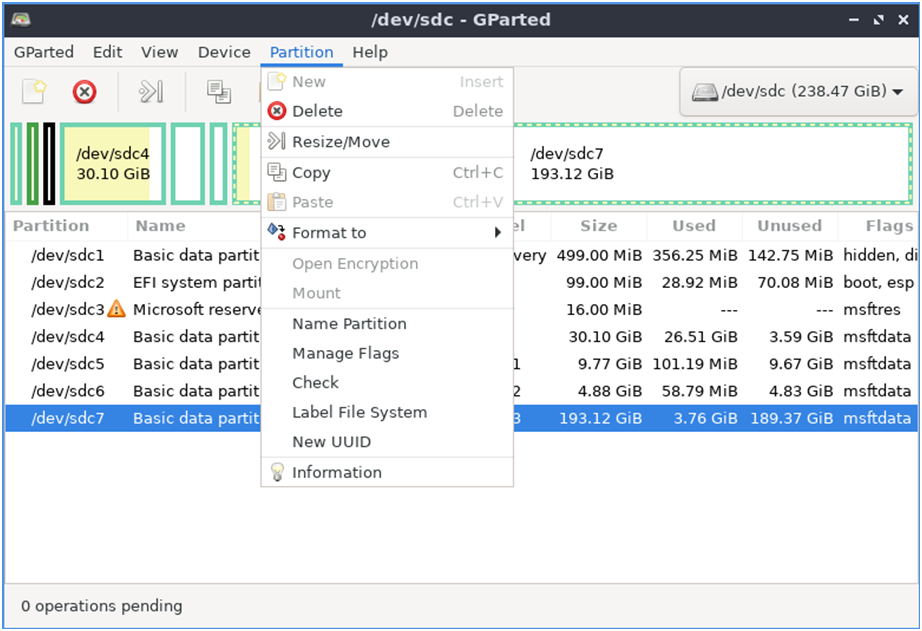
2c.From the top navigation menu, choose Resize / Move:
2d. Hover over the right edge of the desired partition then ...
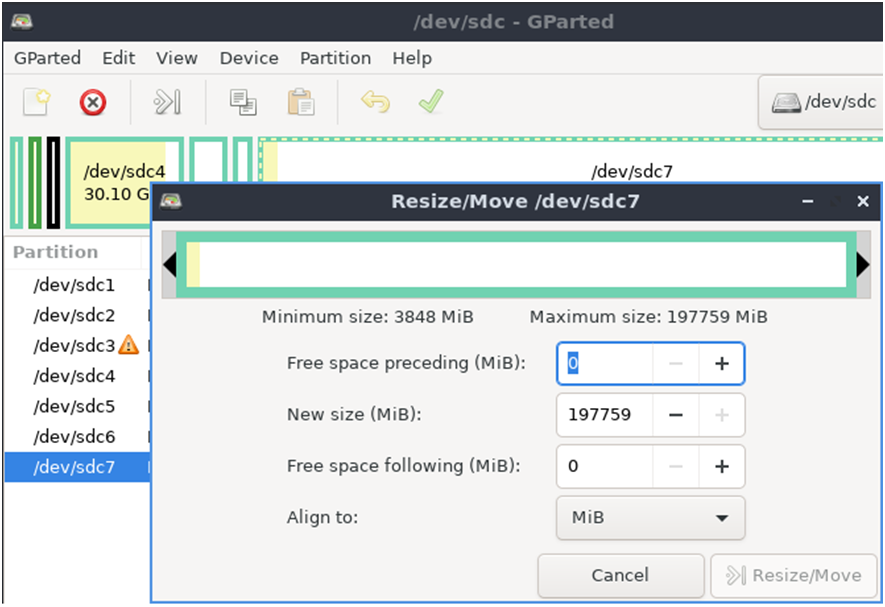
...drag it to the left to resize it.
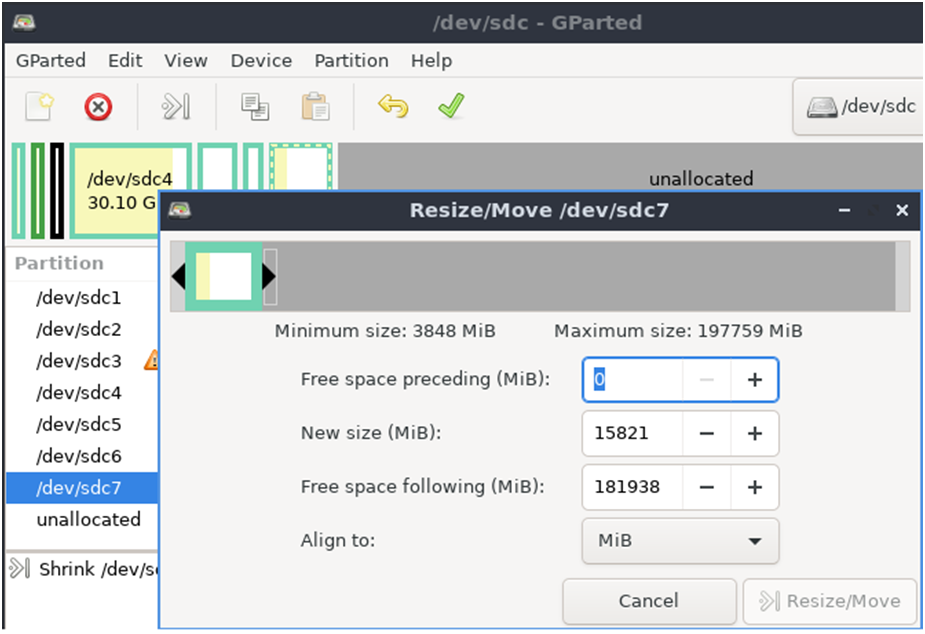
If multiple partitions exist, remember to drag all partitions to the left.
All free space should be to the right.
2e. Click the green checkbox to proceed with partition resizing operations.

3. Once the source disk has been reorganized, close GParted and proceed with the bare metal recovery by clicking Next.
DeleteAdvanced BMR topics
You may have questions about how to work with boot error messages, how to best use our SmartRecovery features or the steps needed to recover Microsoft dynamic disks natively.
The following tabs will provide additional details on these issues. Please open a Support ticket if you need further help.
Resolve boot issues
For issues with ‘Missing Bootloader’ type error messages, see How to fix BOOTLDR is Missing Errors
For issues with ‘No operating system Found’ type messages see Recreate Windows Boot Manager Records
DeleteSmartRecovery options
Notes on SmartRecovery selections:
When recovering from appliances: Smart Recovery is an option when recovering from an appliance. Leave the default (selected) value in place. |
|
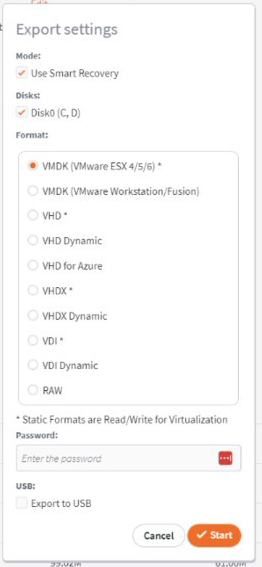
As of 12.4.0, we've enhanced the Virtual Disk Export feature to allow the use of Smart Recovery:
|
Smart Recovery is automatically selected when recovering from D2C local cache. |
| Virtual disks exported from Recovery Center automatically use Smart Recovery. If you wish to use virtual disk exports for bare metal recovery of dynamic disks, use Recovery Center to generate the disk image exports |
- RAID, striped, and spanned disks must be recovered as dynamic disks using Smart Recovery.
- Simple mirror disks can be recovered as standard disks (with Smart Recovery disabled) and then mirrored again within Windows. (This would let you recover only 1 of the 2 disks, in order to save time, for example.)
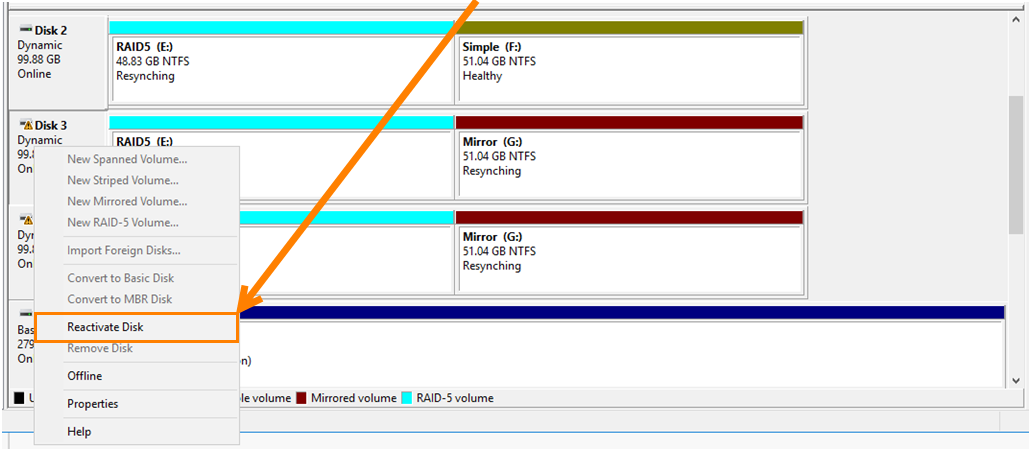
Windows will generally recognize your dynamic disks as ‘foreign’ disks belonging to another system. After booting into Windows:
1. Open Disk Manager
2. Locate the disk labeled as foreign
3. Right-click that disk
4. Reactivate each disk. Once they are re-activated, the volumes will resync.
Microsoft dynamic disks
Microsoft dynamic disks can be recovered natively with our x360Recover bare metal restore tools, but they require some extra steps.
STEP 1. Because Linux does not automatically recognize Microsoft dynamic disks, our default Data Adaptive Mode is not available when recovering these volumes.
IMPORTANT NOTE: You should deselect Data Adaptive Mode when recovering dynamic disk volumes:
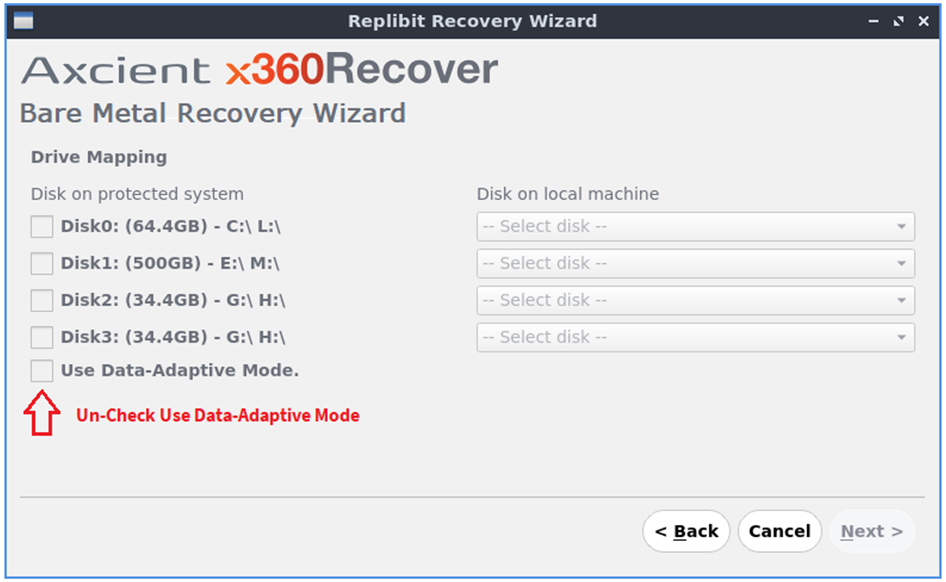
STEP 2. For the disks to be constructed properly as dynamic disks, Smart Recovery is required. You must select Use Smart Recovery when recovering dynamic disks.
Learn more about Smart Recovery here:
DeleteSUPPORT | 720-204-4500 | 800-352-0248
- Contact Axcient Support at https://partner.axcient.com/login or call 800-352-0248
- Free certification courses are available in the Axcient x360Portal under Training
- Subscribe to the Axcient Status page for a list of status updates and scheduled maintenance
1202 | 1423 | 1540 | 1686 | 1987