
Many new PC hardware systems now ship with EFI-only BIOS support. These systems no longer have any option to boot using legacy MBR-style Windows boot records.
If you are performing a bare metal restore of an MBR-based protected system to one of these newer hardware systems, the recovered system image will not be bootable.
You will have to convert the MBR-based system to EFI boot mode to proceed.
How to convert an MBR-based system to EFI boot mode
There are three methods available for converting a legacy MBR-style Windows system into a modern EFI mode image.
Each of the following conversion methods is technical in nature, and Axcient support is available for assistance in this process whenever you encounter this situation during a recovery.
Method #1: Use a Virtual Disk Export Image
In this method, you will first download an VHDX-formatted virtual disk image of the system volume. Then, you'll perform the conversion from a working Windows machine.
Steps to use a Virtual Disk Export Image
STEP 1. Export the protected system being recovered as a Virtual Disk image in VHDX format, from an appliance, vault, or Recovery Center.
Download the VHDX image to a suitable USB hard drive or network shared folder location with sufficient storage space for the image.
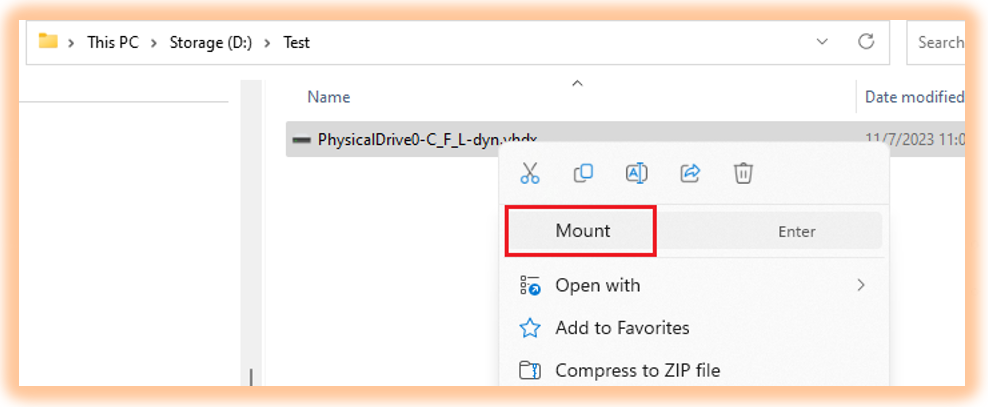
STEP 2. Mount the VHDX image on a Windows 10 or newer PC
a. Browse to the file from Windows Explorer
b. Right-click on the file and select Mount
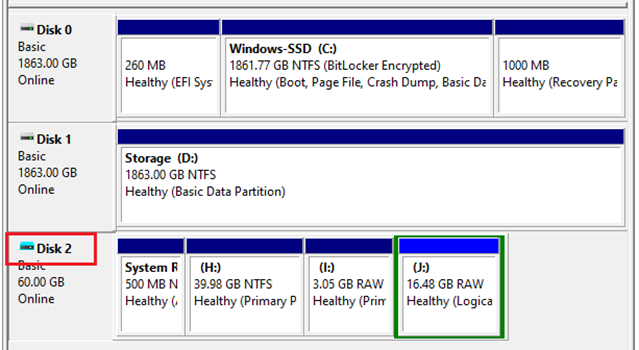
STEP 3. Open Computer Management from the Control Panel and expand Disk Management.
Locate the mounted disk image and identify it’s disk number.
Note: Mounted virtual disks will be highlighted in a different color in the left pane:
STEP 4. Run a CMD prompt session as Administrator.
a. Click the Windows Start button
b. Type cmd to search for the application
c. Right-click CMD and then click Run as administrator

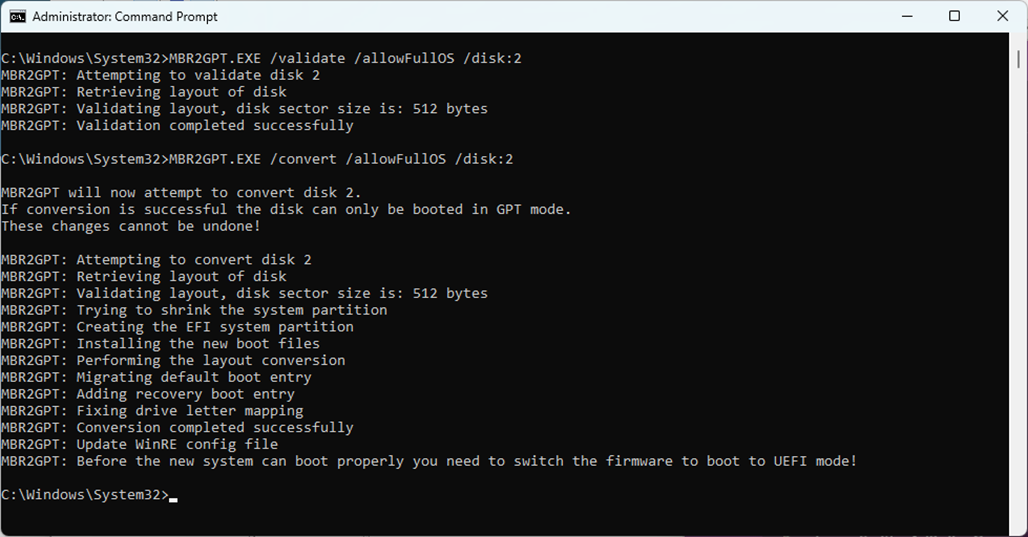
STEP 5. Run the following command to convert the mounted disk image to GPT format and update boot records:
mbr2gpt.exe /validate /allowFullOS /disk:<#>
Note: Replace <#> with the disk number you identified in the previous step.
In the above example, replace <#> with /disk:2

Confirm that the validation passes:

STEP 6. After confirming that validation passes, run the following command to convert the disk to GPT / EFI-boot mode:
mbr2gpt.exe /convert /allowFullOS /disk:<#>
Note: Replace <#> with the disk number you identified in the previous step.
In the above example, replace <#> with /disk:2
Note: if validation fails, try these steps:
Delete any RAW partitions on the disk. Unsupported or unprotected volumes will appear on the disk as RAW, unformatted partitions.
After deleting these partitions, retry the validation command above.
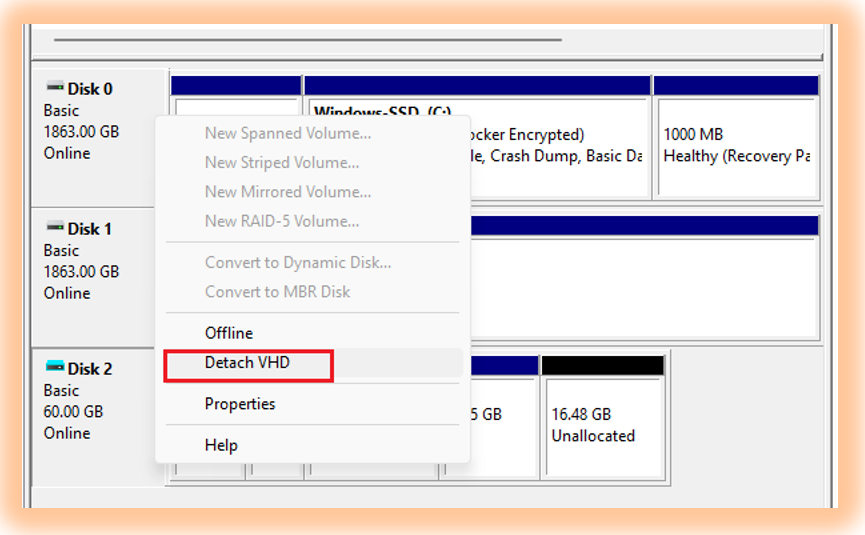
Detach and dismount the virtual disk. From Computer Management -> Disk Management snap-in, right click the disk and select Detach VHD.
STEP 7. Complete the recovery by performing a Bare Metal Restore using the Virtual Disk image. For detailed instructions, please see Bare Metal Restore Guide and follow the section for Bare Metal Restore from Virtual Disk Image.
DeleteMethod #2: Use Windows Installation Media repair tools
If you have already performed a bare metal restore of the system, or do not have a convenient Windows system and USB disk handy to prepare a VHDX image using the previous steps, you can convert the disk in place on the new hardware using a Windows installation disk and the built-in repair tools environment.
Steps to use Windows installation media repair tools
Note: if you have already performed a bare metal restore, skip STEP 1. and proceed to STEP 2.
STEP 1. Boot from the Bare Metal Recovery ISO and perform a bare metal restore of the protected system data. For detailed instructions, please see the Bare Metal Restore Guide and follow your preferred method to complete the restoration of data.
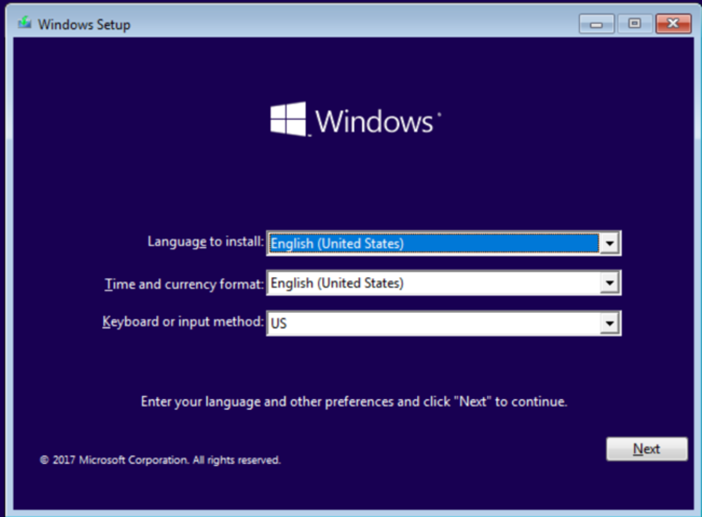
STEP 2. Boot the system using a Windows 10 or newer OS Installation disk.
Press any key when prompted to boot from the Windows Installation disk.
Click Next to proceed to the next screen.
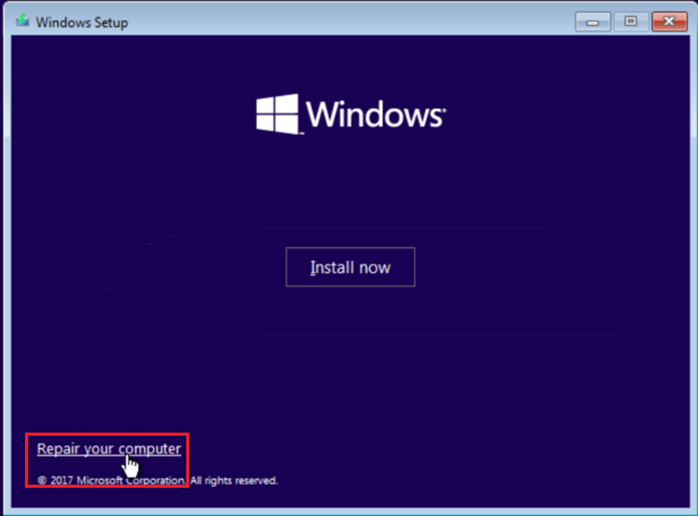
STEP 3. Click Repair Your Computer.
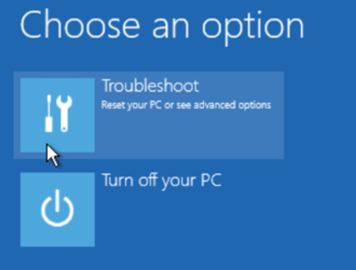
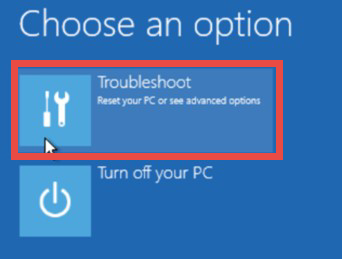
STEP 4. On the Choose an option screen, click Troubleshoot to continue.
STEP 5. Click the Command prompt to continue.

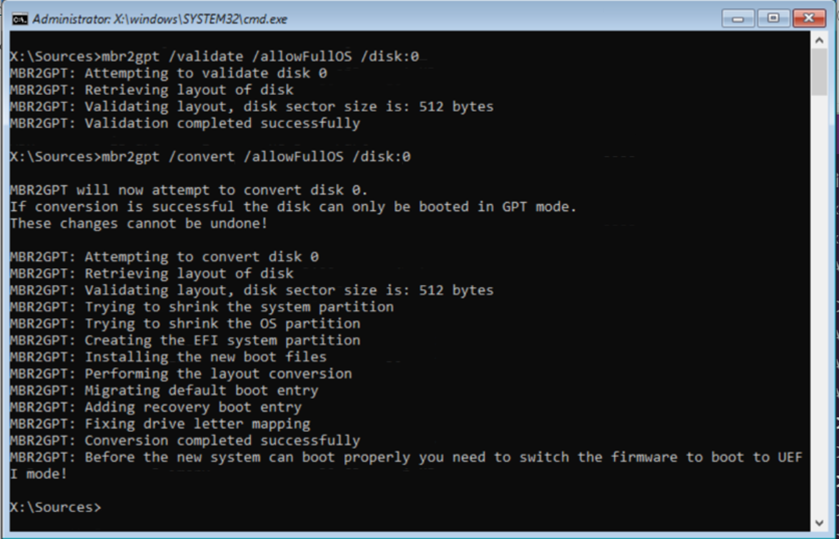
STEP 6. From the command prompt, test to validate the conversion of the MBR disk to GPT by using Microsoft’s converter tool.
Run this command:
mbr2gpt /validate /allowFullOS /disk:0
If the validation completes successfully, perform this conversion:
Run: mbr2gpt /convert /allowFullOS /disk:0
Type Exit.
Press Enter to close the command prompt.
STEP 8. On the Choose an option screen, click Turn off your PC to continue.
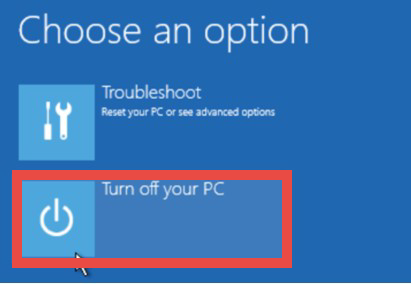
Remove the Windows installation media and reboot the PC.
STEP 9. The system should now boot normally using UEFI BIOS.
DeleteMethod #3: Manually convert the partitions and rebuild the boot records
Use this method to manually convert the partitions if the other two methods have failed.
Steps to manually convert and rebuild records
STEP 1. Boot from the Bare Metal Recovery ISO and erform a bare metal restore of the protected system data. Please see the Bare Metal Restore Guide and follow any method to complete the restore of data.
STEP 2. Before exiting the Bare Metal Recovery environment, perform the following steps to convert the boot disk from MBR to GPT mode:
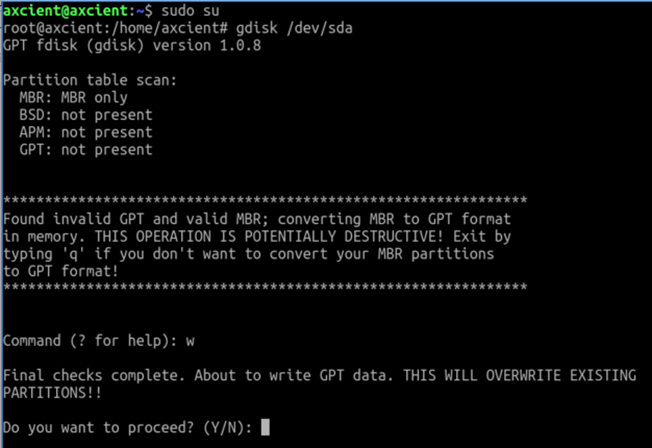
2a. Open QTerminal from the desktop shortcut
2b. Elevate to Root user by running the command sudo su
2c. Run gdisk on the disk containing the boot partitions (This is usually /dev/sda)
2d. If prompted to select between MBR and GPT, select MBR
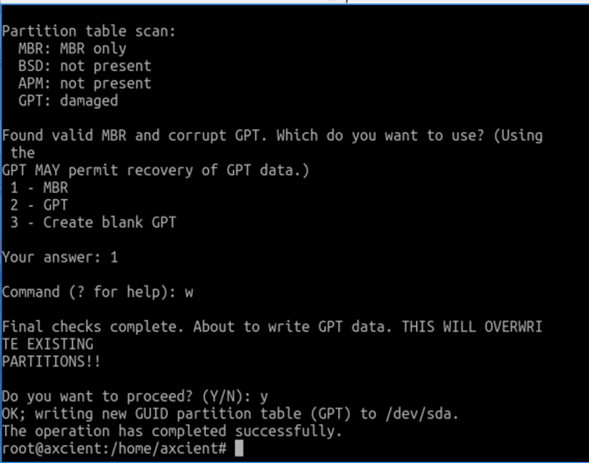
2e. Enter w to write the disk partitions in GPT format.

2f. When prompted with a warning, enter Y and press Enter to continue.
2g. You will receive a confirmation message when the disk is successfully converted to GPT mode:

STEP 3. Exit from the Bare Metal Recovery environment.
3a. Reboot the system using a Windows 10 or newer OS Installation disk.
3b. Press any key when prompted to boot from the Windows Installation disk.
3c. Click Next to proceed to the next screen.

3d. Select the option to Repair Your Computer.

3e. On the Choose an Option screen, click Troubleshoot
3f. The system should now boot normally using UEFI BIOS.
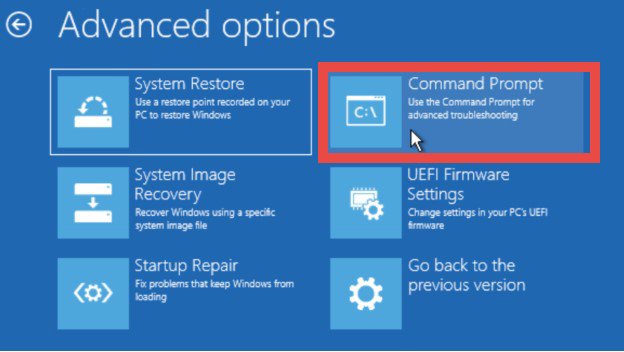
STEP 4. On the Advanced options screen, select Command Prompt
You must now verify the disk and partition layout.
4a. From the Command prompt, run diskpart
4b. Enter list disk to show the disks which are detected.
4c. Enter select disk 0 to select the first disk in the system. (NOTE: If your Windows boot partition is on another disk, enter the correct disk number here)
4d. Enter list part to show partitions.
4e. Verify that the correct disk is selected:
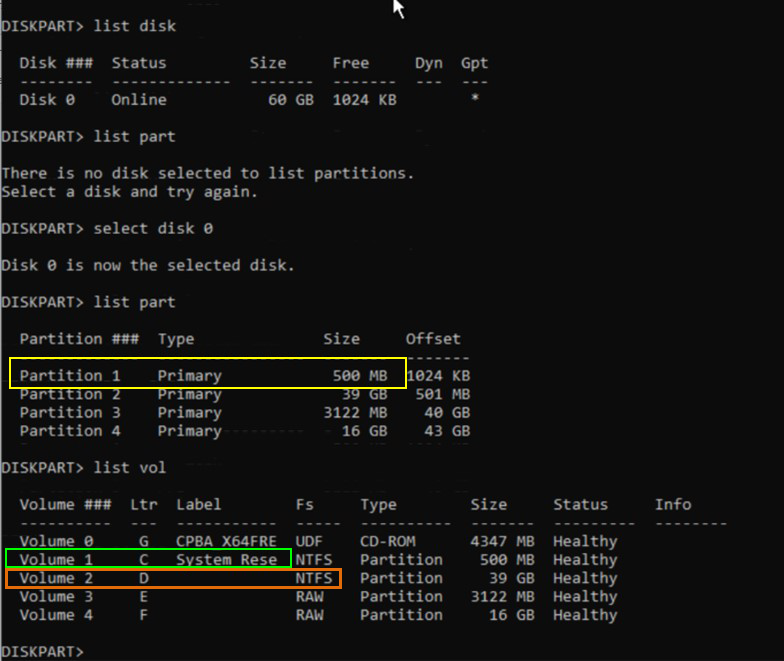
4f. Note the volume of the System Reserved partition.
The example shown here uses drive C as the System Reserved partition.
4g. Note the size of the boot partition.
The size of the boot partition in the example above is 500MB.
4h. Note the volume of the Windows partition.
The volume of the Windows partition in the example is drive D.
STEP 5. From diskpart, format the boot partition by running the following commands:
a. Diskpart
b. Select disk 0
c. Select part 1
d. Format quick fs=fat32 label=”System”
e. Exit
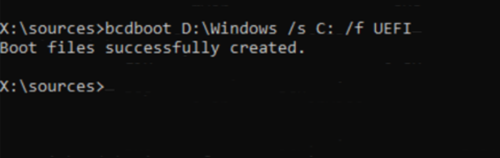
STEP 6. Create the Windows BCD boot records by running the following:
bcdboot D:\Windows /s C: /f UEFI
Note: Replace the drive letter used for Windows and System path to match the drive letters assigned.
For example:
When finished, type exit and press Enter to close the command prompt.
STEP 7. Click Turn off your PC.
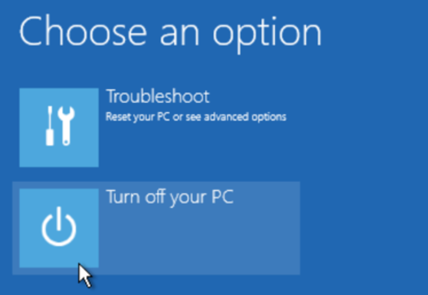
Remove the Windows installation media and reboot the PC.
SUPPORT | 720-204-4500 | 800-352-0248
- Contact Axcient Support at https://partner.axcient.com/login or call 800-352-0248
- Have you tried our Support chat for quick questions?
- Free certification courses are available in the Axcient x360Portal under Training
- Subscribe to Axcient Status page for updates and scheduled maintenance
1662