
This article walks through various ways to recover an existing protected system from a BDR appliance.
Virtualize
The quickest way to restore a protected system from a backup recovery point (with minimum downtime) is to virtualize the protected system on the local backup appliance.
Every x360Recover backup creates a ready-to-use full system image of your protected system, which is ready to be booted as a virtual machine. In the event that a protected system suffers hardware failure, becomes damaged by a virus attack, or is otherwise inaccessible, you can immediately restore the lost system to the network by booting directly on your backup appliance.
Where to virtualize
A protected system may virtualized on any x360Recover appliance or self-hosted vault.
For instructions on how to recover in the Axcient cloud, using an Axcient-hosted vault, refer to Axcient Virtual Office section.
How to virtualize
Virtualization walkthrough
1. Log in to the appliance and navigate to the Protected Systems tab on the lefthand navigation.
2. Click the appropriate System Name.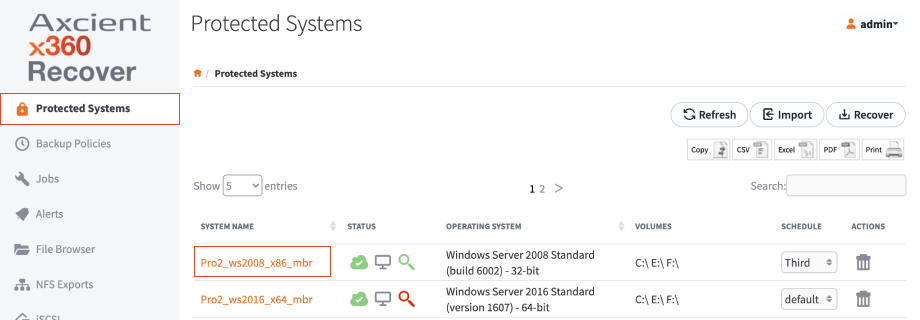
3. Locate the desired recovery point from the list at the bottom of the page.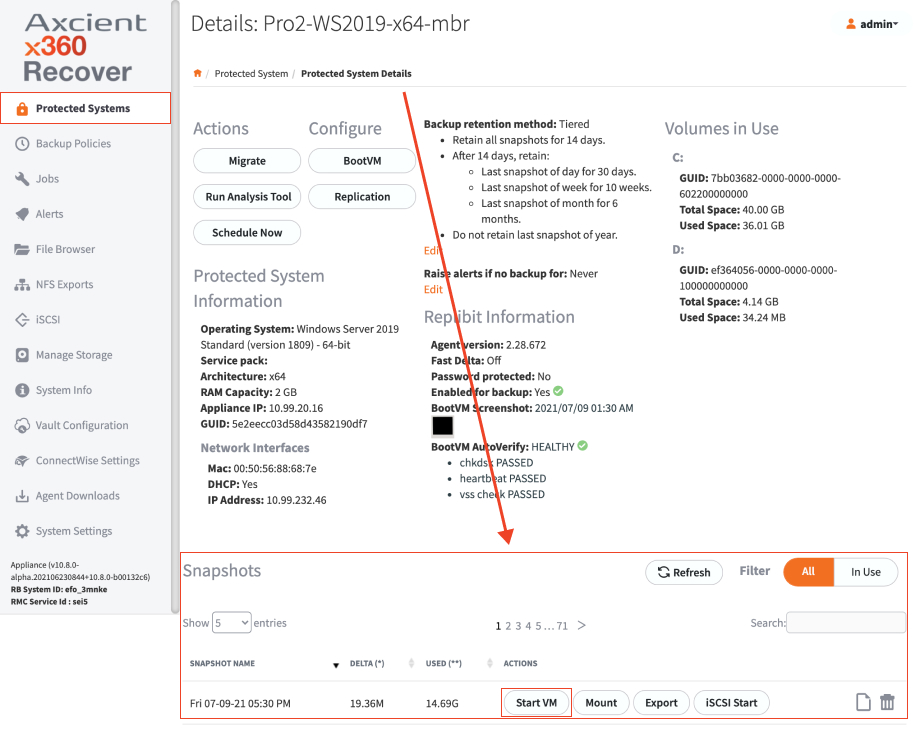
4. Click the Start VM button to open the virtualization settings popup: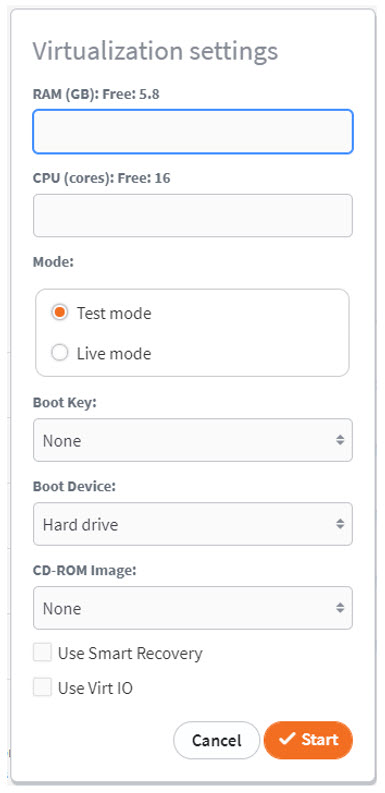
Enter the values for RAM and the number of CPU cores provided for the virtual machine.
Select Test Mode or Live Mode:
- In Test Mode, all changes made to the protected system will be discarded when stopping the virtual machine.
- In Live Mode, all changes made to the protected system will remain persistent on the appliance for later failback to physical or virtual hardware.
Check the Use Smart Recovery box to provide an exact image of the original protected system disk layout and identity. (We recommend this)
Click Start to boot the system as a virtual machine.
Where to access the virtual machine console
Once the virtual machine has started, a separate browser window will open, providing access to the running system video console.
To open this window again later, click the Terminal button from the Actions column in the list of recovery points.

You may also connect to the running virtual machine using RDP (Remote Desktop Protocol), if the system is configured to allow it.
What is test mode recovery?
Test mode is intended for simple recovery validation. Test mode helps you to ensure that the backup image is healthy, and that this system will be ready to recover in the event of a disaster.
- In test mode, the protected system will have no access to the production network environment.
- All changes made to the system in test mode will be discarded once the system is shut down and virtualization is stopped.
What is live mode recovery?
Live mode is intended for production failover operation.
- The system will boot up and have live access to the production network.
- The running virtual machine is an exact clone of the original production protected system and will conflict with itself over NETBIOS if both instances are running simultaneously.
Live mode virtualization should ONLY be performed when the original server is completely failed and no longer running on the network.
Re-configure network settings
Once the virtualized protected system is up and running, you will need to login and reconfigure network settings.
- The system is effectively running on new ‘hardware’ and the previously assigned static IP address (if any) will not be assigned on the new network interface(s).
Once IP addresses have been restored, you may or may not need to reboot the device to ensure all applications and services are operational.
What is VirtIO?
Once the virtualized protected system is up and running, you will need to login and reconfigure network settings.
- The system is effectively running on new ‘hardware’ and the previously assigned static IP address (if any) will not be assigned on the new network interface(s).
Once IP addresses have been restored, you may or may not need to reboot the device to ensure all applications and services are operational.
What is Smart Recovery?
Smart Recovery is a new x360Recover feature that provides an improved user experience for the virtualization and recovery of protected systems.
When you use Smart Recovery, the original disk topology is recreated in the virtual environment (including advanced configuration options like Dynamic Disks.)
Recover to a different appliance with a vault
You can use the vault to recover protected systems on an existing appliance if that appliance fails entirely (or if the appliance storage pool has failed).
This could be necessary if (a) the original appliance is damaged or lost and (b) you wish to retain your existing snapshot history on another, different appliance.
- This article describes how to use the vault to recover an existing appliance-based protected system, by using the vault to recover back to another, different appliance. If you need instructions for converting an existing Direct-to-Cloud (D2C) endpoint to a new appliance, see Convert from appliance mode to D2C mode
The appliance recovery process, using the vault, includes the following steps:
- Stop and disable the x360Recover agent service on the protected systems.
- Replace the disks on the faulty appliance or prepare a new appliance.
- Recover the protected systems from the vault.
- Enable and start the x360Recover agent service on the protected system.
- Verify that backups and replications begin for each protected system.
Before you begin
Ensure the vault and the new appliance have both been upgraded to the latest x360Recover version.
When migrating a protected system from one device to another (appliance to appliance, or private vault to private vault) the protected system data is first sent to the new device and stored in the aristosbay folder, and then imported into the ZFS pool. Because of this, the new BDR device needs to have enough storage space to hold two copies of the data during the migration process.
Since data is stored twice on the receiving unit while a migration is in flight, the new unit must have enough total capacity to hold all of the protected systems you wish to migrate and still retain enough free space to hold a second copy of the largest protected system being migrated. Essentially, this means the storage space available on the appliance must be 2x the data size.
Step 1: Stop and disable the x360Recover agent on protected systems
How to stop and disable agents
1. On the protected system (local machine), launch Windows Services.
2. Find the x360Recover agent service, right-click the service, and select Stop. x360Recover backups are now paused.
3. Right-click the x360Recover agent service and select Properties.
4. In the Startup Type drop-down menu, select Disabled.
5. Click OK to save your settings. The x360Recover agent service is now disabled.
Step 2: Option A: Replace disks on the faulty appliance
If the original appliance is still working but requires new disks, you will need to install replacement disks and create a new storage pool.
How to replace disks
1. Log in to the original appliance web interface and choose the Protected Systems tab on the left hand menu.
2. In the Protected Systems page, select the delete icon associated with the appropriate Protected System row.
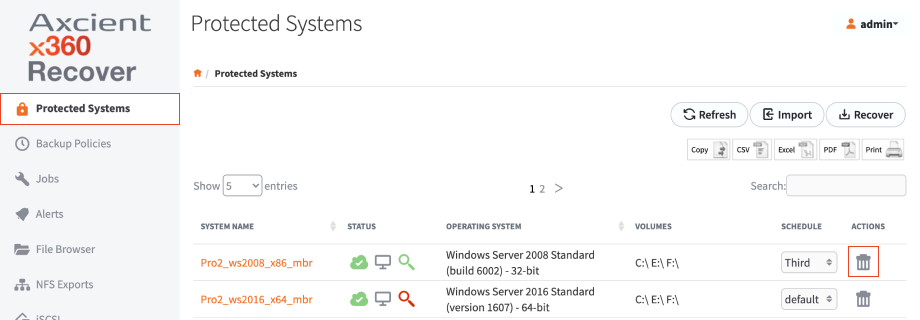
Do not delete replication configurations
Only delete each protected system that displays in the Protected Systems page.
4. To destroy an existing storage pool on your device, please contact Axcient Support for assistance. Enable Remote Assist on the target device (as well as on your Management Portal) and open a ticket requesting that the storage pool be destroyed.
5. When you are ready, return to the appliance web interface and create a new storage pool. For instructions, please reference Managing the Storage Pool
Step 2: Option B: Prepare a new appliance
Alternatively, if the appliance has completely failed, you will need to provision and configure a new appliance.
NOTE: The new appliance should be configured to have the same IP address as the old appliance. If this is not possible, edit the aristos.cfg file on each protected system (located within the agent installation folder) and update it with the new IP address.
How to prepare a new appliance
1. Install the x360Recover software onto the new appliance and configure appliance settings. For complete instructions, please reference the Install the x360Recover OS
Important note on new appliance licenses: The license provisioning process for new appliances has changed since our legacy License Portal was retired in 2023. (See announcement)
As of October 24, 2023, you are no longer required to create locations or sites when assigning licenses for appliances. Instead, new appliances will appear within the Licenses page automatically, once they have been provisioned.
The new appliance must be configured for the same customer account as the previous appliance. (However, the location assigned can be different.) The customer/location containing the protected systems to be recovered must be active within the license portal in order to perform a vault recovery. DO NOT delete the original customer location. If you factory reset the original appliance, (which will deactivate the location,) you must provision the new appliance to the original location to re-activate it. If you provision the new appliance to a new location, complete the vault recovery of all protected systems before deleting the location in the license portal, or factory resetting the original appliance.
2. In the left-hand navigation menu, click the Manage Storage tab and create a new storage pool. For instructions, please reference Managing the Storage Pool
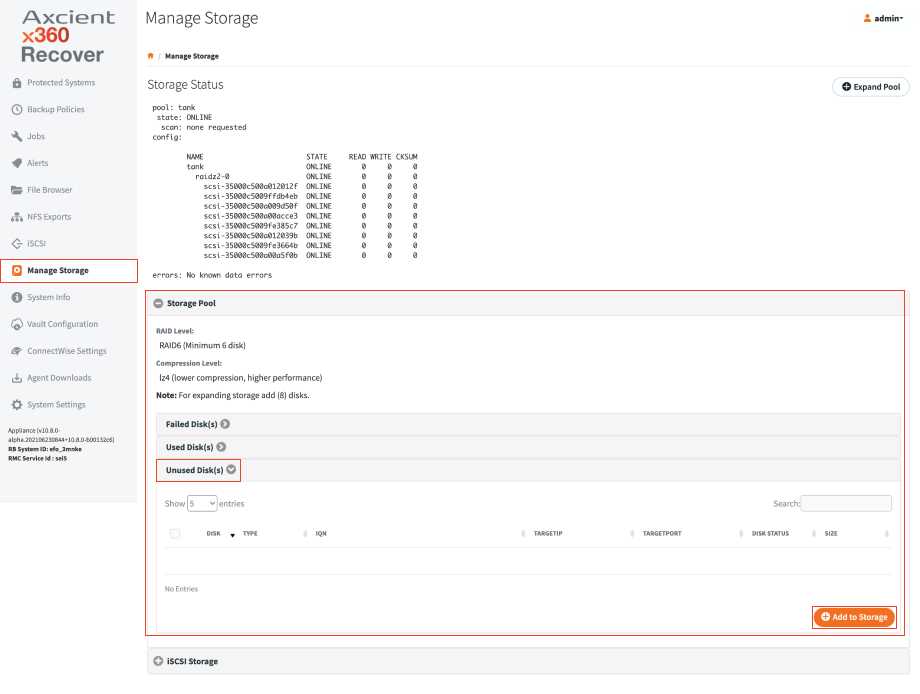
3. In the left-hand navigation menu, click the Protected Systems tab. Make sure the Protected Systems page does not list any protected systems.
Step 3: Option A: Recover over the internet
After the faulty appliance is fixed, you can recover protected systems from the vault. You can recover over the internet or using a USB device.
If you are planning to recover over the internet, complete the steps below. These steps apply to both Axcient-hosted and self-hosted vaults.
Warning: Perform recovery on only one protected system at a time.
How to recover over the internet
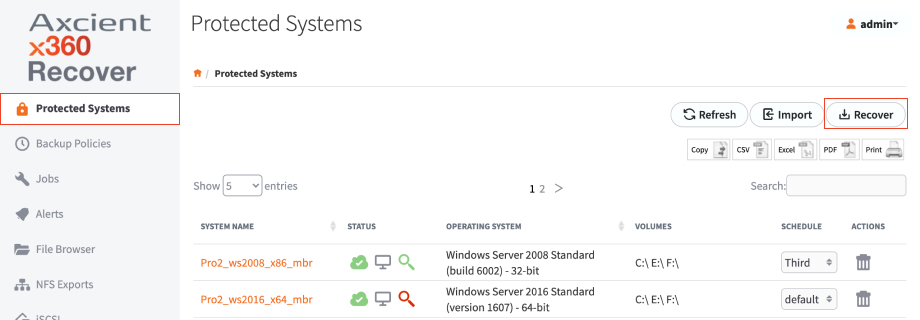
1. Log in to the appliance web interface and select the Protected Systems tab on the left hand navigation.
2. In the Protected Systems page, click the Recover button.
3. In the Recover Protected System pop-up window, enter the Vault IP address or URL (without https). Click the Test Connection button to confirm that the appliance can communicate with the vault.
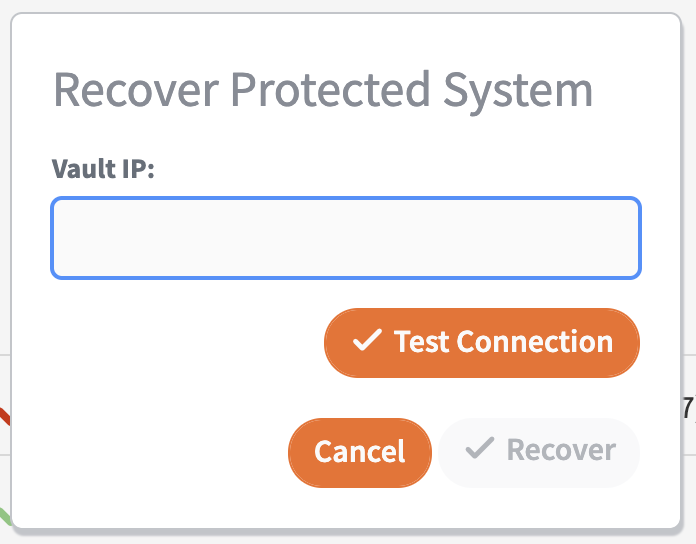
5. When prompted, enter the Customer Location and the appropriate Protected System. Click the Recover button when you are finished.
Note
If no protected systems are listed, ensure that you:
- Entered the correct vault URL; and,
- Selected the correct customer account when provisioning the new appliance.
6. Repeat these steps for each protected system.
Step 3, Option B: Recover from an Axcient-hosted vault using a USB
You can also recover from an Axcient-hosted vault using a USB device.
Warning: Perform recovery on only one protected system at a time.
How to recover from Axcient vault with a USB device
1. Open a ticket with Axcient Support, requesting a USB Recovery device for your protected systems. You will be billed for this service. Ensure you include:
- The full vault URL,
- The Protected System names,
- Shipping instruction; and
- An encryption password to be used.
Do not lose this encryption password.
Axcient cannot recover this password. If it is lost, you will need to request a new USB recovery device.
2. When you receive the USB device in the mail, attach the USB device to the appliance.
3. Log in to the appliance web interface.
4. In the left-hand navigation menu, click the Protected Systems tab.
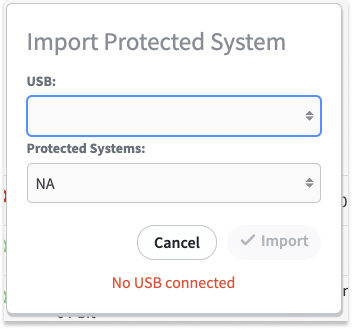
5. In the Protected Systems page, click the Import button.
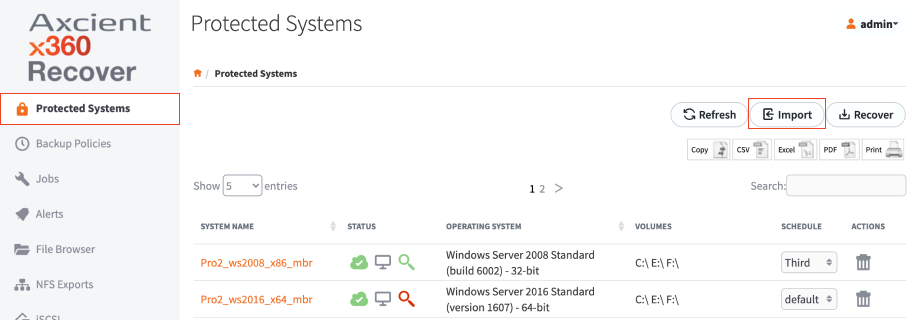 6. In the Import Protected System pop-up window, select the USB device, the Protected System, and the Encryption Password you configured.
7. Click the Import button when you are finished.

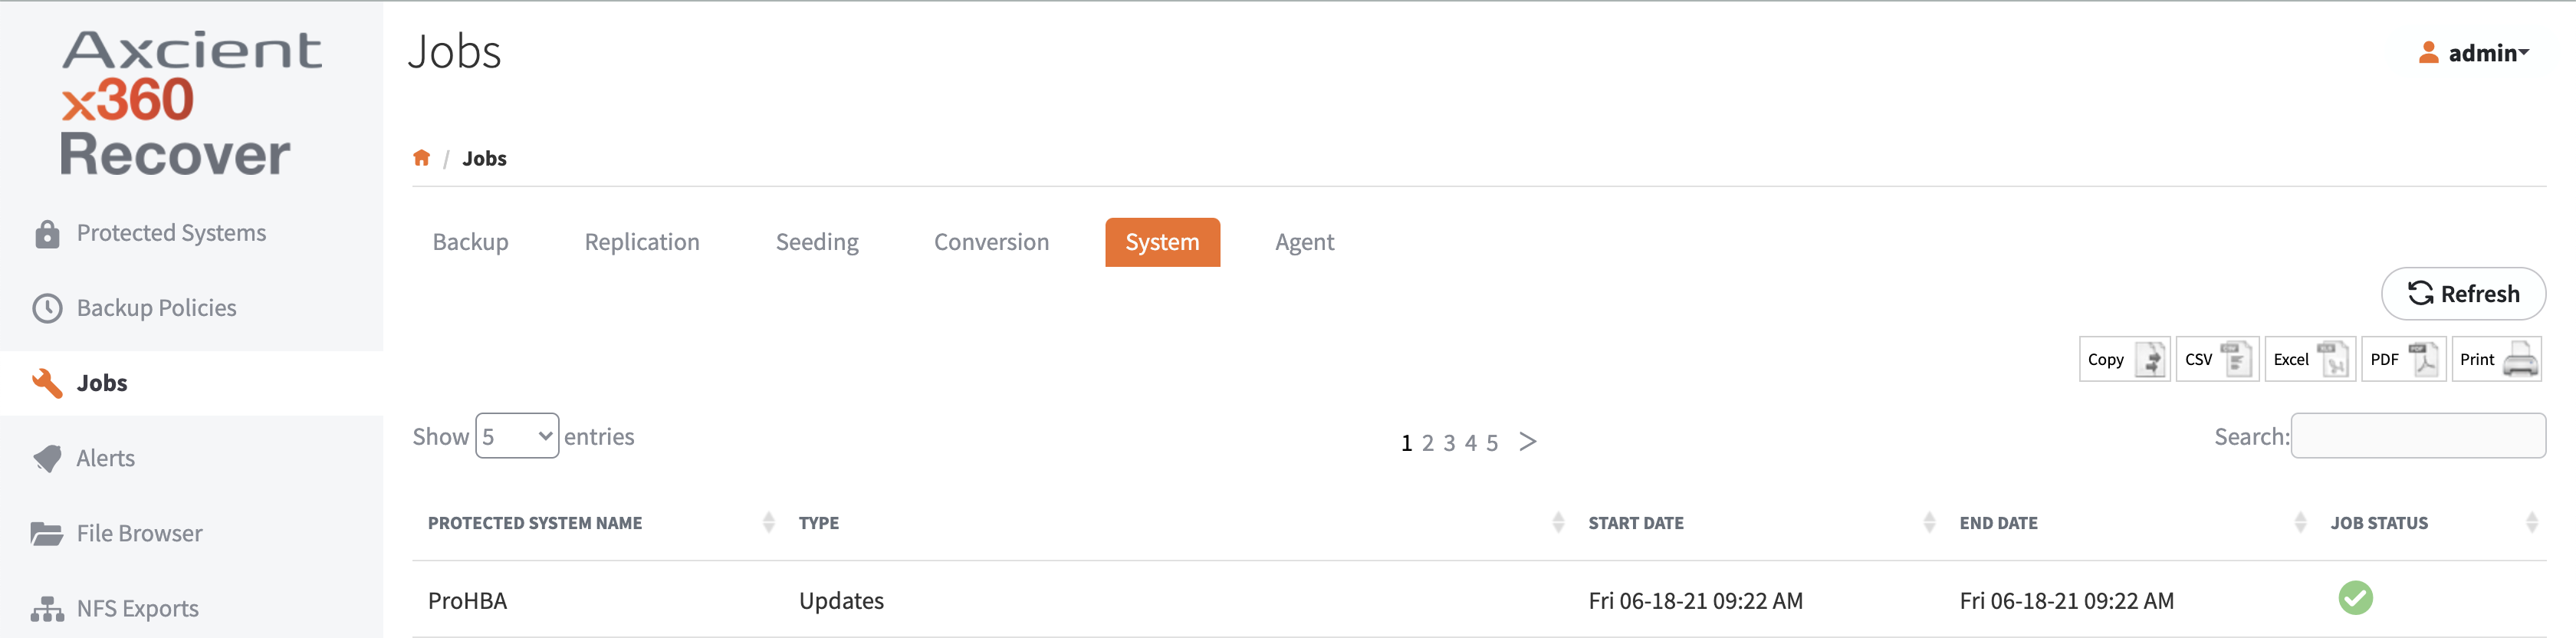
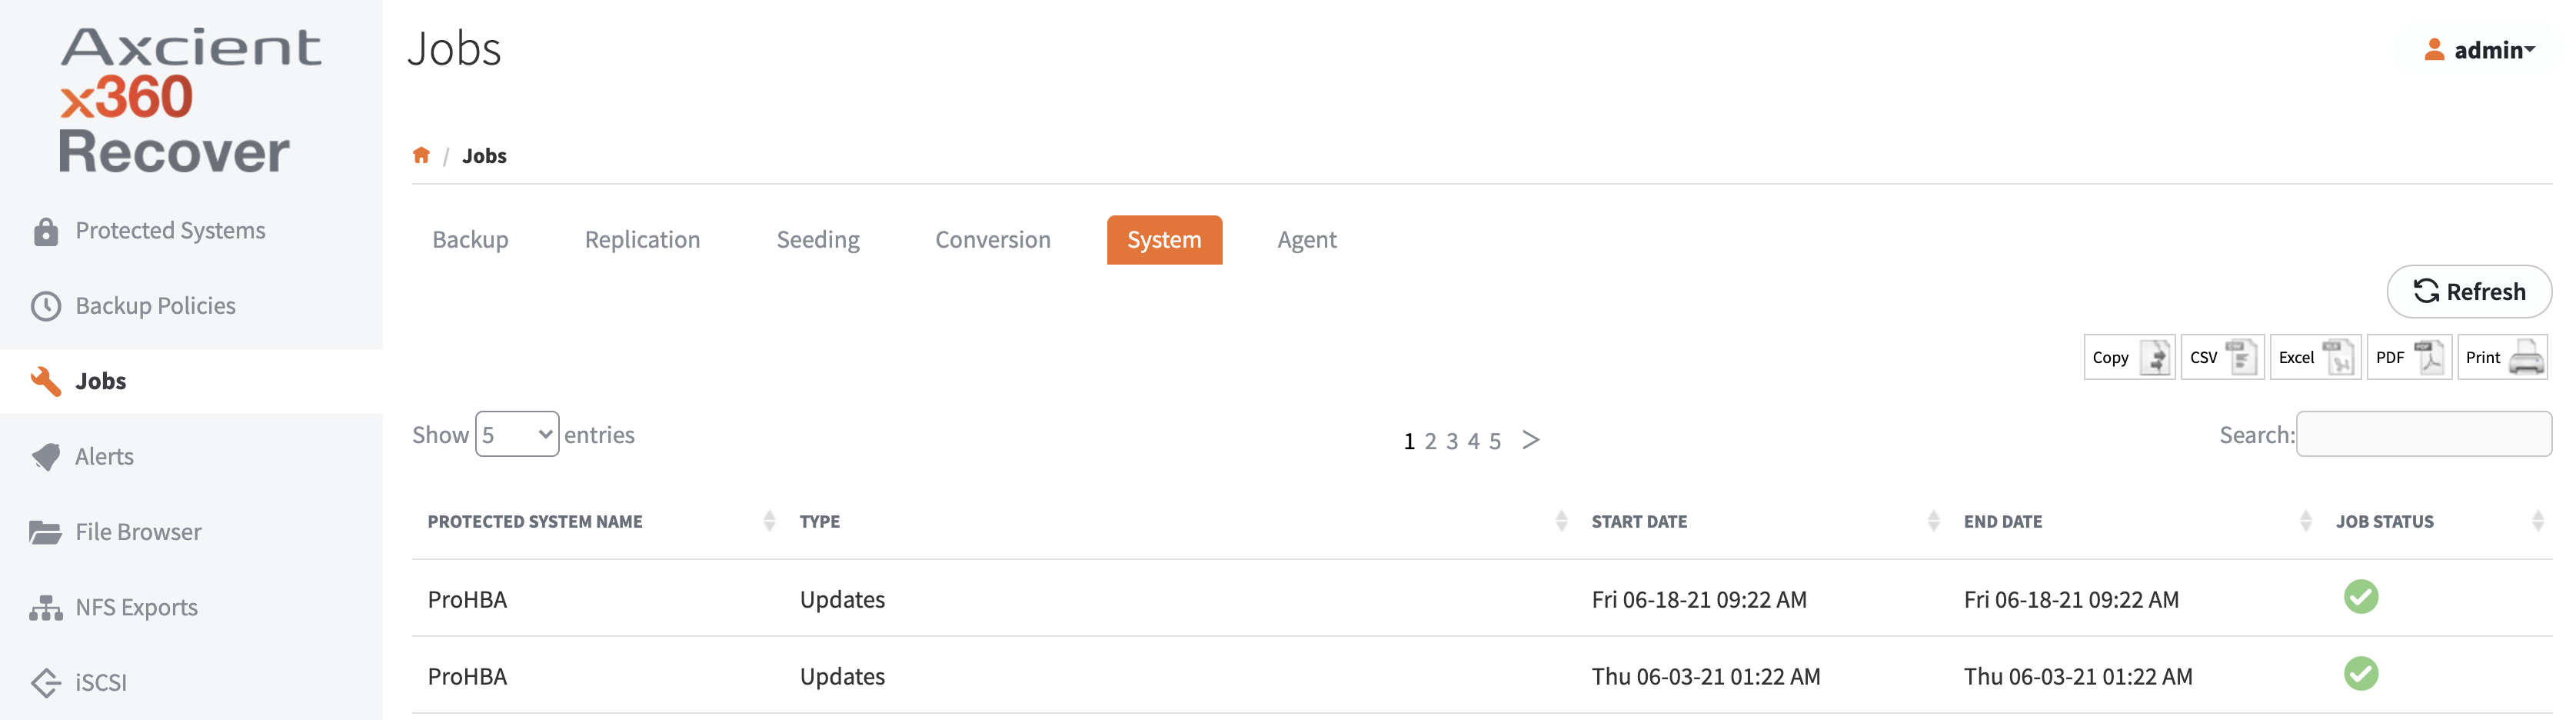
8. To monitor the import process, click the Jobs tab in the left menu and then click the System tab at the top of the page.
 9. Verify the import process was successful and that the protected system is listed on the Protected Systems page.
10. Repeat these steps for each protected system.
Step 3, Option C: Recover from a self-hosted vault using a USB
You can also recover from a self-hosted vault using a USB device.
Warning: Perform recovery on only one protected system at a time.
How to recover from self-hosted vault with a USB device
1. Attach a USB device to the vault.
2. Log in to the vault web interface.
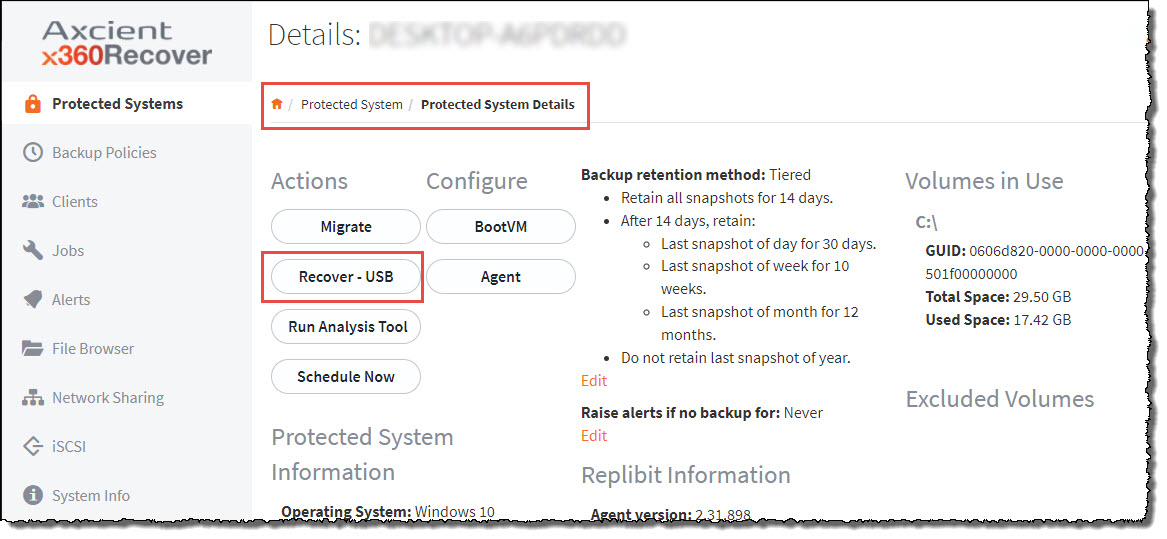
3. In the left navigation menu, click the Protected System tab.
4. Click on the name of the protected system you want to recover.

5. In the Protected System Details page, click the Recover – USB button.
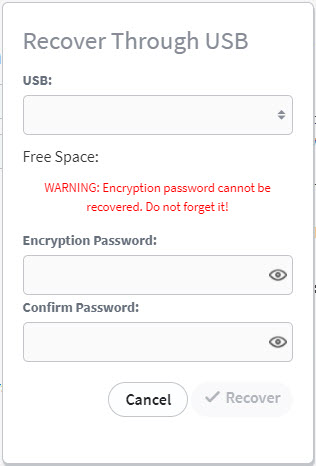
6. In the Recover Through USB pop-up window, select the USB mount point and then configure an Encryption Password.
Do not lose this encryption password.
Axcient cannot recover this password. If it is lost, you will need to request a new USB Recovery device.
7. Click the Recover button when you are finished.
8. To monitor the import process, click the Jobs tab and then click the System subtab.
9. When the recovery process completes, attach the USB device to the appliance.
10. Log in to the appliance web interface.
11. In the left navigation menu, click the Protected Systems tab.
12. In the Protected Systems page, click the Import button.
13. In the Import Protected System pop-up window, select the USB device, the Protected System, and the Encryption Password when prompted.
14. Click the Import button when you are finished.
15. To monitor the import process, select Jobs in the left navigation and then click the System tab at the top of the page.
 16. Verify the import process was successful and that the protected system is listed on the Protected Systems page.
17. Repeat these steps for each protected system.
Step 4: Verify backups and reconfigure replication
After the recovery process is completed, you will need to
- Re-enable the agent services
- Check that new backups are being performed correctly to the appliance
- Verify replication settings
It may be necessary to manually reconfigure replication for the protected system up to the vault if the original replication settings were unrecoverable.
How to enable agent services
1. On each protected system, launch Windows Services.
2. Right-click the x360Recover Agent Service and select Properties.
3. In the Startup Type drop-down menu, select Automatic and click OK to save your settings.
4. Find the x360Recover Agent Service, right-click the service, and select Start.
5. Log in to the appliance web interface and verify that all protected systems have registered with the appliance.
a. Click the Protected Systems tab and verify that the protected system is listed.
Note
If the protected system is not listed, check the aristos.log file within the agent installation directory on the protected system for errors.
6. Verify that backups and replication have resumed:
a. Click the Jobs tab to verify that a full backup is in progress. Incremental backups will resume as well.
Note
The x360Recover agent should immediately begin a full scan of the protected system; however, only incremental changes will be stored to the appliance.
b. Click the Schedule tab to verify that the schedule has been imported correctly.
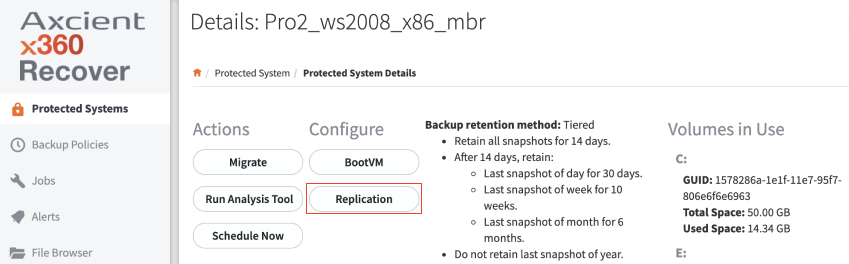
c. Click the Protected System tab in the left navigation and then click name of the appropriate System Name.
d. In the Protected System Details page, click the Replication button and verify that replication has been imported correctly.
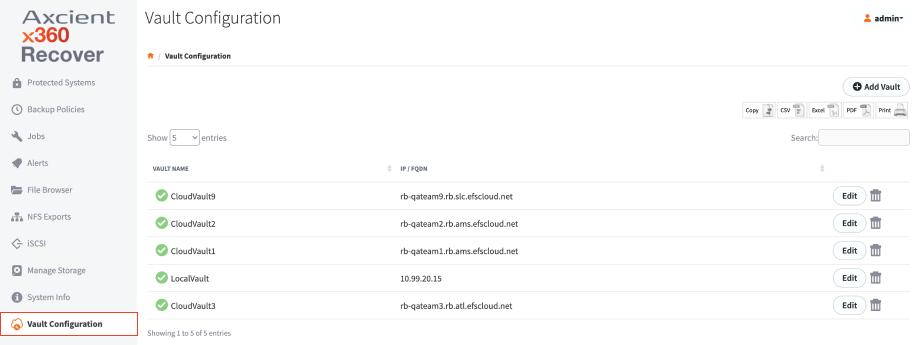
e. If applicable, click Vault Configurations on the left navigation to create a vault schedule. You can then return to the Protected Systems Details page and enable replication to the vault.
After the recovery process is complete, the appliance will perform a full backup of the protected system during the next backup cycle.
When the full backup is complete, incremental backups and replication will automatically start as well.
Note
The full backup will be de-duped and only changed data will be sent to the appliance and replicated to the vault.
Recover a domain controller
If you are restoring a Domain Controller, you will need to perform additional steps when booting for the first time after recovery. Simply restoring a Domain Controller to an earlier point in time is insufficient, as the directory is replicated to multiple Domain Controllers and time-stamped with a serial number to identify the latest version.
For example, on the first boot after recovering the Domain Controller, you will need to press the <F8> key and then choose Directory Services Restore Mode from the boot menu. You will also need the original Directory Services Restore Mode Administrator password created when this server was promoted to a Domain Controller. If the Customer does not have this password, contact Microsoft for support.
How to recover Active Directory objects
1. On the first boot after recovering the domain controller, select <F8> and then choose Directory Services Restore Mode from the boot menu. You will need the original Directory Services Restore Mode Administrator password created when this server was promoted to a domain controller. If the customer does not have this password, contact Microsoft for support.
Important: If you allow this domain controller to boot normally before performing the following actions, Active Directory will be overwritten by replication from other Domain Controllers, and you will have to perform the server recovery again to gain access to the historical directory data.
2. Log in as Administrator and open an elevated command prompt.
Important: Please verify that time, time zone, and date are correct on the server before proceeding. Incorrect time settings can cause USN Rollback corruption of the Active Directory being recovered.
3. Open a Command Prompt and perform the following steps:
-
- First, connect to the Active Directory Database in Restore Mode, run:
- Ntdsutil
- activate instance ntds
-
authoritative restore
- To restore the entire Directory run:
-
restore database
-
restore database
- To restore a particular Directory tree or Organizational Unit run:
-
restore subtree <Distinguished Name>
For example: restore subtree dc=nwtraders,dc=com,ou=boston - To restore a specific Directory Object or User run:
-
restore object <Distinguished Name>
For example: restore object dc=nwtraders,dc=com,ou=boston,cn=bsmith
-
restore object <Distinguished Name>
- Repeat to restore additional subtrees or objects.
-
restore subtree <Distinguished Name>
- First, connect to the Active Directory Database in Restore Mode, run:
4. When you have recovered the objects or directory trees you wish to restore, type quit and then press Enter in the NTDSUTIL console.
5. Repeat until back at the command prompt.
6. Reboot the server into normal mode.
7. Complete any remaining recovery steps, like changing drive letters, assigning correct IP addresses, hardware detection and driver discovery, and so forth.
8. Use Active Directory Sites and Services to force replication with all Domain Controllers and verify that your changes have been successfully applied.
SUPPORT | 720-204-4500 | 800-352-0248
- Contact Axcient Support at https://partner.axcient.com/login or call 800-352-0248
- Have you tried our Support chat for quick questions?
- Free certification courses are available in the Axcient x360Portal under Training
- Subscribe to Axcient Status page for updates and scheduled maintenance