
What is local cache for D2C?
Local cache for D2C is a cornerstone component of Axcient’s x360Recover 'no-hardware' business continuity and disaster recovery (BCDR).
Local cache for Direct-to-Cloud (D2C) is an encrypted, compressed, and deduplicated database containing block storage for your D2C protected systems.
When enabled, local cache for D2C greatly accelerates the recovery of D2C-protected systems by eliminating the need to download bulky data from the cloud.
- Local cache's copy of unique data blocks from the backup agent provides fast, real-time recovery and virtualization without a hardware backup appliance
- Local cache data can be (a) stored on a directly-attached USB device for a single protected system or (b) shared by protected systems on a network or NAS device
Local cache for D2C features: [ Agent 2.33]
- Fast, efficient compression and deduplication of data storage across one protected system (or many)
- Automatic data verification
- Automatic self-healing of missing blocks
- Automatic trimming of data with multiple options to specify retention settings
- Health status reporting and scoring reported to the vault and
- Health status reporting and scoring visible on the Protected Systems Details page
Planned enhancements
- Local cache for D2C health status will be visible in x360Recover Manager and incorporated into the health status determination metrics for each protected system
So, what does local cache for D2C do?
When enabled, local cache for D2C greatly accelerates the recovery of D2C-protected systems by eliminating the need to download bulky data from the cloud.
The local cache repository contains all block data from your recent backups. When performing a recovery, the local cache repository provides you with that data locally (so you don't have to download that data over the internet.)
- When performing a recovery, you can access the Axcient Recovery Center attached to a local cache, and then quickly perform local file and folder recovery, export virtual disks in numerous formats or even directly virtualize a protected system on a local Hyper-V host.
- Local cache for D2C can also be used by the Bare Metal Recovery tool to directly image a bare hardware system from your cloud backup - at speeds comparable to recovery from a local appliance.
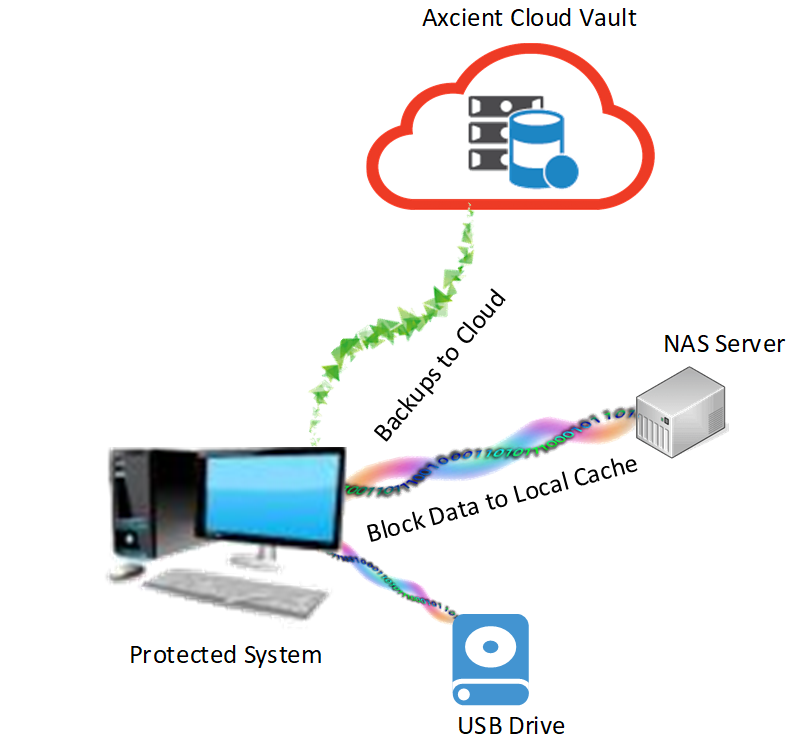
All backup data is sent to the cloud vault with each backup job. The cloud vault contains all metadata about the backups, including recovery points, volumes, disk topology, etc.
A copy of the actual data blocks for each volume is also sent to the local cache. Note that the local cache does not contain any metadata about backups or recovery points. Local cache is strictly a "big bucket of block data" that can be used to avoid downloading backup data from the internet during a recovery.
Local cache contains 64K data blocks that are globally unique, deduplicated within the database, and indexed by hash keys. Hash keys for a given recovery point are retrieved from the cloud vault during recovery and are then used to look up data in the local cache.
Note: You can configure local cache to a single target. The single target can be either (a) a locally attached USB device or other local hard drive, or (b) a network share. Network share targets can be shared by multiple protected systems, and all data stored within the local cache will be globally deduplicated. This provides a slight improvement in overall storage efficiency.
Supported operating systems
Local cache support is limited to the following operating systems:
- Windows Server 2008 R2 and newer server operating systems
- Windows 8 and newer desktop operating systems
- Any supported Linux operating system
Note: Local Cache is specific to image-based backups and is not supported for file and folder only backups of macOS devices.
Local cache for D2C can be configured to store data on either (a) locally-attached storage such as a USB drive or (b) on a network share.
Limitations
Local cache requires approximately 1GB of RAM per 4TB of local cache storage used. (This RAM is used to maintain the key index.)
For the x360Recover agent 2.x version ( a 32-bit application) the maximum local cache size is approximately 12TB. (The maximum memory which a 32-bit process can address under Windows is 3GB.) This size limit applies to the total size of the local cache, including all data for all protected systems that might be sharing the cache, across all recovery points.
Local cache for D2C recommends extended hardware CPU instruction set support for encryption and hashing functionality.
Instructions suggested for best performance:
- SSE2
- SSE3
- SSE4.1
- AES
- AVX
To support these instructions, your CPU must be an Intel Broadwell design or newer, or the AMD equivalent, circa 2011.
| Note: Agent 2.34 and newer support automatic failback to software implementation of encryption. Although hardware CPU support is no longer required, please note that performance will be degraded slightly when using software implementation. |
How to enable local cache
|
Note: There are many settings and parameters you can adjust for local cache. However, simply turning it on is all that is necessary to enable the default behaviors. To turn local cache on, you'll need to by provide a path, (and user credentials, if you are using a network-shared location). Instructions are below: |
We recommend managing local cache settings from the web interface on the vault.
1. Login to the Axcient x360Portal.
2. Click Launch on the x360Recover tile.

3. On the left navigation panel in x360Recover, click on Vaults

4. When the Vaults page opens, click on the desired vault.

5. When the desired vault opens, scroll down to the Protected Devices section and click on the desired Device Name:


7. Within the Agent Configuration dialog, expand the Local Cache Settings:
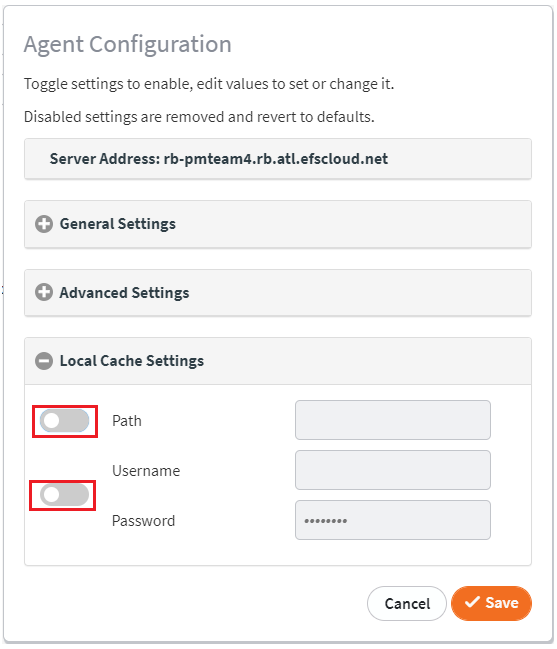
8. Click the toggle to enable Path and enter a path to the local cache. The path is relative to the protected systems being configured.
- Locally attached disks must have a path beginning with a drive letter, like Z:\LocalCache
- Network shared folder paths must use a UNC path, like \\Server\Share\LocalCache
IMPORTANT NOTE: You cannot use a mapped drive path to reference a network shared folder path for local cache. This is because while your users may have a drive mapping for G:\ attached to \\Server\Share\LocalCache, the Axcient agent service does not log in as a user and has no access to network drive mappings.
- For directly-attached local cache path locations, user credentials are irrelevant and are not necessary.
- For network-shared local cache path locations, user credentials are mandatory and must be provided. When configuring a network share for local cache, (a) click the toggle to enable username and password then (b) enter the credentials of a user account with read/write permissions to the Network Share location.
Note: Usernames are expected to be in Windows domain format.
- For a ‘local’ user account (native NAS users for example) enter a simple username, i.e. ‘LocalCacheUser’
- For Windows Domain account users, enter a fully qualified domain account, like ‘MyDomain\LocalCacheUser’ or ‘LocalCacheUser@MyDomain.local’
9. Click Save.
10. Once the agent configuration job completes, schedule a full backup (if one has not already started.) A full backup is required for the local cache to save the metadata.
You can verify the agent configuration job status on the Jobs -> Agent page.
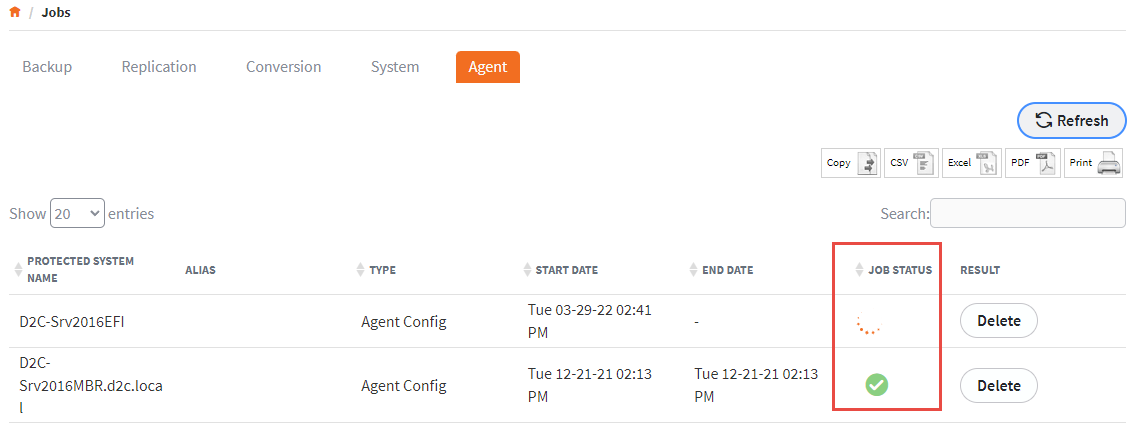
Note: With agent 2.33 and newer, local cache credentials are validated during the agent configuration job. If invalid credentials are entered, the agent configuration job will fail.
Can multiple protected systems share the same local cache?
A local cache repository can be configured to be shared by multiple protected systems.
- Each protected system will independently perform verification and trimming operations during their backup cycle.
-
During verification, each protected system will validate that the block data it needs for recovery is present within the local cache. If the needed data is not found, blocks will be added during the next backup. Block data is globally deduplicated, so any identical blocks present on multiple protected systems will only be stored once in the cache
During trimming, each protected system will perform trimming at the end of each backup cycle. Trimming settings for all configured protected systems should be set consistently.
For example:
- Three systems share a local cache
- One system has LOCAL_CACHE_MIN_FREE_SPACE_PERCENTAGE=25
- Two systems have LOCAL_CACHE_MIN_FREE_SPACE_PERCENTAGE=15
- The cache will be trimmed back to 25% free space whenever that system performs a backup.
What are default local cache behaviors?
The x360Recover agent strives to achieve default behaviors that are applicable to most use cases - without requiring additional configuration changes.
When enabled, local cache uses the following settings and default behaviors.
Behavior during local cache backups
During each backup operation, the local cache database is opened. Data changes are written to the local cache.
The backup agent uses various mechanisms to determine which blocks on each volume might have changed since the last backup.
- All blocks identified as potentially changed are scanned during the backup and compared (independently) against both the backup server and the local cache.
- Only data changes not already present on the backup server are sent to the cloud vault
- Only data changes not already present in local cache are written to the local cache.
For example, perhaps only a small portion of a 64K block of data may have changed. Only those changed bytes will be sent over the wire to the cloud vault. However, the entire block will likely be sent to local cache, because any changes within a block will yield a different hash key for that block.
Conversely, perhaps this block already exists in the local cache. This could happen because another protected systems has a block with the same data (such as a Windows system file, for example). In such a case, the data changes would be sent to the backup server, but nothing new would be written to the local cache.
Be aware that both the backup server and the local cache streams share a common transmission queue. This means that BOTH processes need to complete before the backup job is completed. For example, if there is more data to be written to the local cache than to be sent to the vault, local cache writes will likely fill the queue. This means the backup data transmission will have to wait for available queue slots during the backup (and vice versa)
Behavior during local cache errors
If errors occur when writing to local cache during a backup, the default behavior is to log a warning and otherwise ignore the error.
Other configuration options exist: you can to force the agent to ‘log the event as an error and continue’ or ‘log an error and fail the backup’. We do not recommend either of these options because a few missing blocks within the cache is trivial, and any large number of missing blocks will be reported and self-healed later. (See local cache verification below)
- Local cache errors can occur if you have intermittent connectivity to a shared local cache location (such as a laptop that travels outside the office periodically.)
- Local cache errors can also occur when a storage device is experiencing hardware problems (or is nearly full.)
Local cache errors will be re-tried during a backup. Because failing local cache writes can delay completion of a backup, further re-tries will be aborted (after a maximum number of re-tries has occurred.) This helps to avoid affecting the overall backup completion time.
Important note: It is not necessary for all block data to be present in local cache for you to effectively perform a recovery. This is because any missing block data will be automatically and seamlessly retrieved from the cloud vault during the recovery operation.
- If relatively small amounts of data are missing (for example, if a backup is taken while a laptop is out of the office), you will generally notice little impact in recovery times.
- If large amounts of data are missing, you may experience extended recovery times when using this snapshot. Local cache verification is designed to periodically check the full contents of the cache and refresh any missing data to avoid this circumstance.l
[See Local cache verification for D2C for more details]
Local cache verification is a process which checks all data on the protected systems against the contents of the local cache repository. Any missing data is then flagged for inclusion during the next backup.
- Because verification of very large protected systems can take some time (potentially hours, in extreme cases), verification runs asynchronously from backups.
- If a new backup is scheduled to occur while verification is running, verification is paused while the backup is performed and then resumed afterward.
- Verification runs at the lowest CPU and IO priority allowed by the operating system, so it should never interfere with the performance of your protected systems.
What happens If any blocks of data are found to be missing on any volume during verification?
- A missing block bitmap file will be generated and saved in the agent directory.
- During the next backup, this bitmap will be included in the list of blocks that ‘might have changed’ to ensure that missing blocks are sent to the cache during the backup.
- If more than 1% of blocks are found to be missing from the cache, the backup status is considered Failed. Cache status is sent to the backup server at the end of the verification process.
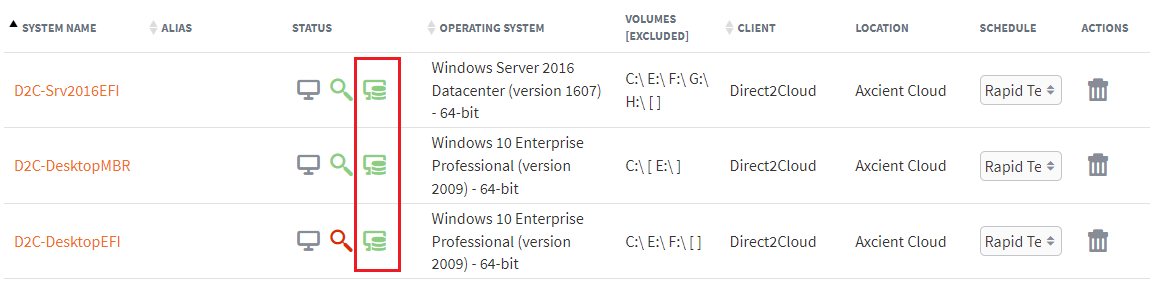
Basic local cache status can be found on the Protected Systems page under the icon in the Status column. Hover over the STATUS icon for a brief text description of the status.
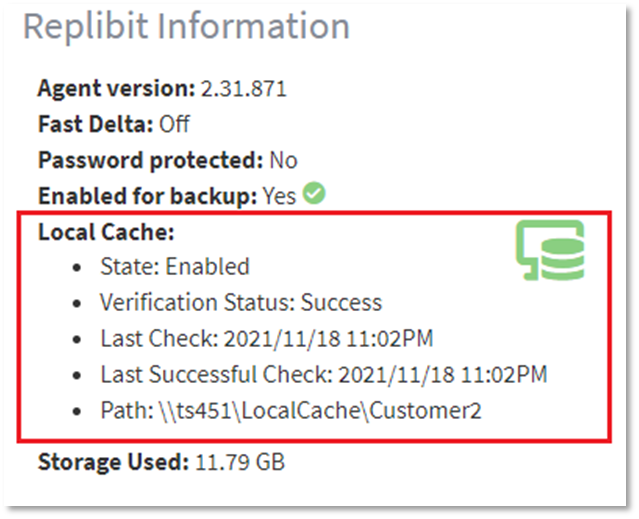
More details about local cache configuration and status details can be found on the protected systems Details page.
Local cache verification is enabled by default in agent 2.32 and newer.
Planned enhancements: Management of verification controls within the vault UI will be included in a future release of x360Recover. Additional settings will be added to the agent configuration button within the protected systems Details page.
Understanding local cache verification frequency
NOTE: The following configuration information is provided for reference only. We recommend that you accept the default behavior of local cache verification (performed once every 24 hours.)
- By default, local cache verification is performed once every 24 hours.
- Verification is triggered at the end of a backup cycle. If no verification has been performed in more than 24 hours (and no verification job is currently running), a new verification job will be started.
|
Local cache verification frequency can be configured by setting: LOCAL_CACHE_VERIFY_FREQUENCY_HOURS=<Hours> This metric defaults to 24 hours if nothing else is specified and cannot be set to less than 1 hour or to more than 720 hours. |
Understanding local cache verification and business hours
By default, a new local cache verification job can be started during the assigned customer's business hours.
The agent determines business hours in one of two ways:
If the agent is configured with an advanced backup policy job schedule on the server, the business hours defined within that job determine when business hours are in effect for the agent
If the agent is configured with a 'classic' backup policy job schedule on the server (and no explicit business hours schedule exists), business hours are defined internally as M-F from 8:00 AM to 6:00 PM
How to exclude local cache verification during business hours
Verification is an extremely low priority background job and is expected to have no noticeable performance impact on any system.
However, if you find it necessary to explicitly exclude verification during business hours, there is a configuration option available to address this. It is essential that verification be allowed to run periodically, however, so if times outside of business hours are not available, we will trigger jobs (eventually), as necessary.
Only new verification jobs are blocked from starting during business hours.
Verification blocking during business hours
There is a minimum delay period when we will accept blocking of verification during business hours. After that minimum delay period expires, the verification block is overridden and a verification is forced. This minimum delay defaults to 27 hours.
Notes:
- Using the combined settings for default verification frequency and minimum blocking delay, it is possible to create settings with a maximum of 51 hours since the last verification attempt occurs and before the next verification is run again.
- If verification fails, the self-healing feature should repair the missing blocks on the next backup. However, the status of the local cache displayed on the vault UI will not be updated until the next verification cycle completes.
- Once a verification job is started, it will run to completion regardless of business hours.
Example:
- A verification job is triggered after the 7:00 AM backup prior to business hours starting.
- When the 8:00 AM backup occurs, verification is paused while the backup is performed.
- When the backup is completed, the previously running verification job will be resumed even though it is new within the business hours’ time window.
|
Local cache business hours handling can be configured by setting: LOCAL_CACHE_VERIFY_ALLOW_DURING_BUSINESS_HOURS=<True|False> This metric defaults to True if not specified LOCAL_CACHE_VERIFY_BUSINESS_HOURS_MIN_DELAY=<Hours> This metric defaults to 27 and can be set to any integer value >= 1 |
What is local cache trimming?
Local cache trimming identifies ‘older’ blocks and and purges them from the local cache. This ensures that all storage space is not fully consumed in the local cache repository.
During the verification process, the time stamp on every block in the local cache on the protected system is updated. This time stamp determines which blocks are considered older than others.
Of course, protected systems might all have different backup schedules and different verification times. Due to the complexity of supporting multiple protected systems within a single local cache, it is not safe to assume we can delete blocks not seen in only a relatively few number of days.
So, local cache trimming is hard coded to prevent removal of any block data less than two (2) days old - regardless of any other factor.
The agent defaults to a value of 168 hours for minimum trimming age. To specify a new value add the following parameter to the agent configuration file:
LOCAL_CACHE_TRIMMING_MINIMUM_AGE_HOURS=<hours>
IMPORTANT NOTE: If the local cache device is too small to store at least two (2) days of block data, that device will be filled to capacity and trimming WILL NOT remove the data. The default minimum age is 168 hours (7 days) so by default the agent will not remove any data from the cache that has been actively detected by the agent within the last 7 days. This minimum age value can be set as low as 48 hours (2 days) but no lower.
Local cache trimming is enabled by default with agent 2.33 and newer
How is local cache trimming controlled?
You can specify how local cache trimming is performed and you can also define the thresholds when data will be pruned from the local cache.
- Local cache trimming is checked at the end of every backup cycle. Note that all backup changes will be written to the local cache first, during the backup, and then cache trimming will be performed afterwards.
- If the storage used by the local cache is sufficient to trigger any of the configured trimming mechanisms, then a cleanup will be performed. This will reduce the used storage below the configured threshold.
- Blocks stored within the local cache are indexed by date and will be removed, one by one, from oldest to newest, until either (a) the configured threshold is achieved or (b) no blocks remain that are less than two (2) days old.
NOTE: The following configuration information is provided for reference only. We recommend using the default behavior of local cache trimming at this time (which will maintain 15% free space on the local cache device.)
Planned enhancements to local cache trimming: Management of trimming controls will be included in a future release of x360Recover, with additional settings added to the agent configuration feature within the protected systems Details page.
Define percentage of free space remaining
The default method of local cache cleanup is based on the free space remaining on the local cache path.
- By default, local cache trimming attempts to maintain a minimum of 15% free space on the target device.
- If less than 15% of the target device is free, blocks will be removed from the local cache until sufficient free space is achieved.
|
Percentage of free space remaining can be configuring by this setting in Aristos.cfg LOCAL_CACHE_MIN_FREE_SPACE_PERCENTAGE=<percentage> This metric cannot be disabled. Valid values are integers ranging between 1-95 and represent the percentage of total space of the local cache volume to try to maintain free. |
Define a maximum cache size
- This option is not enabled by default.
You can specify a maximum amount of storage space which the local cache is allowed to consume in GB.
If total storage size for the local cache exceeds your specified amount, blocks will be purged from the local cache until the used space is equal to 95% of your specified limit.
NOTE: If the specified maximum storage amount is found to be insufficient to store at least two (2) days of block data, then blocks less than two (2) days old will not be purged, even if the device runs out of space.
|
Maximum cache size can be configured by setting: LOCAL_CACHE_LIMIT_GB=<GB> This metric has no default value and is not enabled by default |
Define a maximum age
- This option is not enabled by default.
Similar to setting a backup retention policy to retain a certain number of days of backups, this option aims to retain only block data that is not older than a specified number of days.
- At the end of each backup cycle, all blocks within the cache which are older than the specified age will be purged.
Note: This value cannot be set to less than the minimum trimming age + 1 day (Eight (8) days by default.) If this value is found to be set to less than the minimum value, it will automatically be removed from the configuration and disabled.
|
Maximum age can be configured by setting: LOCAL_CACHE_TRIMMING_MAXIMUM_AGE_DAYS=<days> This metric has no default value and is not enabled by default. |
Local cache size considerations
Local cache has a maximum total size limitation of about 12TB.
- To reach 12TB, the protected system running the agent must have 3GB of RAM free just for the local cache index, plus additional RAM for the agent operations.
Although you are allowed to configure multiple systems to share the same local cache database (thereby saving overall disk space via deduplication across systems), you may find it desirable in some cases to configure individual local cache locations for each protected system — particularly if you are trying to limit RAM use during backups.
How to recover with local cache
|
Axcient's Recovery Center allows you to:
|
| Axcient's Bare Metal Restore tools ISO provides the tools for you to perform complete system image recovery of your cloud protected systems. Note: Bare metal restore requires either a local cache or a Virtual Disk Image export to recover a protected systems from the cloud. |
|
IMPORTANT NOTE: Local cache is not an independent local backup of your protected system.
|
How to monitor local cache reports
Local cache status is reported on the protected systems Details page on the vault, as well as in the Protected System page in x360Recover Manager.
How to read local cache reports
Local cache reports
Scan results from local cache verification are sent to the backup server for reporting.
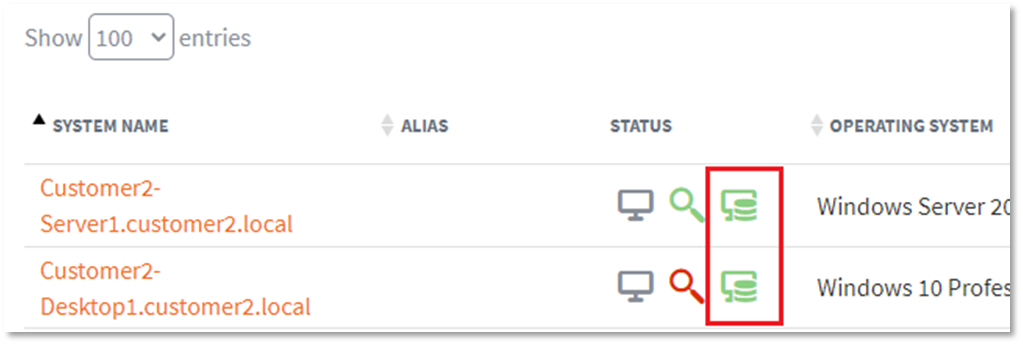
The results of the latest local cache verification are displayed on the Protected Systems page in the Status column.
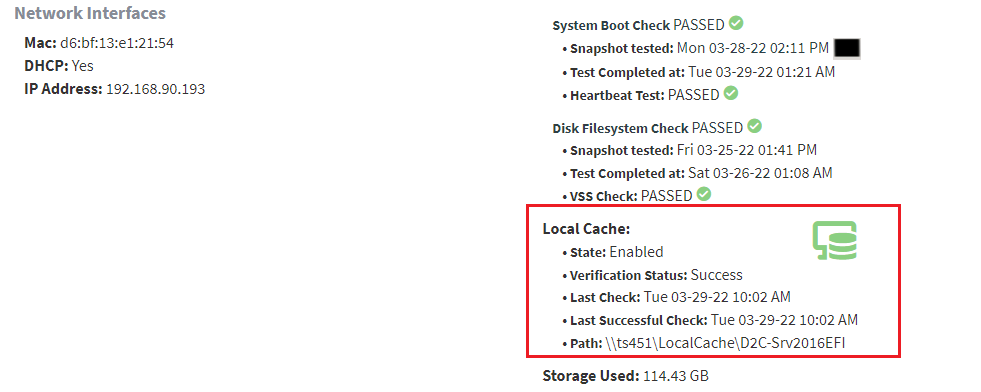
Additional details about the local cache verification are displayed on the Protected System Details page.
What do the status icons mean?
 |
Green indicates that local cache testing passed successfully |
 |
Yellow indicates that local cache testing has passed successfully in the past, but the most recent successful test is greater than 48 hours (up to 72 hours) longer than the scheduled testing interval. (After 72 hours, the status is elevated to red.) |
 |
Red indicates that the most recent local cache test failed. More than 1% of total data blocks on the protected system were not found in the local cache. Missing blocks should be pushed into the cache on the next backup and the next local cache verification test should then be successful. |
 |
Gray indicates that (a) local cache is not enabled for this system, or (b) local cache verification testing has not yet been performed.
Note: It can take up to 24 hours after a backup completes for the local cache status to be updated. If your backup completes and the local cache appears to be populated, but the icon is still grey, this is only a concern if it has been more than 24 hours since the backup completed with the cache configured. |
How to troubleshoot local cache issues
- If the local cache is being reported as Failed, check the aristos.log file in the agent installation directory and look for error messages associated with ‘Local Cache’.
A variety of problems can occur to make the local cache unusable.
Below are some examples and steps to take to remediate common issues.
How to troubleshoot local cache by status
 |
Local cache is disabled |
The status icon will be gray if you have not yet enabled local cache for your Direct-to-Cloud (D2C) endpoints (or if local cache verification has not yet been run).
- D2C is intended to leverage local cache. Enabling local cache allows you to perform rapid recovery and virtualization using Recovery Center and provide the full 'no-hardware BDR experience' to protected systems. If you have not yet configured local cache for your endpoints, please follow the instructions at the top of this article describing how to do so.[ see Enable local cache]]
-
If you have already configured local cache and are receiving a gray icon, verify that the agent installed on the end point is version 2.31.877 or higher.
Note: It can take 24 hours after a backup completes for the local cache verification status to be updated. If your backup completes and the local cache appears to be populated, but the icon is still grey, this is only a concern if it has been more than 24 hours since the backup completed with the cache configured.
 |
Local cache warning: The most recent successful test is 48-72 hours older than the configured verification testing frequency. |
A yellow status icon indicates that (a) at least one successful local cache verification test has been performed in the past, but (b) the most recent successful test is 48-72 hours older than the configured verification testing frequency.
Example: The default testing interval is every 24 hours. A yellow icon indicates that the most recent successful test is at least 72 hours old (but no more that 96 hours old.)
There may either be no more recent test attempt, or the most recent attempt may have failed. If the most recent successful test is greater than 72 hours + testing frequency hours old, the status will be elevated to failed
 |
Local cache failed: More than 1% of the total data blocks were found to be missing from the cache during the verification run and/or the last successful test is more than (72 hours + testing interval) hours old. |
A red icon indicates that the local cache is considered to be in a failed state.
If more than 1% of total data blocks were found to be missing from the cache during the verification run and/or if the last successful verification is more than 72 hours + testing interval hours old, the local cache is considered to be in a failed state.
- Check to make sure the local cache storage device is accessible and not out of storage space.
- Contact Axcient Support for additional assistance in troubleshooting local cache failures
How to use local cache log files
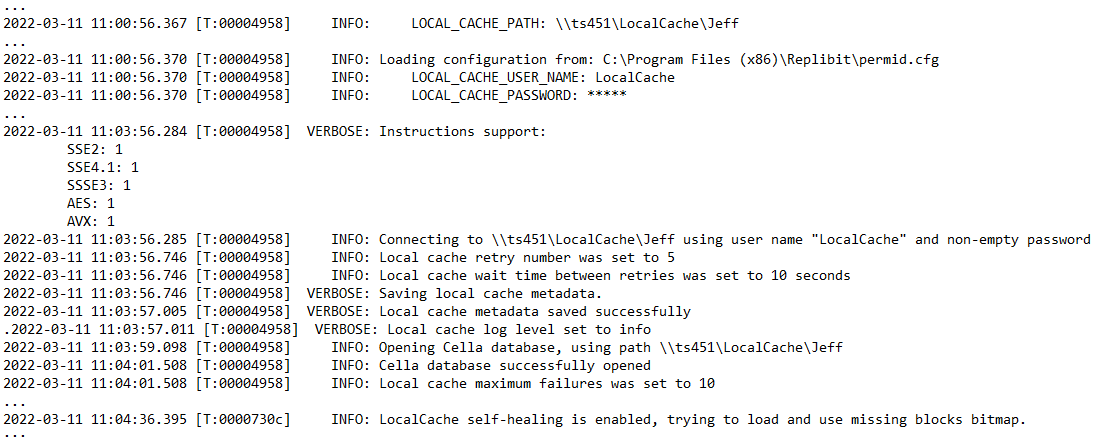
Local cache operations are recorded in aristos.log during each backup.
Errors related to accessibility, read/write issues, bad credentials/path, corrupted cache database issues, and other error types will all be found in aristos.log.
- Search aristos.log for ‘cache’ to find log entries like these:
(Only partial log entries are shown as examples below)
How to use local cache verification log files
Local cache verification is logged separately in local_cache_verification.log.
- Errors, cache status verification, and verification job-related scheduling will be found in local_cache_verification.log
(Only partial log entries are shown as examples below)
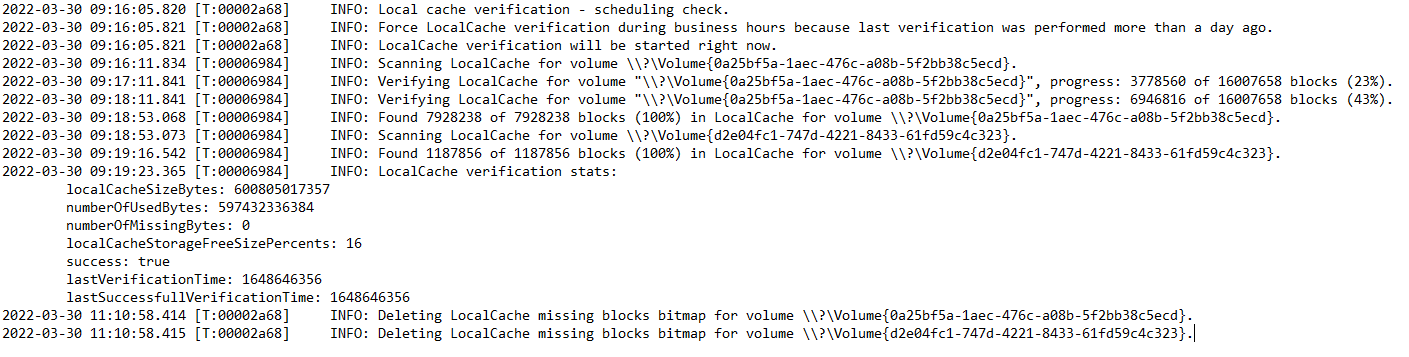
A verification check that has run will look like this:
A verification check that has been skipped will look like this:

How to troubleshoot a local cache with multiple open superblocks
If the local cache runs out of space during a backup, the agent may be unable to close a full superblock when opening a new superblock. Having multiple open superblock files will result in an error in the agent logs, which prevents writing new data, block trimming and validation of the cache.
To remedy a broken cache with multiple open superblocks, the simplest solution is to delete the cache contents and let the agent rebuild the cache via self-healing.
1. Delete the contents of the local cache repository folder
2. Delete the file local_cache_verification_stats.json in the agent installation folder
3. Perform a new incremental backup of the protected system
4. Repeat steps 2 and 3 for any other agents configured to use the local cache repository
After the backup completes, the agent will perform an immediate verification of the cache and create a bitmap of missing data. The next incremental backup will rebuild the missing data in the cache
DeleteHow to troubleshoot a local cache with an empty superblock folder
In rare cases, there may only be enough space on the cache volume to create a new superblock folder, but insufficient space to create the new superblock file.
This will result in an empty folder in the cache directory.
There is a current bug that prevents writing further data to the cache when an empty folder exists.
To resolve this issue, you must free space on the cache volume and delete the empty folder.
Note: If there is no easy way to free space from the cache volume by deleting unrelated files, you can randomly delete some or all the existing cache files and folders and rebuild the cache by following the steps above to self-heal the repository.
DeleteHow to troubleshoot an agent that is unable to open a cache file
Various problems can occur to make the cache file inaccessible. (The files could have become damaged or corrupted for example.)
In most cases, the only way to resolve a totally corrupted local cache is to delete the files and rebuild the cache data via self-healing.
DeleteUnderstand verification and trimming of local cache
Local cache is an encrypted, compressed, and deduplicated datastore containing a copy the unique blocks of data encountered by each of the x360Recover agents participating in the local cache store.
By enabling the agent to generate and maintain a local cache, recovery of data for Direct-to-Cloud deployments can be greatly accelerated by eliminating the need to download most of the recovery data from the cloud; Recovery is performed using the locally available block data within the cache repository.
For details on how to enable and configure a cache repository, see Local Cache for Direct to Cloud.
How does verification work?
By default, when local cache is enabled, the agent performs a validation of the local cache repository once every 24 hours.
During the verification process, the agent uses the hash index from the most recent backup to inspect the cache and verify that a block is present in the cache matching each key in the hash.
If more than 0.1% of hash keys are missing, then the cache verification is considered failed.
Also during the verification, the agent makes a record of any hash keys that were found missing and creates a bitmap of missing data that will be collected and applied during the next backup operation. This process allows the agent to self-heal any missing data within the cache in a short amount of time.
To prevent the local cache from growing infinitely larger over time, with each backup cycle a cache trimming operation is performed to remove old and stale data.
There are several different types of trimming threshold controls that can be configured to meet different partner needs, but the basic default operation is to attempt to keep at least 15% free space on the target local cache storage volume.
Trimming rules are checked and evaluated at the end of every backup. If the data contained within the local cache repository exceeds any of the specified trimming thresholds, then data will be removed to reduce the storage usage below the configured threshold(s).
Delete- - - > Why Is my local cache full? Isn’t trimming working?
Local cache is designed to allow multiple protected systems to share the same data repository and globally deduplicate identical blocks of data across all systems.
Multiple protected systems may have different backup schedules and/or may be offline on different schedules. This makes it vital that the local cache retain a minimum number of days of data, in order to prevent the trimming process from removing currently-required backup data belonging to another system.
By default, the agent will not remove any data that has been actively registered as ‘current’ on any protected system using the cache within the last seven (7) days. Only data older than seven (7) days can be deleted. In Agent 2.37 and newer this restriction can be configured to be as low 48 hours (2 days.)
To change the default trimming restriction, add the following configuration parameter to the aristos.cfg file in the agent installation folder:
LOCAL_CACHE_TRIMMING_MINIMUM_AGE_HOURS=<hours>
where HOURS is an integer value like 72, for example.
Note: Entering an invalid value will cause the agent to default to 168 hours (7 days)
Delete- - - >How to troubleshoot trimming settings
The amount of new data waiting to be written to the queue may be larger than the configured trimming free space.
This is especially possible when you are adding a new system to the local cache or when you are rebuilding the cache after it has been offline for some time.
Trimming does not occur until AFTER the backup. This means there must be sufficient free space on the cache volume to allow the backup to complete. Trimming will take place AFTER the backup and will return free space back to the volume (if possible)
Here are some options to adjust local cache trimming thresholds. Set one or more of these options by adding the configuration parameter to aristos.cfg in the agent installation folder:
Note: Multiple trimming threshold options may be set concurrently. Whichever one is triggered will be the one used set the storage threshold.
LOCAL_CACHE_MIN_FREE_SPACE_PERCENTAGE=[1-99] (in Percentage)
This value is present by default whether it is included in aristos.cfg or not. If not defined, this value defaults to 15%. This means that the agent will always try to maintain at least 15% free space on the local cache volumes, based on the total volume size.
Note: This value is always present. If you wish to use another threshold option to override to a setting LESS than 15% free space, you must explicitly set this value in aristos.cfg as well.
LOCAL_CACHE_LIMIT_GB=[Integer] (in GB)
This parameter tells the agent to limit the total size of the local cache to a fixed size in GB. This number must be an integer (such as 60) and cannot be a fractional value (such as 60.5)
LOCAL_CACHE_TRIMMING_MAXIMUM_AGE_DAYS=[Integer] (in Days)
Some partners have expressed a desire to limit the cache contents by a maximum number of days (similarly to how their backup retention thresholds are maintained.)
Setting this option tells the agent to purge data older than the specified timeframe in days. Other threshold options, notably
LOCAL_CACHE_MIN_FREE_SPACE_PERCENTAGE
may purge data younger than what is specified by this threshold option.
DeleteIs it okay to purge and rebuild a local cache?
Yes, it is!
The local cache is a convenience- and not a critical component of the backup.
Local cache contains only a copy of the block data, not the actual backup itself.
The sole purpose of a local cache is to accelerate recovery of a protected system whose primary backup is located remotely in the cloud. Recreating a fully healthy local cache can be accomplished in as little as two backup cycles, so for the uncommon cases where your local cache has experienced a problem, it is relatively simple and quick to rebuild the data repository.
DeleteCan multiple protected systems share one local cache?
A local cache repository can be configured to be shared by multiple protected systems.
- Each protected system will independently perform verification and trimming operations during their backup cycle.
-
During verification, each protected system will validate that the block data it needs for recovery is present within the local cache. If the needed data is not found, blocks will be added during the next backup. Block data is globally deduplicated, so any identical blocks present on multiple protected systems will only be stored once in the cache
During trimming, each protected system will perform trimming at the end of each backup cycle. Trimming settings for all configured protected systems should be set consistently.
For example:
- Three systems share a local cache
- One system has LOCAL_CACHE_MIN_FREE_SPACE_PERCENTAGE=25
- Two systems have LOCAL_CACHE_MIN_FREE_SPACE_PERCENTAGE=15
- The cache will be trimmed back to 25% free space whenever that system performs a backup.
SUPPORT | 720-204-4500 | 800-352-0248
- Contact Axcient Support at https://partner.axcient.com/login or call 800-352-0248
- Free certification courses are available in the Axcient x360Portal under Training
- Have you tried our Support chat for quick questions?
- Subscribe to the Axcient Status page for updates and scheduled maintenance
1318 | 1326 | 1372 | 1423 | 1581 | 1835 | 2034