This article walks through launching a protected system as a virtual machine from an appliance or VMware.
Looking for information on launching from x360Recover Manager and/or using Virtual Office? See our Virtual Office section here.
Before you begin with VMs
For fast local recovery of a server or workstation, a virtual machine allows you to host a server or critical workstation directly on the BDR while you rebuild or replace the original hardware.
Live mode best practices
When performing any recovery operation, the device creates a clone of the selected snapshot.
When you select Live mode, the generated snapshot clone is marked as persistent; you will not be able to delete the clone, or the original snapshot, until the persistent snapshot is manually removed (you will need to contact Axcient Support for assistance).
- Snapshots that have a persistent clone on-disk cannot be deleted due to retention cleanup and cannot be manually deleted from the web interface.
- When performing Mount or Export recovery operations, if a persistent snapshot clone already exists, the live mode persistent snapshot will automatically be selected as the target of the operation.
-
Bare Metal Recovery operations automatically select Live Mode iSCSI and create a Persistent Snapshot.
Live mode best practices:
You should perform a recovery of any system running in Live Mode back to physical or virtual hardware as soon as possible. If you plan to run the Virtual Machine in Live Mode, please consider the following best practices:
- In the Virtualization Settings pop-up window, use the Boot Key drop-down menu to select the F8 option. The F8 option will boot the machine in Safe Mode.
-
When you boot in Safe Mode, you can:
- Let the machine drivers load,
- Configure Network Interface Card (NIC) settings, and
- Configure Drive letters.
-
When you are finished, reboot in Normal mode.
A note on billing and auto-discard
Each calendar year, each protected system receives 30 days of free virtualization in a cloud virtual office. (All virtual machines in a test virtual office will be automatically shut off after a pre-defined time period you configure. You can monitor, stop, or extend this automatic VM shutoff date at any time in the Virtual Office (Test) details page.)
For more information on Virtual Office billing, please visit this article.
Support for deployment
It is important to note that limited support is available for deploying a x360Recover device as a virtual machine. Axcient Support will provide support for x360Recover-specific problems only. Support for troubleshooting of performance, deployment, configuration, or other issues related to the hypervisor layer is not available.
x360Recover virtual machines are supported under the following requirements:
- VMware ESXi 5.5 or newer (other hypervisor platforms not supported)
- Intel CPU’s only
- Virtual machines must have CPU enabled passthrough of Intel VT
- 12GB RAM minimum
- 4 CPU cores minimum
- E1000 or VMXNET3 network adapter
- VMware Tools installed (Recommended)
Axcient does not perform rigorous testing of virtual deployments across a wide range of hypervisor major and minor releases. Issues encountered related to specific builds and releases of VMware are beyond the scope of Axcient Support troubleshooting and assistance.
Important:
Axcient x360Recover does not recommend deploying a virtual appliance to the same hypervisor hosts or storage pools as your production servers, as this provides no redundancy between your production systems and backup platform. Be aware that deploying x360Recover as a virtual appliance may have performance limitations compared to deploying on bare metal.
Launch from an appliance or vault
You can start a VM from within an appliance or private cloud vault and boot a protected system from a point-in-time snapshot. This tool is useful for testing purposes, or for emergencies if you need to temporarily access a protected system before it is restored to the replacement hardware.
NOTE: After virtualizing a system in Live Mode, x360Recover will automatically perform a new Full Backup at the next scheduled time in order to synchronize the recovered system with the backup image. This Full Backup will only write changed data, but it is essential to ensure that the Backup Image remains in sync with the Protected System.
How to launch VM
To launch a Virtual Machine:
1. Log into an appliance or private vault through x360Recover Manager. From the Protected Systems page, click into a protected system and scroll to the bottom of the page to view its snapshots.
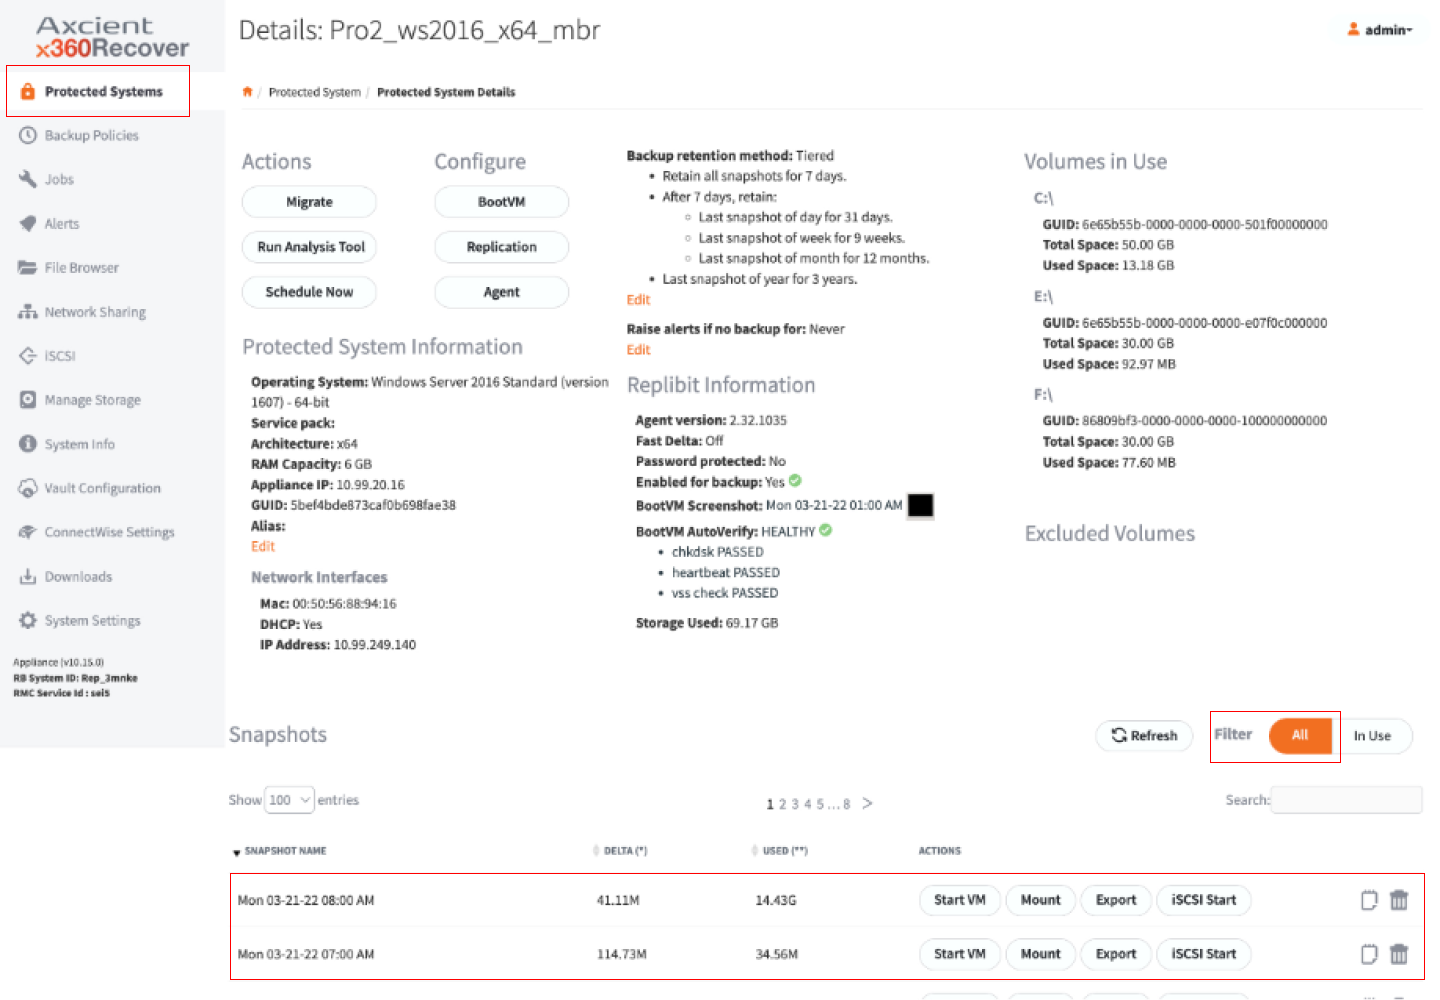 2. Find the correct Snapshot and click the Start VM button.
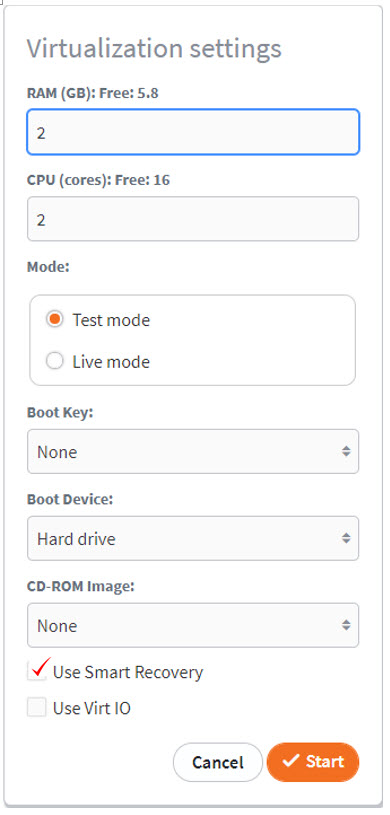
3. In the Virtualization Settings pop-up window, define settings for the VM: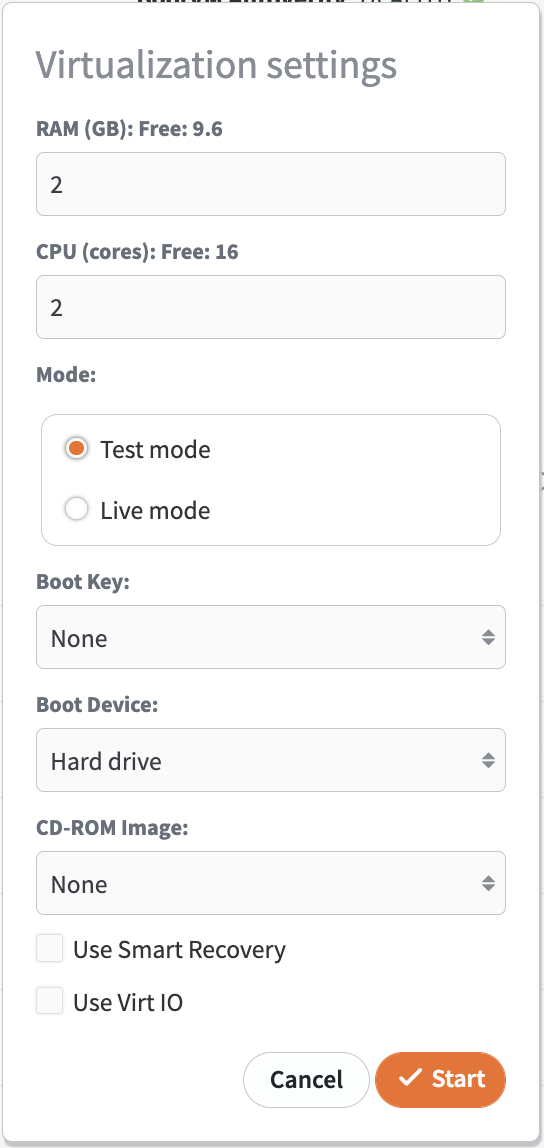
- In the RAM field, enter the amount of RAM that will be available for the VM.
- In the CPU (cores) field, enter the number of CPU (cores) that will be available for the VM.
- In the Mode area, select either Test Mode or Live Mode.
- Test Mode boots the VM in a private network for testing. Any changes made to the VM hard disk images will be destroyed when the system is shutdown.
- Live Mode boots the VM on the same LAN as the web interface. The selected snapshot will be marked as Persistent and any changes made to the VM disk volumes will not be lost when the system is shut down. For more information, please see the Live mode best practices section above.
- If you selected Live Mode, select the appropriate NIC setting.
- Optionally, in the Boot Key drop-down menu, select a key stroke you want sent to the VM, letting you access BIOS or Windows Startup menu during the system boot process.
- Optionally, in the CD-ROM Image drop-down menu, select a Boot Device or CD-ROM Image to allow the protected system to boot from a CD image for diagnostic or testing purposes.
- If you entered an Passphrase when installing the agent, you will also be prompted to enter the password in the Password field.
- Click the Start button when you are finished. The VM will initiate within the web interface.
- When you are finished, close the VM window. If the VM was running in Test Mode, the process is now complete.
4. If you selected to run the virtual machine in Live Mode for production purposes, you will need to recover changes made while the VM was running.
- In the Protected System Details page, find the snapshot you used to launch the VM.
- Select your preferred method of recovery (for example, Mount, Export, iSCSI, and so forth).
- If you select Mount or Export, you will have automatic access to the latest state of the protected system.
- If you select iSCSI or Start VM, select Live Mode to access the latest state of the protected system.
- Recover the data as appropriate and restore to the newly repaired protected system.
Use Smart Recovery
x360Recover Smart Recovery is an enhancement to the virtual disk engine that allows the appliance or vault to return an exact copy of the original disk volume present within the source protected system.
When to use Smart Recovery:
- We recommend enabling Smart Recovery for all BootVM checks to ensure your systems are tested in an environment exactly matching the production protected system.
- We also highly recommend running live recovery virtualization using Smart Recovery. This will retain the original system disk architecture when performing future backups while virtualized.
- The only situation in which Smart Recovery is not recommended is when you find that the system will not boot with it enabled. In such a case, partners are encouraged to contact Axcient support to open an escalation with our development team and help us to resolve any currently unknown issues encountered with Smart Recovery.
How does Smart Recovery work?
With Smart Recovery, the original partition tables and volume topology present on the source protected system can be exactly replicated. This allows the system to return virtual disk images that exactly match the source protected system. Not only are the separate Windows Volumes stitched back together into the correct layout on the virtual disk, but the original partition tables, device headers, and other key information is retained.
The result is that Windows cannot distinguish the drives from the original when launched as a virtual machine. A key benefit of Smart Recovery is that Windows drive letter enumeration is preserved when launching the protected system as a virtual machine.
Enabling the Smart Recovery feature is expected to resolve many problems with virtualization and BootVM check failures that are due to odd partition layouts on protected systems.
Note: Smart Recovery requires extended metadata to be present within the selected snapshot to function. If this metadata is not present, the Smart Recovery option will not be available. All backups taken with agent version 2.25 or newer will contain Smart Recovery metadata.
DeleteHow to use Smart Recovery
Log into an appliance or private vault through x360Recover Manager. From the Protected Systems page, click into a protected system and scroll to the bottom of the page to view its snapshots. Find the correct Snapshot and click the Start VM button.
Set up a virtual machine using Smart Recovery:
 |
Once you have clicked the Start VM button, a popup will appear for Virtualization Settings. 1. Specify the amount of RAM and CPU resources to use. 2. Select Test Mode or Live Mode for the virtualization. 3. Specify the Boot Key, Boot Device, and CD-ROM image locations (all optional). 4. Check the Use Smart Recovery checkbox. Enter the Protected System password (if required) and then click Start. The virtual machine disks will now be constructed using Smart Recovery and begin booting Windows. |
Recover a protected system via iSCSI with Smart Recovery:
You may also select Use Smart Recovery with iSCSI exports for use with bare metal recovery or with raw disk attachments to virtual machine hypervisor host machines.
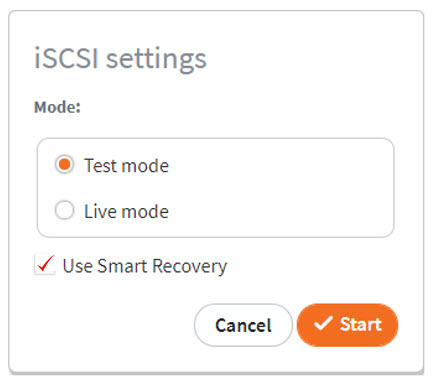 |
1. Select Test Mode or Live Mode 2. Check Use Smart Recovery 3. Click Start Note: Bare metal restore directly supports using Smart Recovery within the Recovery Wizard.
|
Use Smart Recovery with nightly BootVM checks:
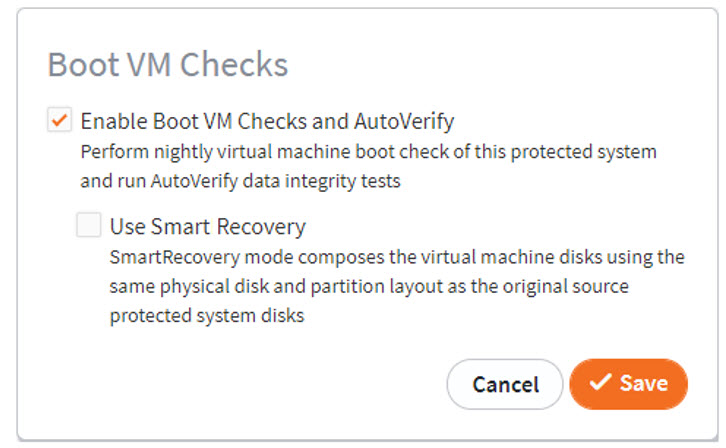 |
Smart Recovery may be enabled when performing nightly BootVM checks with AutoVerify. 1. Click BootVM from the protected systems Details page. 2. Click to enable Use Smart Recovery. 3. Click Save. |
Note: If protected systems are currently failing to perform nightly BootVM Checks properly due to the partition table configure on the source system, it is recommended to try enabling Smart Recovery.
DeleteLaunch x360Recover as VM from VMware
VMware ESXi 5.5 and newer is supported for deploying Axcient x360Recover devices in a virtual environment.
While it may be technically possible to deploy and operate x360Recover devices within other hypervisor platforms, no testing is performed on such platforms and no support from Axcient will be provided for virtual x360Recover devices outside of VMware ESXi.
x360Recover internally utilizes Linux KVM as the hypervisor engine to enable protected system virtualization for boot testing and instant recovery.
Nested virtualization
To operate as a VM, an x360Recover appliance or vault requires support for nested virtualization from the host hypervisor environment to allow for virtualizing systems for nightly boot checks, AutoVerify, and Recovery. VMware ESX 5.5 and newer supports nested virtualization only for Intel processors. AMD-based servers are not supported for virtualizing x360Recover devices.
Prior to deploying x360Recover as a virtual machine, we recommend you schedule a call with Axcient x360Recover Support to assist with the deployment.
| IMPORTANT: Axcient x360Recover does not recommend deploying a virtual appliance to the same hypervisor hosts or storage pools as your production servers, as this provides no redundancy between your production systems and backup platform. Be aware that deploying x360Recover as a virtual appliance may have performance limitations when compared to deploying on bare metal. |
It is safe to deploy your self-hosted management portal as a virtual device provided sufficient resources are allocated to the device. A management portal should have at least 4GB of RAM, and a 100GB operating system disk. Disks may be thin provisioned.
| NOTE: If you make changes to the virtual machine while it is running, you must reboot for the changes to be applied |
How to deploy x360Recover on VMware
Create a new virtual machine guest
Use the VMware stand-alone client (5.5), vCenter, or Web client (6.0+) to create a new virtual machine guest for your x360Recover device. Ensure that you provide the guest with sufficient memory, CPU, and storage resources for the type of x360Recover device being provisioned (appliance, vault, or management portal.)
When creating the virtual machine:
- Choose the most recent Ubuntu Linux operating system available as the target OS.
- Select virtual machine hardware version 9 or higher (if available)
Customize the guest VM
Once the guest VM has been created, it needs to be customized to operate properly as a virtual x360Recover device.
For ESXi 5.5
Use the vSphere client to connect to your vCenter server or directly to a host and configure the guest VM as follows:
1. Edit the settings of the virtual machine.
2. Check the Virtual Machine version and verify that it is set to vmx-09 (ESX 5.1) or higher.
If the version is less than vmx-09, close the edit settings dialog, right click the virtual machine in the left pane and select Upgrade Virtual Hardware.
Navigate to the Options page and select Advanced -> General from the left pane.
Click Configuration Parameters.
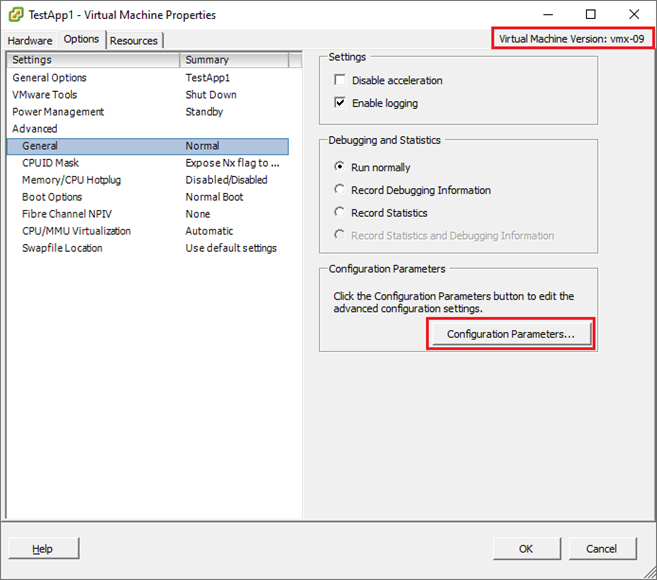
Use the Add Row option to add each of the configuration values below to the machine definition.
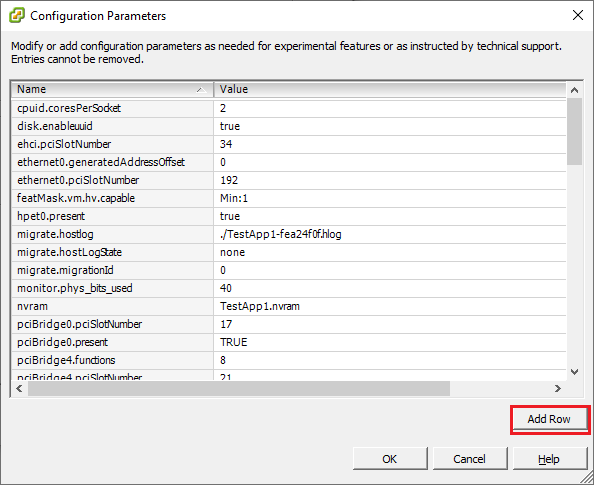
| hotadd = "FALSE" featMask.vm.hv.capable = "Min:1" vhv.enable = "TRUE" disk.EnableUUID = "true" |
Click OK to save changes once complete.
DeleteFor ESXi 6.0+
Use the web client on either your vCenter server or ESXi host to configure the guest VM as follows:
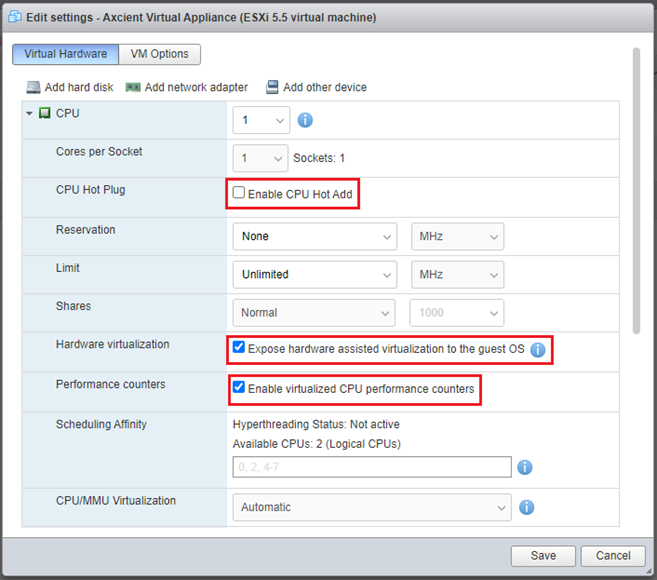
1. Edit the settings of the virtual machine.
- Be sure that Enable CPU Hot Add is not selected.
- Check to select Expose hardware assisted virtualization to the guest OS.
- Check to select Enable virtualized CPU performance counters
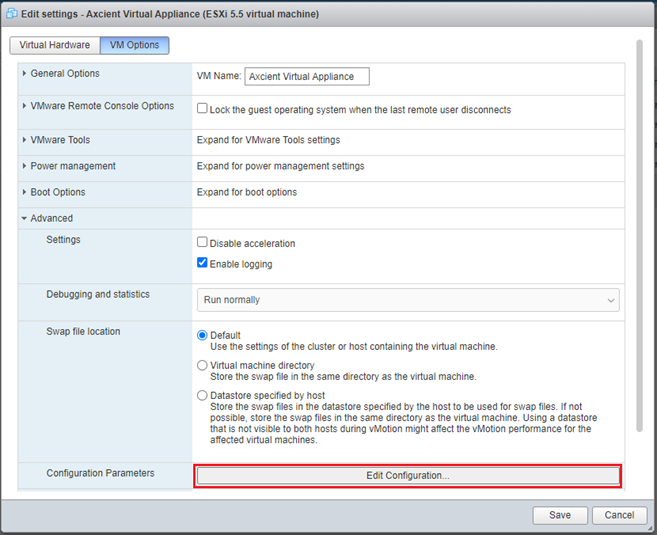
2. Select the VM Options tab and click to expand the Advanced section in the left pane.
Click Edit Configuration.
3. Click Add parameter to add a new line to the list.
Then select Click to edit key name and Click to edit value and enter the following:
| disk.EnableUUID = "true" |
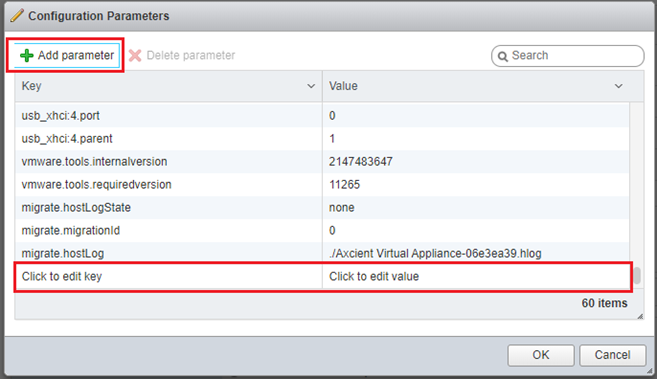
Click OK and then click Save.
4. Install x360Recover onto the guest virtual machine using the latest ISO available from the Axcient Software downloads page.
NOTE: If you make changes to the virtual machine while it is running, you must reboot for the changes to be applied
DeleteVirtual Machine recovery with Azure
x360Recover now supports instant virtual disk exports in Microsoft Azure VHD format.
The feature allows relatively easy virtual machine recovery - directly into Azure from your x360Recover backup data.
Essentially, all you do is export the virtual disk(s) from backup, upload them to Azure, and create a new virtual machine.
How to recover a VM with Azure
STEP 1. Export your protected system disks using Recovery Center
Axcient Recovery Center supports virtual disks for Direct-to-Cloud endpoints using local cache.
Recovery Center can be download from our software download page (or you can download Recovery Center from the Downloads page on your x360Recover appliance or vault.)
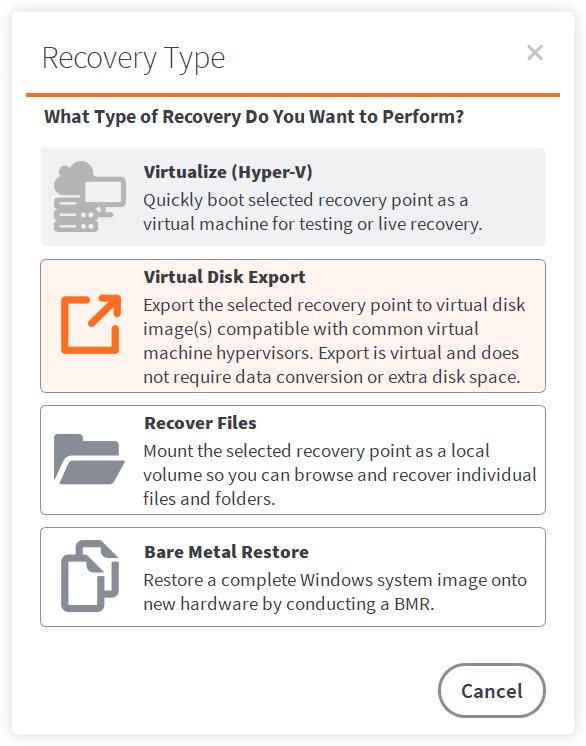
1. Within Recovery Center, start a new recovery.
2. For Recovery Type, select Virtual Disk Export.
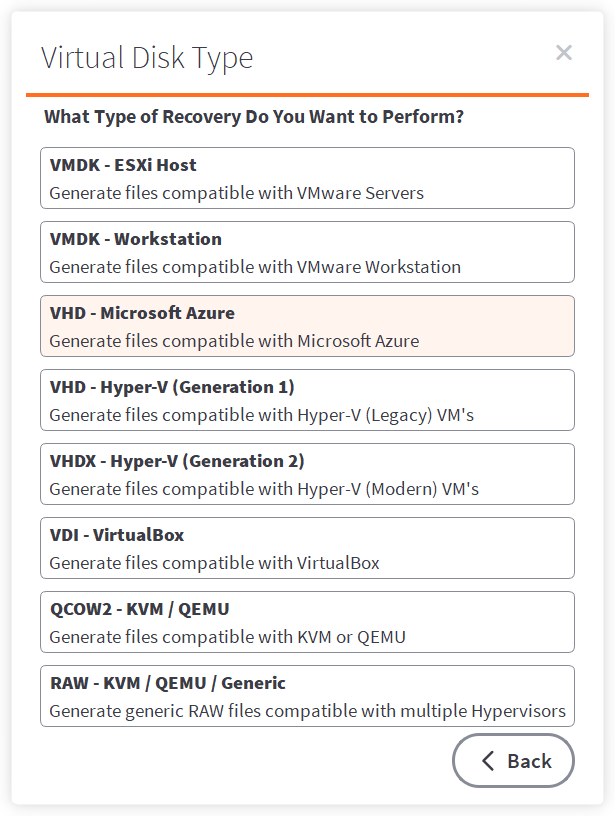
3. For Virtual Disk Type, choose VHD - Microsoft Azure.
You will then select the desired client, data source, (vault) protected system, and recovery point.
Finally, execute the recovery job.
Once the recovery job is running, your VHD disk image is available to be copied or uploaded to Azure.
For more details on using Recovery Center, see Virtual Disk Export with Recovery Center.
Export your protected system disks from the vault
Instant virtual disks exports are available within the x360Recover appliance or vault for all major Hypervisor platforms.
1. Log in to your vault and navigate to the Protected System Details page of the protected system you wish to recover.
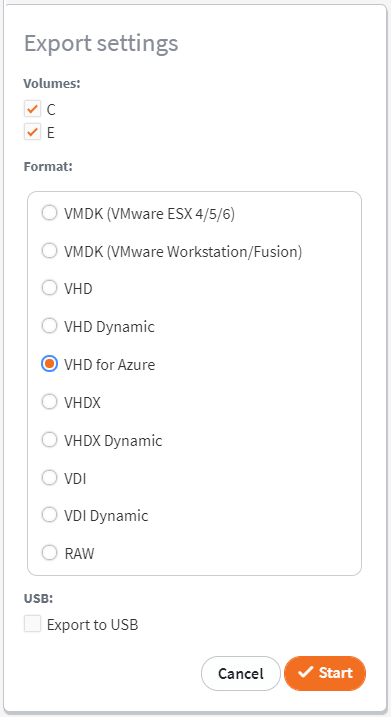
2. Select the desired snapshot recovery point and click Export.
You may optionally choose to include or exclude disks to be exported.
3. Choose VHD for Azure, enter the protected system encryption passphrase if present, and click Start.
Exported virtual disks will immediately be available for download from the File Browser or via FTPS.
For more detailed information on performing exports, see Instant Disk Exports.
For more details on using FTPS, see FTPS for File and Folder Recovery.
Check the virtual disk export
Before uploading the virtual disk to Azure, it is a good idea to verify the integrity of the disk export images.
1. Open the Disk Management utility on the Windows machine.
2. Press the Windows key + R simultaneously to open the run dialog.
3. Enter diskmgmt.msc and click OK.
4. Click Attach VHD from the Action menu and select the exported Azure disk image.
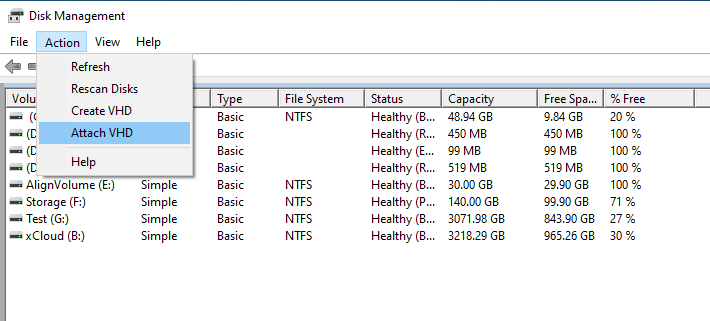
5. Verify the virtual disk mounted, and all volumes are readable by Windows.
Note: Mounted virtual disks are highlighted with a different color within Disk Manager.
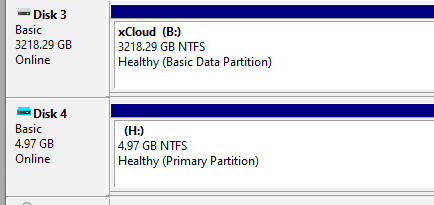
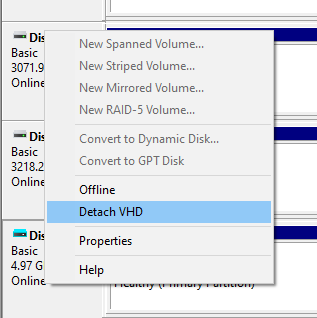
6. Once you have verified the disk integrity, remove the virtual disk from the local system. Right-click the virtual disk and select Detach VHD.
STEP 2. Manually import virtual disks into Microsoft Azure
Once you have downloaded your virtual disks, you need to upload them to Azure and create a virtual machine.
Prepare the Azure environment
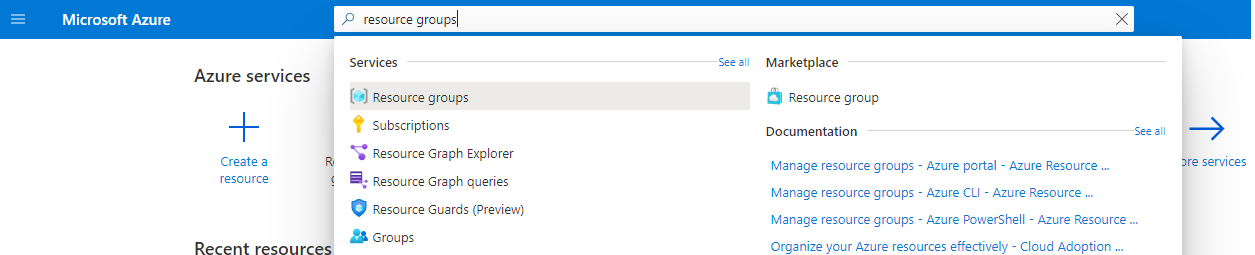
1. Go to https://portal.azure.com/#home
2. Log in with your Microsoft account or common Azure account.
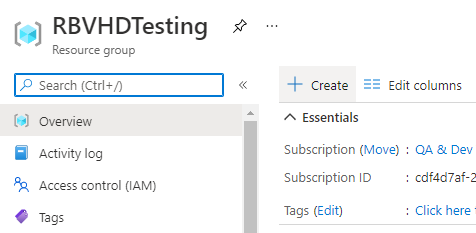
3. Enter ‘resource groups’ in the search bar and click on the Resource Groups service.
4. If you have an existing Resource Group you wish to use for the new virtual machine, select it and skip to #9.
Otherwise, you will need to create a new Resource Group.
5. Click Create.
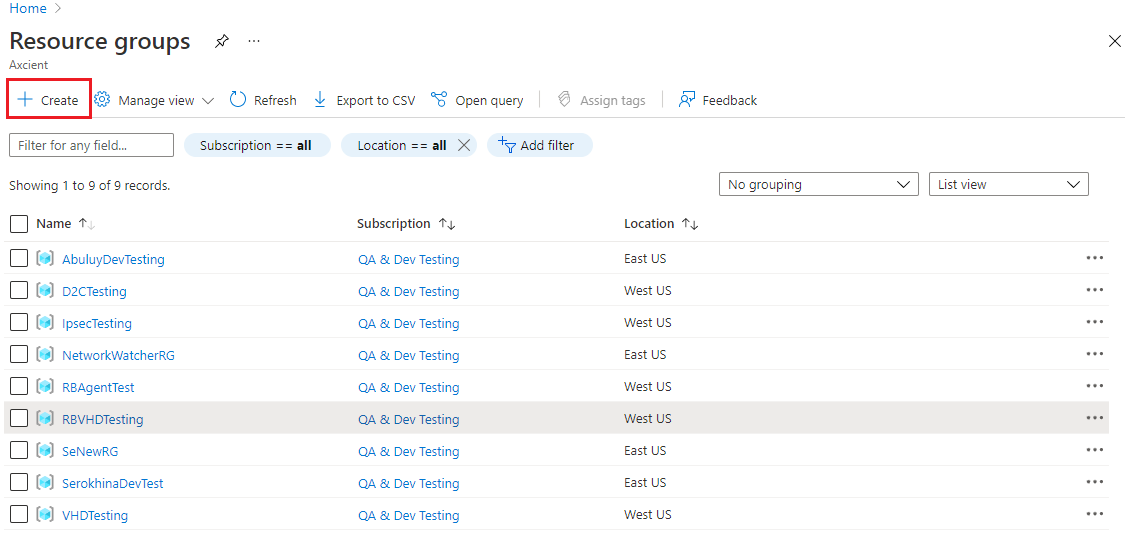
6. Choose the Subscription to which this Resource Group will belong.
7. Enter a name for the Resource Group and select a data center Region.
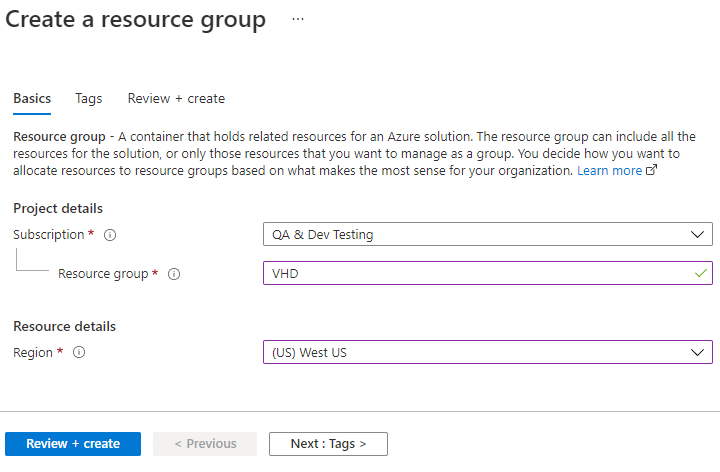
8. Click Review + create. Review the details then click Create to complete creation of the Resource Group.
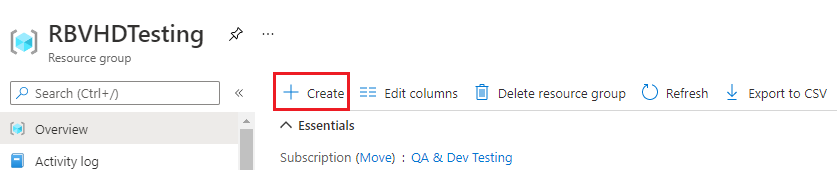
9. Click the name of your Resource Group to open it.
10. Click Create.
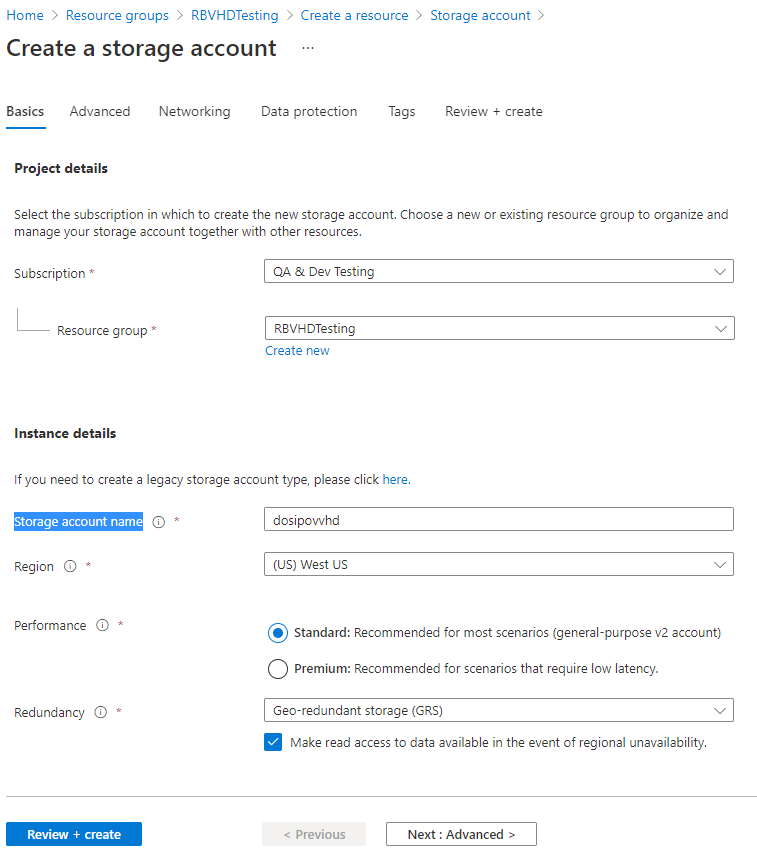
11. Enter ‘Storage Account’ in the search field, then click into Storage Account.
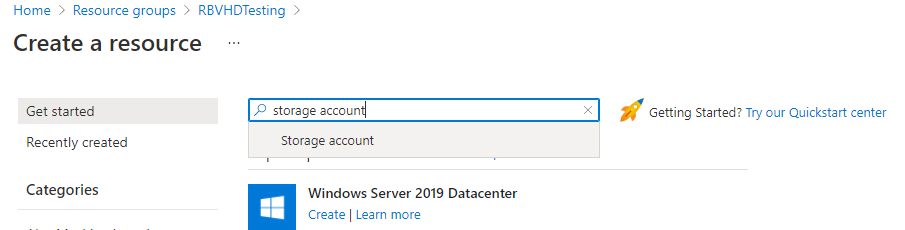
12. Click Create.
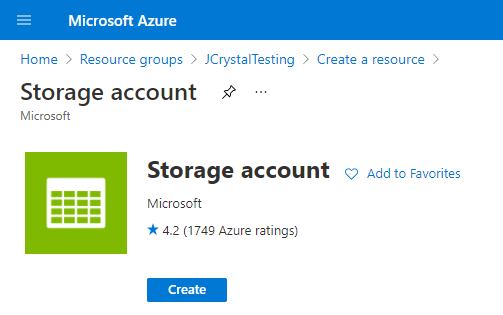
13. Choose a Subscription and Resource group. Enter a Storage account name and select a data center Region. All other settings can remain at their defaults. Click Review + create. Review the selections then click Create.
Note: Deployment of the storage account can take up to 40 minutes.
Upload virtual disk(s) to Azure
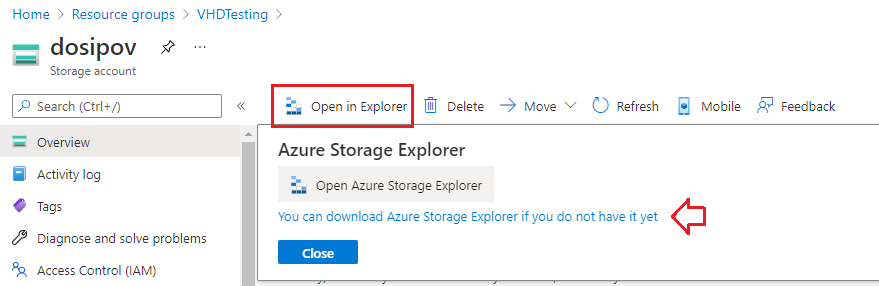
1. Open the Storage Account and click Open in Explorer. If you have not yet installed Azure Storage Explorer, click the provided link to download and install it.
2. Within Azure Storage Explorer, expand your Subscription, expand Storage Accounts, expand the Storage Account you created for this virtual machine, and right-click on Blob Containers. Click Create Blob Container.
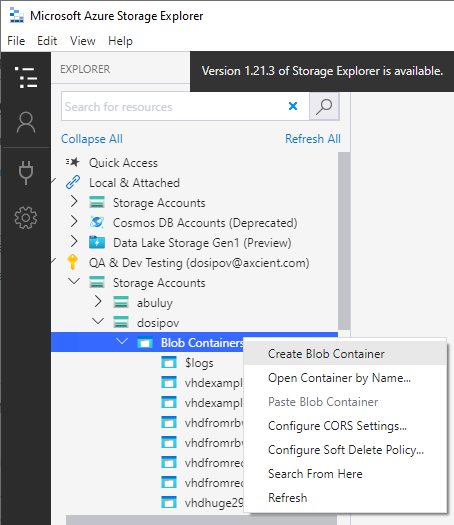
Note: If you don’t see your subscription within Azure Storage Explorer, you may need to sign in. Click sign in from the top toolbar. A new browser window will open for you to sign in with your Azure subscription. When finished, return to Azure Storage Explorer.
3. Click to select your new Blob Container, then click Upload. Click Upload Files.
Note: You can select multiple virtual disks to store all disks in a single blob.
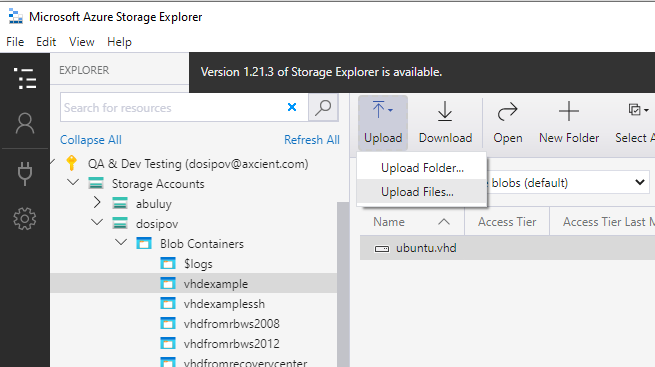
4. Click the Blob type dropdown and select Page Blob. Select your VHD image file(s) and click Upload.
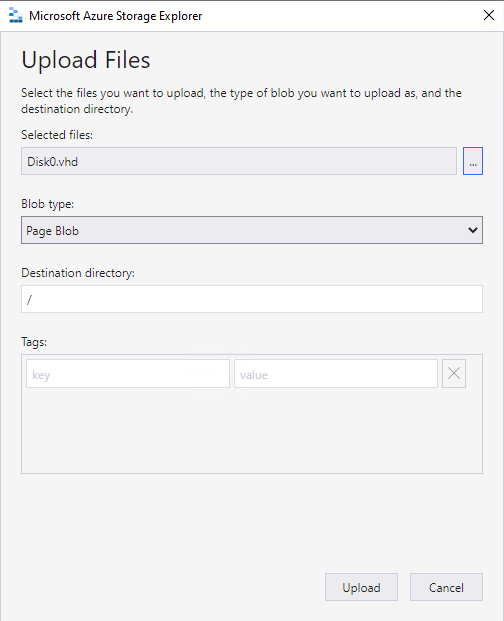
Uploading your virtual disk images may take some time.
Note: If you are uploading a virtual disk image created with Recovery Center, you may have to first set permissions on the file. (Recovery Center exports are set with permissions by default to allow only Hyper-V administrators to access the data.)
- Right-click the file and click Properties. Navigate to the security tab and click Advanced, Permissions, Continue, then Add. Click Select Principle.
- Type 'Users’ and click Check Names, then click OK.
- Select Full Control and click OK.
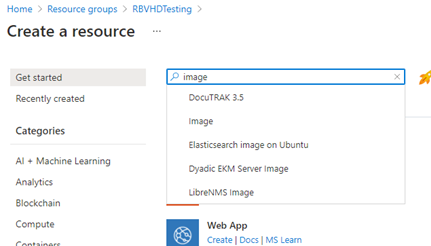
Create an Azure virtual machine Disk Image
1. Log in to Azure and open your Resource Group. Click Create.
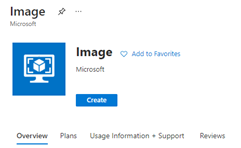
2. Enter ‘Image’ in the search and click to select Image.
3. Click Create.
4. Enter a Name for the virtual machine and select a data center Region.
For OS type, select Windows.
For VM generation:
- For Legacy BIOS / MBR protected systems, select Gen1.
- For Modern EFI protected systems, select Gen2.
Select the Storage Blob containing your protected system boot disk.
For Account type, Standard HDD is recommended.
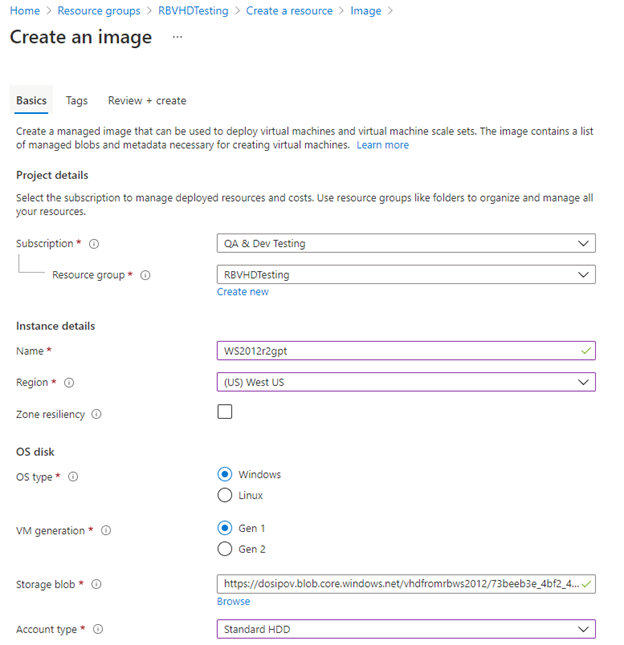
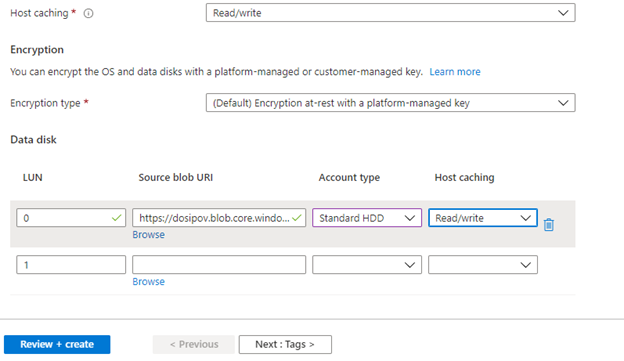
For Host caching, Read/write is recommended.
Select an option for Encryption Type.
If your protected system has additional disks, specify additional disk LUN numbers as needed and select the blob object representing each disk.
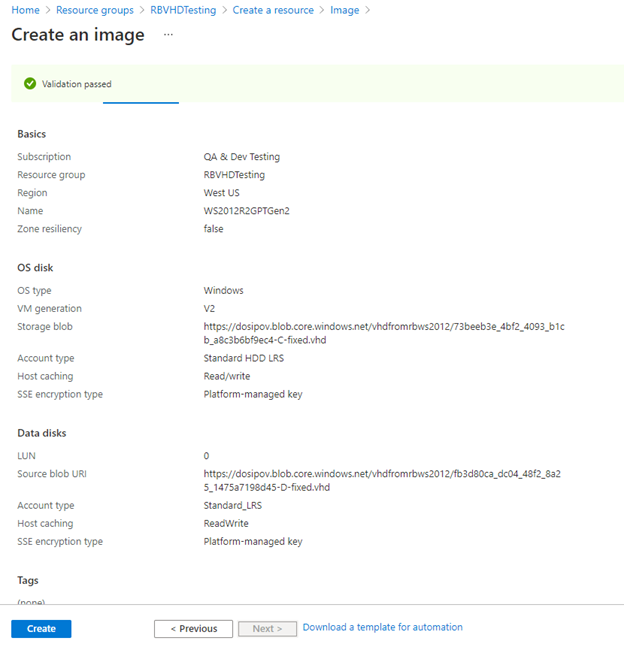
Click Review + create.
5. Review your selections and click Create.
Create an Azure virtual machine (may take up to 30 minutes)
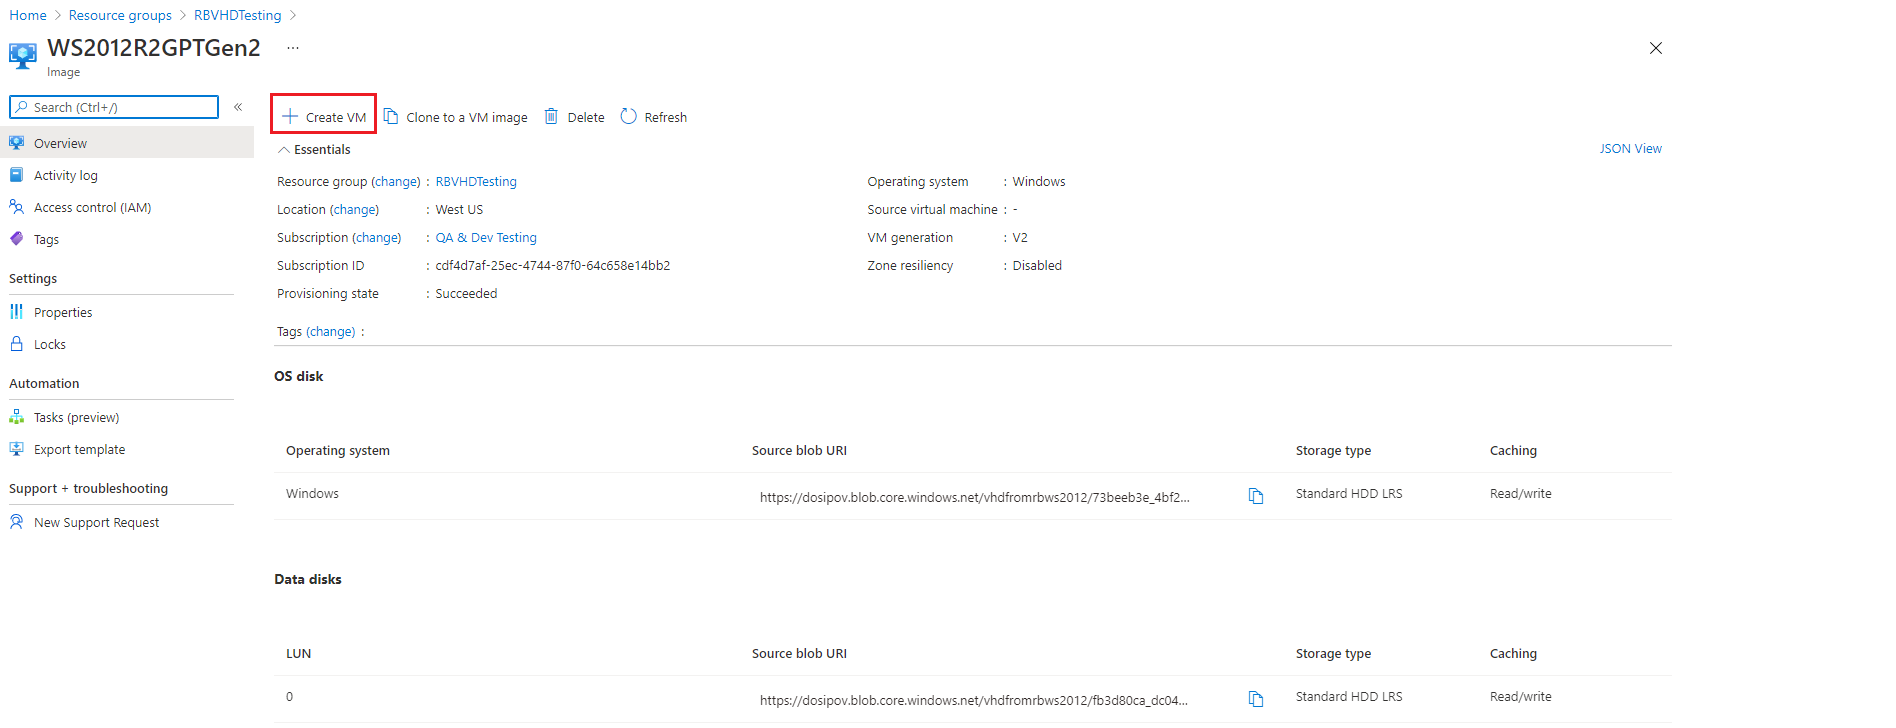
1. Go to your Azure Image and click Create VM.
You may search for ‘Image’, click image, then click your image name to open the Image.
2. Enter a Virtual machine name, choose an Image and a Size, and specify Administrator account credentials.

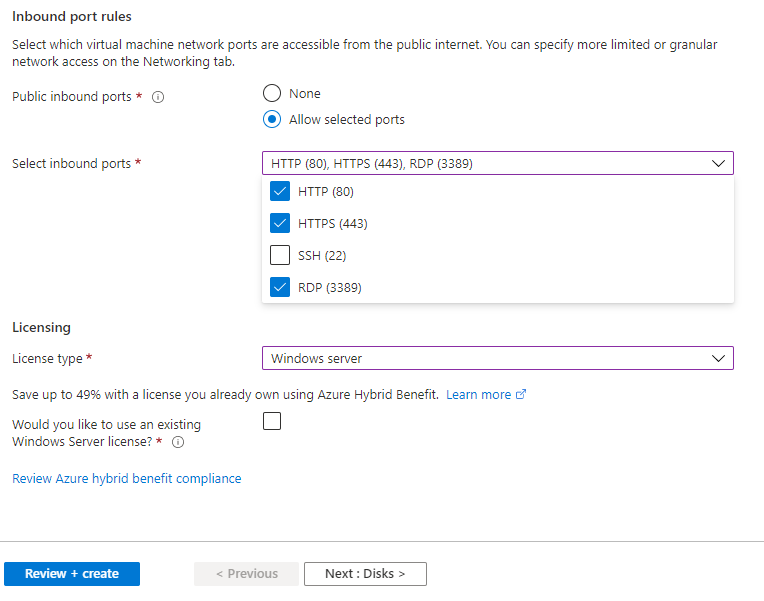
3. Specify firewall inbound ports. RDP is recommended to enable easy remote access to the protected system virtual machine.
Specify Windows OS license type and click Next: Disks >.
4. Specify disk options; you may specify disk types, and add or remove additional disks to the VM if necessary.

On the Management tab, you can also disable boot diagnostics and/or OS updates.

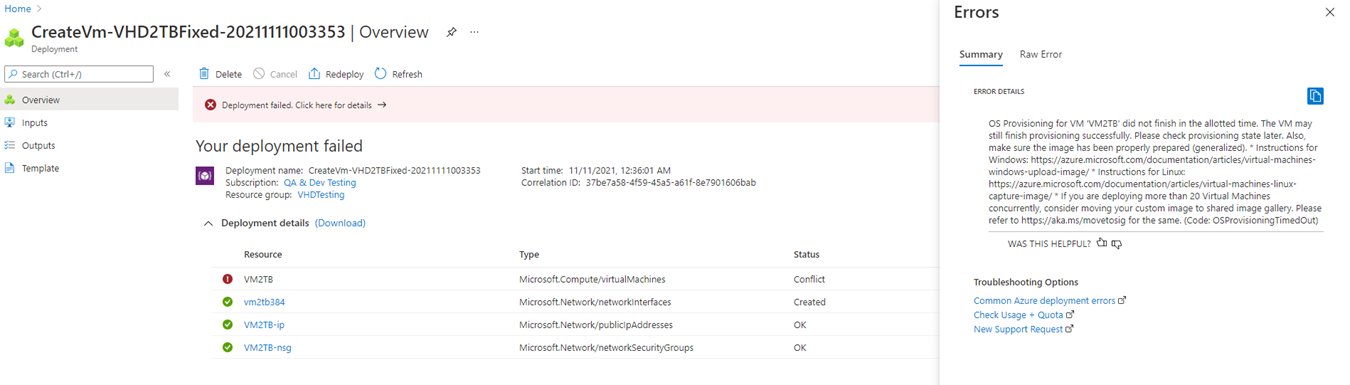
Click Review + Create then click Create. Deployment may take about 30 minutes.
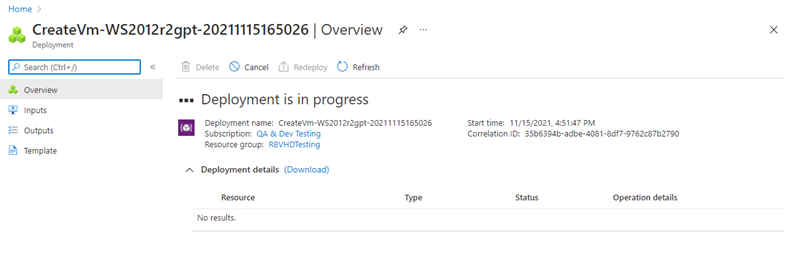
Note: It’s possible your deployment will time out and fail with an error similar to this:
This is OK, check back later and verify that the deployment succeeded in the background.
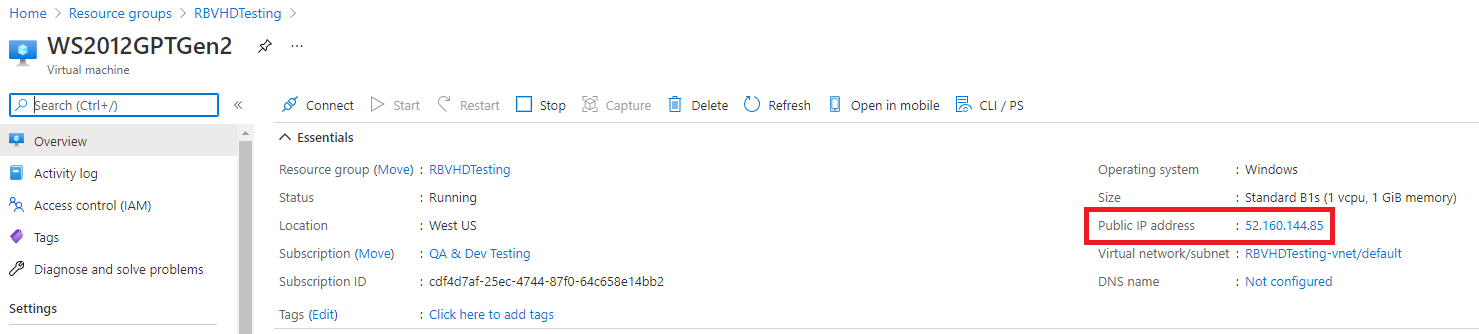
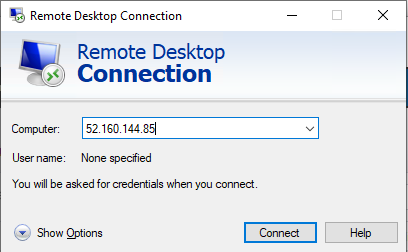
Once the virtual machine is created and running, it will be assigned a public IP address. Find this IP address on the VM details page and use it to connect via Remote Desktop Connection (RDP).