Symptom
The Outlook add-in is designed to display in the Home tab of the MS Outlook application. Additionally, when you create a new email message, you will also see an Attach button in the Message tab.

In some instances, however, the Outlook add-in might not appear as expected.
Cause
The Outlook add-in might not display in your MS Outlook application due to one of the following reasons:
- Your local environment does not support the Outlook add-in
- You might need to restart your MS Outlook application
- MS Outlook might not correctly load the Outlook add-in
- You might not have correct read and write permissions for certain registry entries
- MS Outlook might disable the Outlook add-in
- You might need to download the latest version of the Outlook add-in
Resolution 1: Check System Requirements
Ensure that the Outlook add-in is supported by your local environment. For information on system requirements, please reference the What are the x360Sync System Requirements Knowledgebase article.
Resolution 2: Restart your MS Outlook Application
If your local environment meets all system requirements, you can attempt to restart your MS Outlook application.
Resolution 3: Ensure the Outlook Add-In Loads Correctly
To ensure that the Outlook add-in loads correctly:
- In MS Outlook, click the File tab, and then select Options. The Outlook Options dialog box displays.
- Click the Add-ins link. The Add-ins section displays, listing all add-ins according to their status: Active, Inactive, or Disabled.
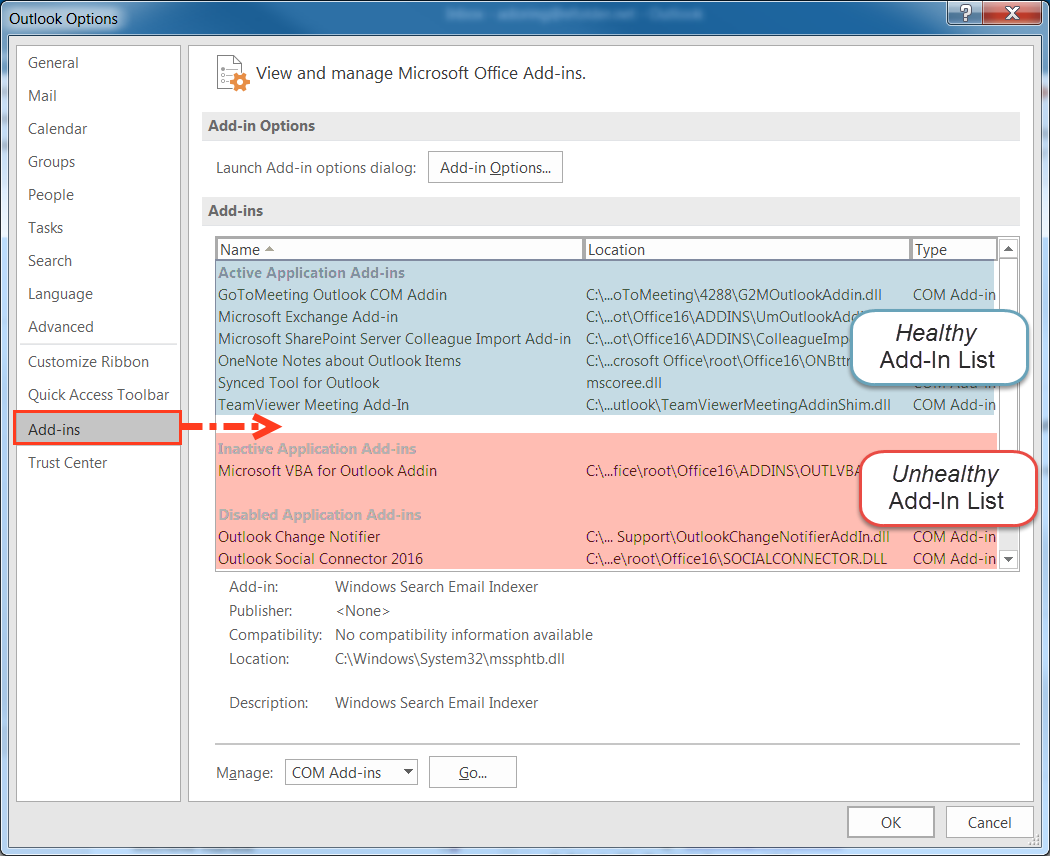
- To manage this list, click the Manage drop-down menu, select COM Add-Ins, and then click the Go button.

The COM Add-Ins dialog box displays. - In the COM Add-Ins dialog box, select the Synced Tool for Outlook checkbox, and review the Load Behavior field at the bottom of the dialog box.
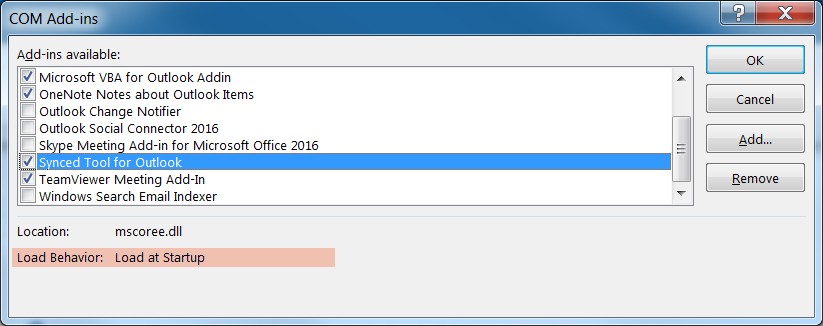
- If the Load Behavior field is listed as Load at Startup, the add-in should load properly when starting Outlook. Restart the application and test to ensure that the Outlook add-in loads as expected.
- If the Load Behavior field is listed as, Not Loaded, the add-in will not load properly.
- If the Outlook add-in is listed as Not Loaded, open an elevated command prompt and run the following command:
set VSTO_SUPPRESSDISPLAYALERTS=0
This setting allows Outlook to display the actual error it receives when attempting to load the add-in, which supports the troubleshooting process. - Open the registry editor and navigate to:
HKEY_CURRENT_USER\Software\Microsoft\Office\Outlook\Addins\CloudAttachment.Outlook.Addin.Connecter
- Find the LoadBehavior registry string and set the value to 3 to indicate that it should load at startup.
Note: Please proceed with caution and create a backup of your registry before making changes. Editing registry entries is not supported.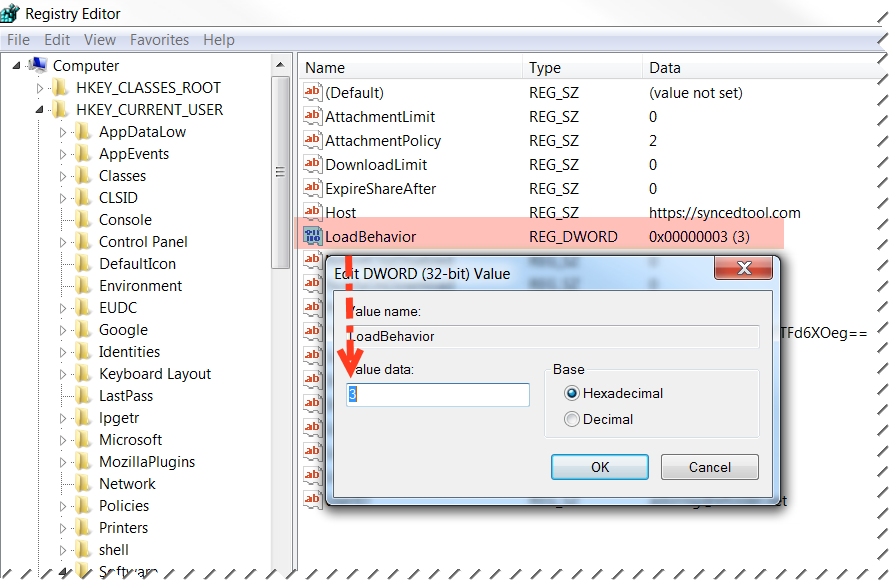
- Restart Outlook.
- If the Outlook add-in is listed as Not Loaded, open an elevated command prompt and run the following command:
Resolution 4: Ensure the User Has Appropriate Permissions in Registry Entries
In some instances, certain registry entries will need read or write permissions for the Outlook add-in to load properly.
- Open the registry editor and navigate to the appropriate registry node, depending on your version of Windows and the Outlook add-in:
Windows OS Version |
Microsoft Outlook Version |
Registry Node |
32-bit |
32-bit or 64-bit |
HKEY_LOCAL_MACHINE\SOFTWARE\Microsoft\Office\Outlook\Addins\CloudAttachment.Outlook.AddIn.Connecter |
64-bit |
64-bit |
HKEY_LOCAL_MACHINE\SOFTWARE\Microsoft\Office\Outlook\Addins\CloudAttachment.Outlook.AddIn.Connecter |
64-bit |
32-bit |
HKEY_LOCAL_MACHINE\SOFTWARE\WOW6432Node\Microsoft\Office\Outlook\Addins\CloudAttachment.Outlook.AddIn.Connecter |
Note: If you do not see these registry entries, then the Outlook add-in did not install correctly, or a group policy is blocking the creation of these registry entries.
- Right click the node and select Permissions.
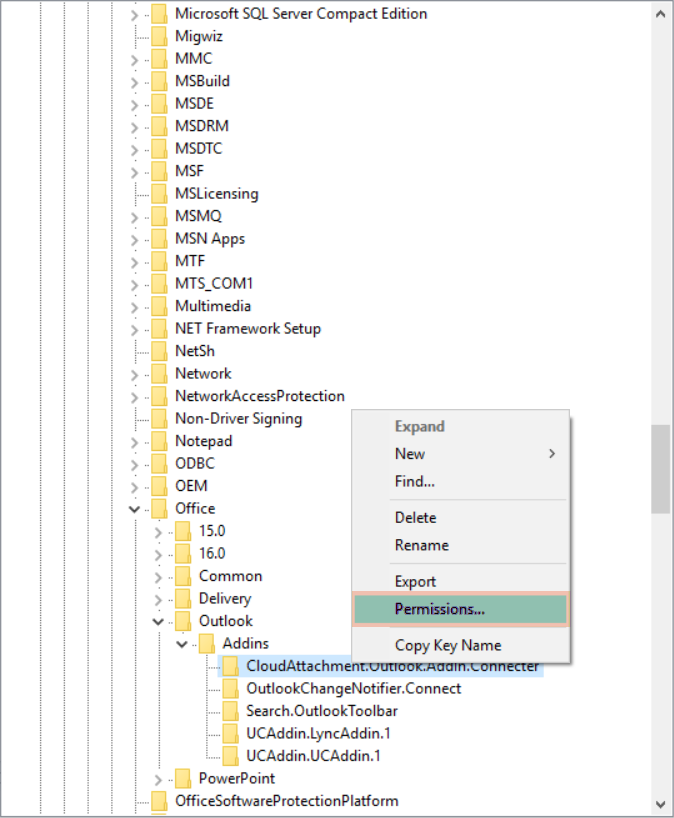
- In the Permissions dialog box, ensure that the user has read permissions.
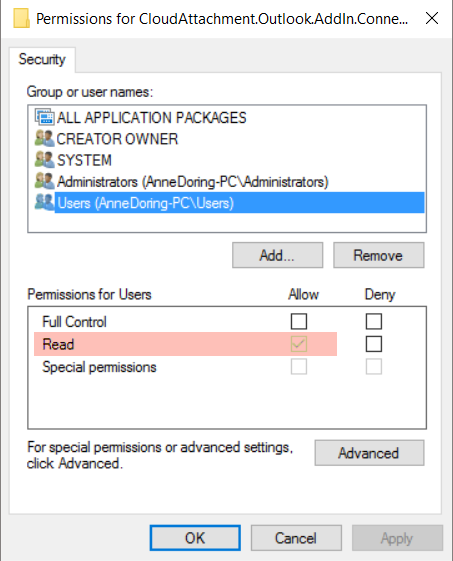
- Click the OK button to save any changes.
- While still in the registry editor, navigate to:
HKEY_CURRENT_USER\SOFTWARE\Microsoft\Office\Outlook\Addins\CloudAttachment.Outlook.AddIn.Connecter
Note: If you do not see this registry entry, then the Outlook add-in did not install correctly, or a group policy is blocking the creation of these registry entries. - Right click the node and select Permissions.
- In the Permissions dialog box, ensure that the user has write permissions.
- Click the OK button to save any changes.
Resolution 5: Enable a Hard-Disabled Add-In
In some instances, MS Outlook might deactivate the Outlook add-in. For example, if an add-in that utilizes the same DLL (mscoree.dll) has been previously disabled, the Outlook add-in will also be listed as disabled.
To activate the Outlook add-in:
- In MS Outlook, click the File tab, and then select Options. The Outlook Options dialog box displays.
- In the Manage drop-down menu, select Disabled Items and then click the Go button.

The Disabled Items dialog box displays, listing all disabled add-ins. - Select mscoree.dll from the list of disabled items, and click Enable.
- To ensure that the DLL is no longer disabled, open the registry editor and navigate to:
HKEY_CURRENT_USER\Software\Microsoft\Office\[version number]\Outlook\Resiliency\DisabledItem
Confirm that the Outlook add-in is not listed under this registry key.
Resolution 6: Reinstall the Outlook Add-In
If you are still experiencing this issue, please uninstall the Outlook add-in, and then reinstall the latest version. For installation instructions, please reference the How to Configure and Use the Outlook Add-In Knowledgebase article.