
Important: Please be aware that the legacy License Portal for x360Recover (formerly Replibit) described in this article will be deprecated in 2023.
For additional details on the new licensing process, please see Licensing in x360Recover Manager (RMC)
LEGACY License Portal for x360Recover
Intro to the License portal
The License portal is a separate x360Recover tool for assigning and managing licenses. This will eventually be integrated into the x360Recover Manager (RMC).
For access, please contact Axcient Support.
To log in, open any web browser and navigate to https://licensing.x360Recover.com
1. In the License Management window, enter login credentials:
- In the Username field, enter the Partner Account username.
- In the Password field, enter the password that was assigned to you when you completed your initial onboarding training session. Your Partner username and password are case sensitive.
2. Click the Login button.
3. If you have forgotten your password, click the Forgot Password link. Your password will be sent to the email address specified when your Partner account was created.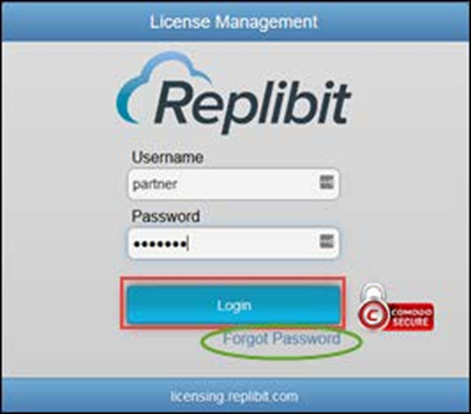
From inside the License portal, you can:
- Create and manage customer accounts with their associated site locations
- Assign endpoint-based or storage-based licensing to backup appliances
- Order an Axcient x360Recover BDR appliance and have it preconfigured for a specific customer and location
- Request an Axcient hosted vault to replicate your customer data to the Folder. Additionally, you are also able to replicate to a vault hosted at your own data center if you prefer.
How to log in the first time
1. The first time you log in to the portal, from the x360Recover License Management left pane, click the My Account drop-down menu.
2. Select Profile Details.

3. From the Profile Details window:
- Enter your Address, City, and Zip Code in the corresponding fields.
- From the drop-down menu, select your Region, Country, and State.
- Enter your Email address and Billing email address for your company.
- Click the Update button to complete your Profile Details updates.

4. After you have updated your profile, we recommend that you change your password at the same time.
NOTE: If you do not change your password during this initial logon process, changing it later will require you to update all deployed vault devices with the new partner login password.
5. From the x360Recover License Management left pane, click the My Account drop-down menu.
6. Select Change Password.

7. From the Change Password window:
- In the Old Password field, enter your Old Password.
- In the New Password field, enter a New Password that is complex, highly secure password for your Licensing Portal account.
- In the Confirm Password field, please enter this new password again.
- Click the Update button to complete.

The x360Recover User Management Pane will appear after logging on to the x360Recover Licensing Portal.
Endpoint and storage licenses
There are two distinct types of licenses available for use within x360Recover:
- Endpoint licensing, and
- Storage licensing.
All Axcient x360Recover licensing is based on a monthly recurring Per-Device or Per-Storage-Size
Licensing charges for storage licensing are prorated, and billed based on the date they are assigned or removed.
Licensing charges for endpoint licensing are NOT prorated, and are billed based on the number of server and workstation licenses assigned (whether they are in use or not) to all customers on the last day of the month. For example, a server license assigned on the 23rd of the month will incur billing for the entire month for that endpoint.
Note for Legacy partners: Legacy partner licensing charges are prorated from date of purchase or return. All charges are calculated based on total license count PURCHASED, regardless of whether it is assigned to a customer. To avoid charges for licenses not in use, return unused licenses by:
- Clicking on User Management,
- Select Reduce
Pricing of x360Recover licensing varies based on a tiered usage scale and specific pricing will not be covered within this guide, except in general terms. Please consult the latest Axcient x360Recover Pricing Guide for current pricing on all Axcient products.
About endpoint licenses
- Each endpoint license provides the right to back up a single workstation or server, referred to as a protected system.
- Endpoint licenses come in two classes: workstation, and server.
- Endpoint licenses are assigned to a location, and are consumed automatically by the appliance when an agent is installed on a protected system.
- Workstation operating systems, like Windows 10 require a workstation license, and server operating systems, like Windows Server 2012 require a server license.
- All endpoint licenses, workstation or server, include the right to replicate to an unlimited number of off-site vaults.
- Endpoints protected systems that are NOT replicated to an Axcient Cloud vault are considered Local-Only. Local-Only licenses are billed at a reduced rate and do not include cloud storage.
Note for Legacy partners: All new endpoint licenses purchased through the portal will be bundled licensing with replication. Existing server-only and workstation-only licensing will continue to function as they do today, and will be billed at the existing rates.
Important Note
Endpoint licenses are not prorated from the date they are provisioned.
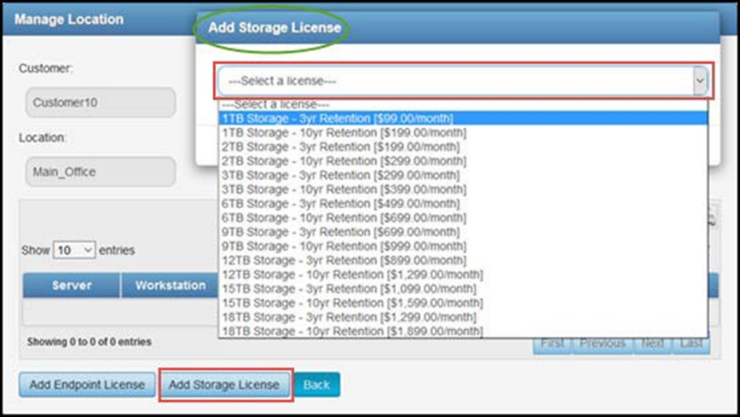
About storage licenses
- Storage licenses provide the right to back up an unlimited number of protected systems to a single backup appliance, up to the storage limit.
- Available storage sizes are: .5TB,1TB, 2TB, 3TB, 4TB, 6TB, 9TB, 12TB, 15TB, 18TB, 24TB,
30TB, and 36TB. - In addition, each storage license comes bundled with unlimited cloud storage in the Axcient data center, with a fixed retention period.
- Cloud retention options are 3 years or 10 years.
- For example, when purchasing storage-based licensing for an appliance, you might elect for 1TB of local storage with 3 years of retention in the cloud, or 2TB of local storage with 10 years retention in the cloud, etc.
- Storage licensing may be assigned to both Axcient branded BDR appliances, and Build- Your-Own appliances.
Important Note
Storage licenses are prorated from the date they are provisioned.
Endpoint or storage licensing?
One of the most frequent questions on licensing is: Which licensing model is better?
The answer depends upon the number and size of devices that you want to license.
With Axcient x360Recover , you are free to combine both licensing models in any way you choose to best meet your needs.
Additionally, you can choose to change licensing models at a later point in time. You will have the ability to simply remove the current licenses, and reapply the license you would like to assign.
- Endpoint licensing is best suited for customer locations that have fewer protected systems with larger storage
- Storage Licensing is best suited for customer locations that have many protected systems with smaller storage
Create customers and locations
Before you can deploy an appliance at a new customer location, you must create a customer account within the x360Recover Licensing Portal.
You can create a new customer account by clicking the User Management link in the License Management left pane menu.
- Each customer account must have one or more locations. (BDR appliances and licenses are assigned to locations). When you are ready to deploy an appliance, please note that it must be assigned to an existing customer location that is not already in use by any other appliance.
Important notes on assigning customer accounts and locations
Only create one account for each customer that you support.
- You can, however, create as many locations as needed for each customer account.
- Each location can be assigned to only one appliance.
- When you deploy a new appliance at a customer site, you will be prompted to assign that appliance to a customer location.
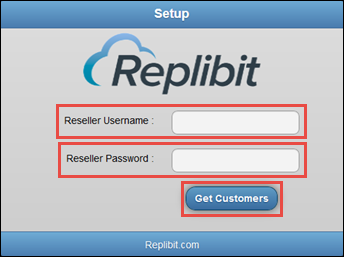
- If you do not see any accounts available when you click the Get Customers button, then you do not have any customer accounts with previously unassigned locations for an appliance. In this instance, you will need to either (a) create a new customer or (b) add a new location to an existing customer account.
Performing a factory reset on a deployed appliance will release the location in the License Portal to be reused by a new appliance
How to create a customer
When you create a customer, you will be prompted to configure a username and password for the account. These credentials are required when logging into any vault to recover data. We recommend recording the username and password. You can optionally share these credentials with the customer if they will be performing self-service restores from an off-site vault.
- Each customer account must be configured with a unique username. You cannot create two customer accounts with the same username within the Licensing Portal.
- If you need to recover a lost password, click the Change Password button to reset the password. Please note that if the customer password changes in the Licensing Portal, it must also be changed on the appliance within the Settings page (Licensing subtab)
1. From the License Management left pane menu, click to expand User Management and then select Users.
2. Click the Add User button. The Customer Details window displays.
3. In the Customer Details window, update the following fields:
- In the Customer Username field, enter the username for the new customer. This field only accepts letters, numbers, and underscore characters. You cannot add spaces or other special characters.
- In the Customer Company Name field, enter the name of the company.
- In the Customer Password field, enter a complex password. You must confirm this password in the Customer Confirm Password field.
- In the Customer Email Address field, enter an email address for the customer.
- In the Locations field, enter one or more locations for the customer. Separate each location with a comma. This field only accepts letters, numbers, and underscore characters. You cannot add spaces or other special characters.
Edit customers and locations
You can manage and update existing Customers and Locations from within the Licensing Portal. Specially, you can perform the following actions:
- Edit the name of the company.
- Deactivate, or temporally suspend, a Customer account (for example, due to non-payment).
- Activate a previously deactivated Customer account.
- Add a new Location to a Company account.
- Remove a Location from a Company account, including all assigned licenses.
- Delete a Company account, including all associated Locations and assigned licenses.
- Reset a lost or stolen Customer account password.
- Create a new Customer account and Location(s).

How to edit a customer
1. From the License Management left pane menu, click to expand User Management and then select Users.
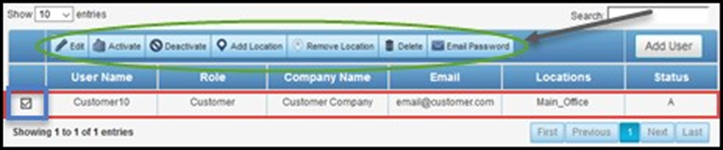
The User Management window displays, listing all Customer Location sites. Customers with more than one Location will appear in the list multiple times, one for each Location.
2. Click the checkbox adjacent to the Customer that you need to modify and then select an action from the toolbar:
- Click the Edit button to edit the Company Name field.
- Click the Activate button to activate a previously deactivated account. This action will also reactivate licenses.
- Click the Deactivate button to deactivate an active account (for example, due to non-payment). Deactivated accounts cannot perform backups. Licensing for all Locations belonging to the Customer will be revoked without modifying the license assignments.
- Click the Add Location button to add a new Location to the account.
- Click the Remove Location button to remove a Location from the account. This action will also remove any assigned licenses. Any Appliance associated with the removed Location will need to be Factory Reset and re-provisioned before it can resume backups. If an Appliance has been lost—for example, due to hardware failure—you can either delete and recreate the Location or contact Support to have the existing Appliance association cleared from the Licensing Portal.
- Click the Delete button to delete the Customer account, including all Locations and all assigned licenses.
- Click the Set Password button to reset the account password to a new value. Please note that this information must be updated on all Appliances that belong to this Customer within the Settings page of the Appliance Web interface (Licensing subtab).
- Click the Add User button to create a new Customer account and Location(s).
Assign licenses
After you have created a customer and at least one location, the next step is to assign licenses to that location.
To assign licenses:
1. From the License Management left pane menu, click to expand User Management and then select Licenses.
2. Locate the appropriate Customer and Location within the main window. Optionally, use the Search field to search by Customer name or Location. Customers and Locations are case sensitive.
Customers with more than one Location will appear in the list multiple times. Ensure that you have selected the correct Location while managing licenses.


3. Click the Manage button. The Manage Location window displays.
4. To add an Endpoint license, click the Add Endpoint License button and update the following fields:
- In the Allocated fields, enter the license count for Server(s) and Workstation(s) licenses as needed.
- Click the Submit button.
Endpoint licenses are cumulative; you can add additional license packs over time to meet your needs.
Endpoint license billing is not prorated. Billing occurs on the last day of the month for all licenses that are allocated to a Location, regardless of whether the license is in use by a protected system.
Remove licenses
You can change licensing models at any point in time. When updating licensing models, consider the following:
- Endpoint licenses are cumulative; you can add additional license packs over time to meet your needs.
- You can only assign one Storage license at a time to a location.
- Endpoint and Storage licenses are mutually exclusive. You can only assign one or the other to a location.
If you need to switch licensing models, you will first need to remove all assigned licenses and then add the new license type.
If you are replicating protected systems to the Axcient Cloud and you remove a protected system from an appliance, you will also need to delete the protected system from the vault to avoid future billing.
Any protected system remaining in the Axcient Cloud will be billed a full month at the bundled endpoint license rate, whether it still exists in its original appliance or not.
1. From the License Management left pane menu, click to expand User Management and then select Licenses.
2. Locate the appropriate Customer and Location within the main window.
3. Click the Manage button. The Manage Location window displays.
4. Find the license you would like to remove and click the Delete button. You can remove a Protected System from the Axcient Cloud from the Vault Web interface.
5. Alternatively, you can remove a Protected System from the Appliance Web interface, which allows you to also delete the Protected System from the vault.
Manage Axcient BDR orders
To manage Axcient BDR orders:
1. From the License Management left pane menu, click to expand My Account and then select My BDR Orders.
2. To review the status of your pending BDR order, click the View Details button.

3. Optionally, click the Cancel button to cancel an order that has not yet shipped.
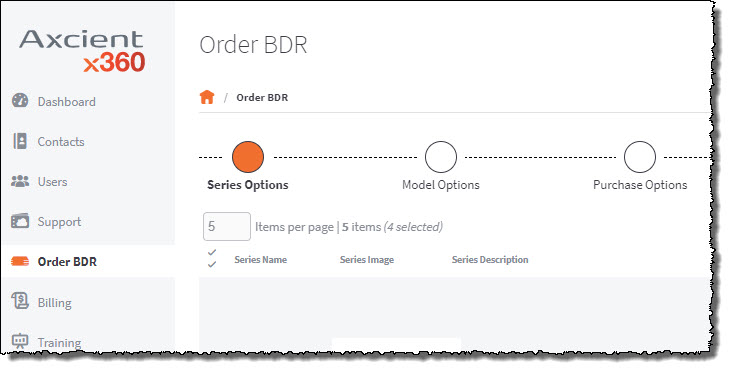
NOTE: For information on ordering appliances from the x360Portal, please review Order BDR appliances
SUPPORT | 720-204-4500 | 800-352-0248
- Contact Axcient Support at https://partner.axcient.com/login or call 800-352-0248
- Free certification courses are available in the Axcient x360Portal under Training
- To learn more about any of our Axcient products, sign up for a free one-on-one training
- Subscribe to the Axcient Status page for a list of status updates and scheduled maintenance
541 | 862 | 1215 | 1497