
Overview
Support for backup and recovery of files and folders for macOS protected systems is now available in x360Recover.
| How to uninstall the x360Recover macOS agent |
Requirements
To support backup of macOS devices, you must meet the following requirements:
- x360Recover appliance and vault running version 12.6.0 or higher
- xCloud agent version 3.7.0 or higher
- macOS 12 (Monterey) or newer
- Full Disk Access permissions
- macOS running on Intel/AMD x64 or ARM x64 CPU (Apple Silicon)
- Files must be stored on locally attached Apple Filesystem (APFS) formatted volumes
- 4GB+ system RAM
- 1 gigabit ethernet or faster network connection (in appliance mode)
- 500Kbps or faster internet upload speed (in Direct-to-Cloud mode.)
Features
- Snapshot-based backups of files and folders on APFS volumes
- File and Folder (Mount) Recovery via web browser and FTP
- Appliance-based backups
- Direct-to-Cloud backups
- Endpoint Manager support
- Automated agent upgrades
- No system reboot required for installation or uninstallation of the agent
- Secure transport of backup data over TLS 1.2+
- Zstd compression of data transmitted during backup
- Agent access password protection
Agent for macOS provides a file and folder-level backup of selected volumes. By default, the agent targets only the /Users folder to backup user files, but you may configure the agent to backup one or more custom folder paths.
Note: The agent leverages the native filesystem snapshot capability provided by APFS and currently only supports backup of data residing on APFS formatted volumes. NTFS, FAT, or HFS formatted volumes or external USB disks are not currently supported for backup.
Recovery operations include only Mount, which allows for file and folder recovery only. Files may be retrieved from appliances and vaults via web browser or FTP client.
The following are NOT supported
- Image-based backup and recovery
- Virtualization
- Bare Metal Restore
- Local Cache
- Virtual Disk Exports
- iSCSI Exports
macOS is inherently incompatible with image-based backups.
Apple’s EULA explicitly excludes the right to virtualize macOS on non-Apple branded hardware, and kernel-level driver support necessary to implement block-level disk snapshots are not permitted. As a result, full image-based backups cannot be performed on macOS, and Virtualization, Bare Metal Restore, Virtual Disk and iSCSI Exports are not possible with macOS.
Local Cache is a block-based data caching mechanism that is not compatible with file and folder backups and is not available for macOS devices.
x360Recover protected data size limitations
Storage of protected system data in the Axcient cloud is intended to fit common use cases of MSPs and their customers. We have tailored our recovery SLAs and Cloud Fair Usage policies to ensure that the vast majority of MSPs core use-cases for data protection are covered. That said, there are limitations to our bundled cloud storage and specific protected system size limits.
The Axcient Fair Use policy spells out the terms of overall cloud storage limits based on the number and type of protected systems you have protected in the Axcient Cloud. Fair Use is intended to provide a reasonable storage pool capacity which most partners will find provides virtually unlimited cloud storage for their per-endpoint protected systems (based on the expected nominal average size of typical server and workstation endpoints) while providing Axcient with a means of remediation in the event of abuse by a partner.
See: Axcient’s Fair Use Policy for details.
100TB protected system limit
In addition to Fair Use limitations to the total storage pool usage, there also exists a practical size limitation for a single protected system endpoint. Axcient does not support storage of any protected system in the Axcient cloud where the total data consumption for the system exceeds 100TB. This 100TB size includes not just the in-use size of the protected system, but also the total aggregate of data consumed by the protected system backup retention.
Important: Backups and replication for protected systems exceeding 100TB may be halted to ensure proper operation of the Axcient cloud.
Partners that need to provide backups for protected systems larger than 100TB may do so using Private Cloud vaults hosted in your own datacenter.
User interactive or scripted silent installation of the Agent
Important: Regardless of the installation method used, the agent requires that Full Disk Access permissions be assigned. Please refer to the instructions below for details on assigning Full Disk Access permissions.
The agent for macOS can either be deployed (a) silently from the command line using a Terminal session from the local desktop or via a remote ssh login, or (b) installed interactively by the user from the GUI
Appliance deployment
- Login to the appliance and select Downloads from the left menu pane.
- Click the macOS Agent download button to open the agent deployment options:

- For user-interactive installation, click the macOS Agent button to download the agent in Apple Disk Image format. Double-click the disk image file from the mac to mount the disk and begin the installation wizard.
-
For scripted or RMM managed deployment, click the Copy gadget to copy the command to the system clipboard.
- Paste the command into your terminal session to run.
- The command utilizes ‘sudo’ to elevate the command to root level privileges, so enter the user password when prompted to authenticate.
- The embedded command performs the following actions:
- download the agent installation package ‘xcloudagent-mac.zip’
- extract the zip archive to the /tmp folder
- execute the agent installer script in unattended mode
- pass the IP address of the apliance to the installer to configure the agent

Direct-to-Cloud deployment
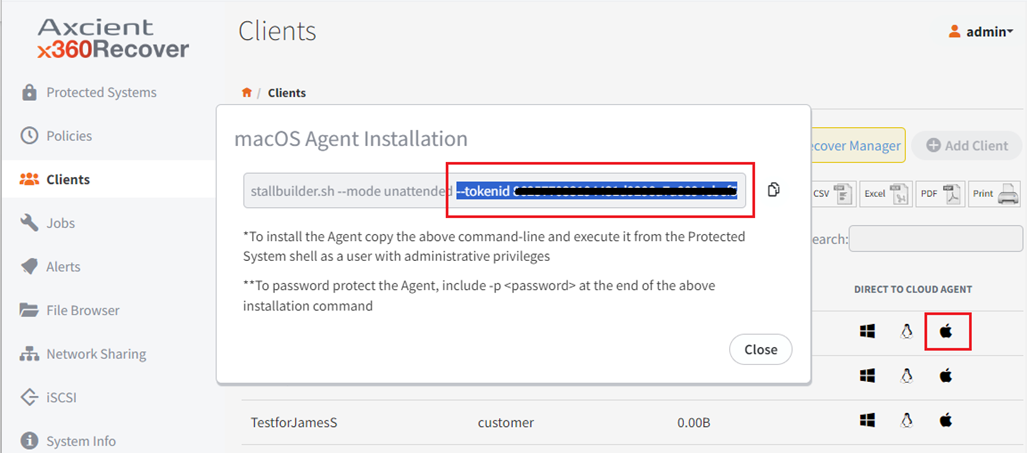
Log in to the desired location and select Clients from the left menu pane.
- Locate the Client and click the Agent for macOS icon in the actions column.
- A popup will open displaying the installation command.
- Click the Copy gadget to copy the command to the system clipboard.
- Paste the command into your terminal session to run.
- The command utilizes ‘sudo’ to elevate the command to root level privileges, so enter the user password when prompted to authenticate

The embedded command performs the following actions:
- Download the agent installation package ‘xcloudagent-mac.zip’
- Extract the zip archive to the /tmp folder
- Execute the agent installer script in unattended mode
- Pass the TokenID of the Client and Vault to the installer to configure the agent
Assigning Full Disk Access Permissions
Important: Regardless of the installation method used, the agent requires that Full Disk Access permissions be assigned.
Agent for macOS requires Full Disk Access permissions to operate properly and backup all files successfully. Assigning Full Disk Access permissions on macOS requires special management tools or user interaction.
When deploying Agent for macOS administratively, we recommend deploying permissions using Apple’s Mobile Device Management (MDM) layer and a Privacy Preferences Policy Control (PPPC) policy before deploying the agent. Deploying a PPPC policy requires that you have already deployed an macOS management tool that supports Apple MDM, like Microsoft Intune or JamF, etc.
A generic PPPC Profile policy file can be downloaded here:
[xcloud-agent.mobileconfig|https://updates.axcient.cloud/xcloud-agent/xcloud-agent.mobileconfig]
IMPORTANT: You MUST deploy the PPPC Profile policy BEFORE installing the agent for the system to correctly register Full Disk Access permissions. It will not work to deploy the policy after the agent is already installed.
- For instructions on deploying a PPPC policy to grant Full Disk Access to the Agent for macOS, see Deploy a Privacy Preference Policy Control (PPPC) file
- To manually assign Full Disk Access permissions from the macOS desktop after deploying the agent, see How to Enable Full Disk Access (macOS) for agent service below.
Note: Full Disk Access permissions assigned via PPPC policy controls are separate from (and parallel to) the UI-based Full Disk Access controls in system settings. (See section below.) When Full Disk Access permissions are managed via PPPC policy, (either granted or revoked) they take precedence over and override the system controls. Full Disk Access permissions assigned via PPPC policy are not visible in the system controls UI.
Interactive GUI Installation of the Agent
From your macOS system, use Safari or other web browser to download the agent installer image here: x360Recover Agent for macOS
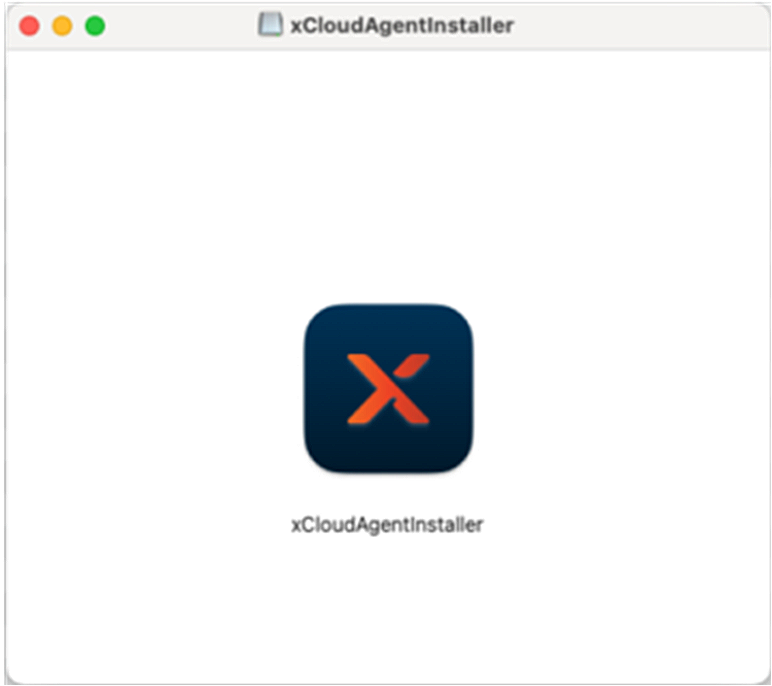
Double-click the downloaded disk image to open it, then double-click the xCloudAgent Installer.
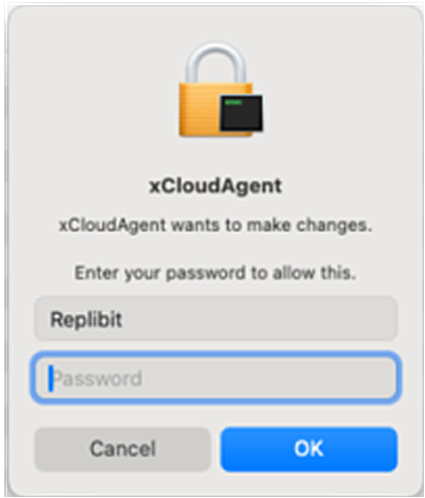
Enter your password to authorize running the installation with elevated privileges.
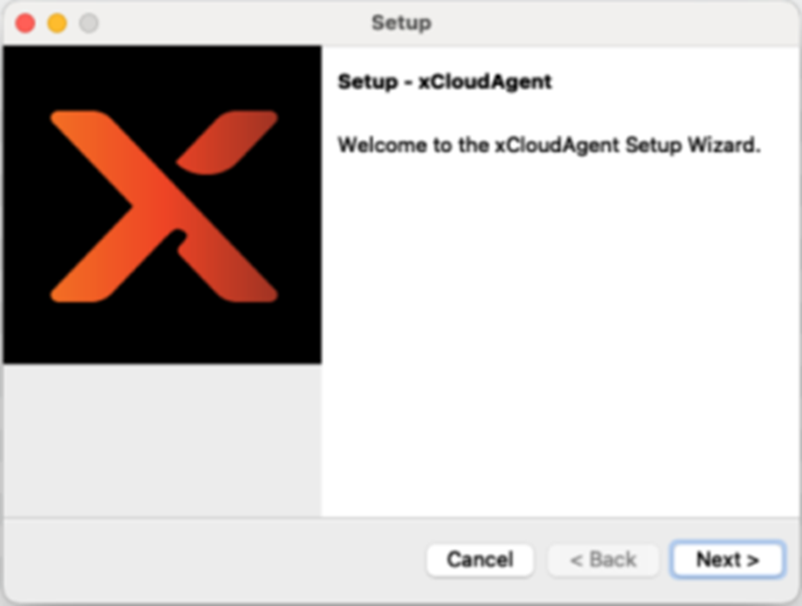
Click Next to begin the installation.
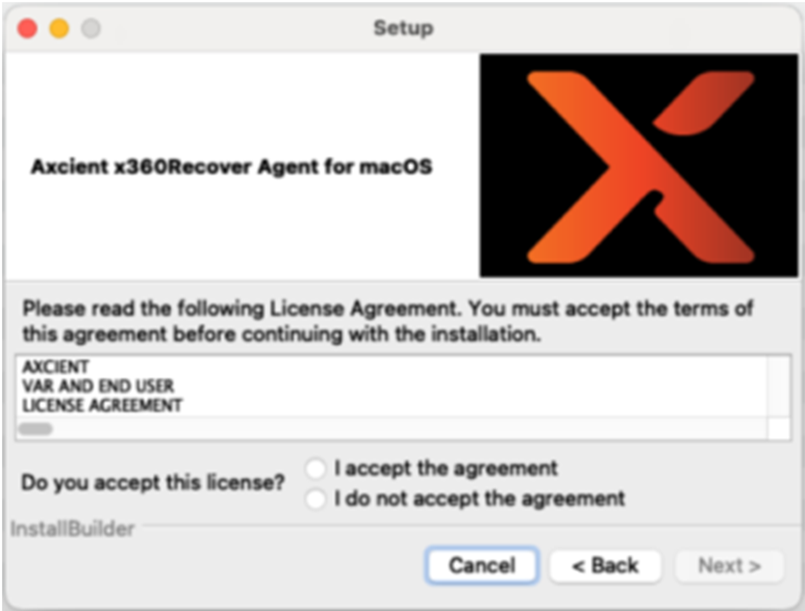
Select to accept the EULA and click Next to continue.
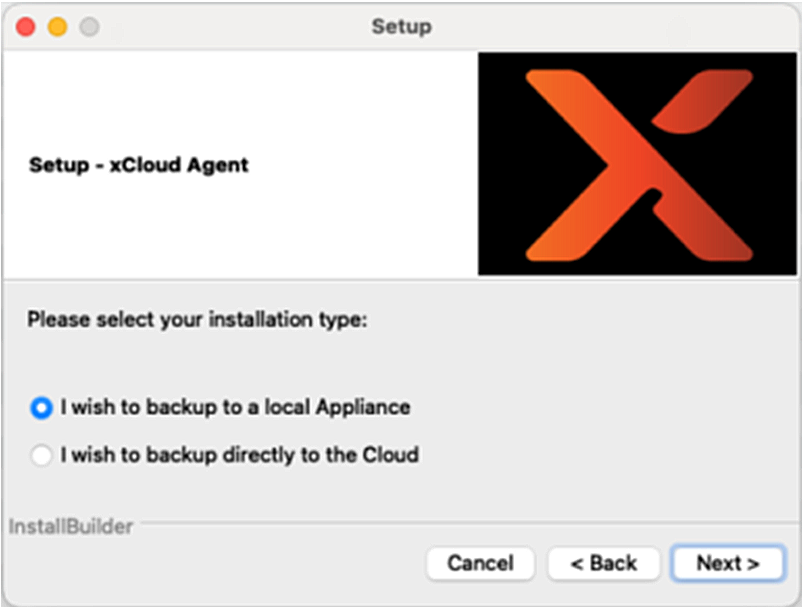
Select which type of installation you wish to perform.
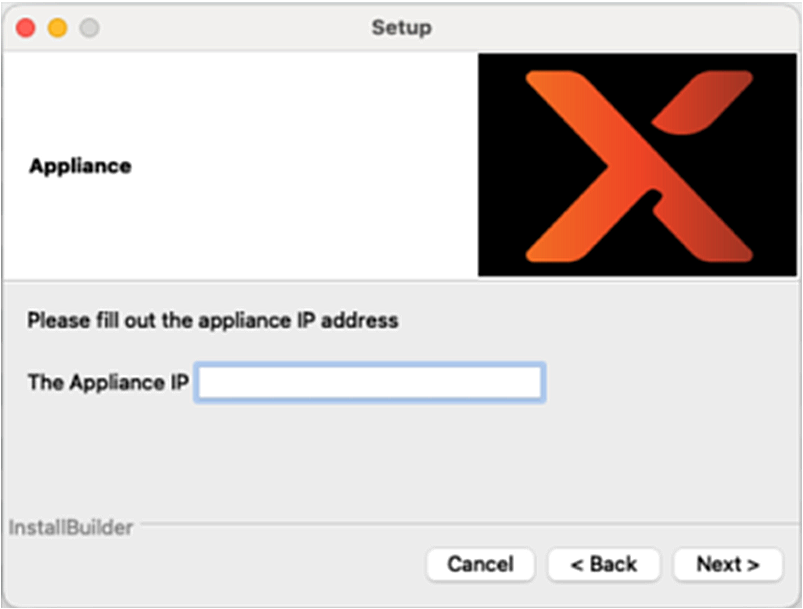
Select ‘I wish to backup to a local Appliance’ to install the agent in Appliance mode. You will be asked to provide the IP address of the local Appliance on the next page.
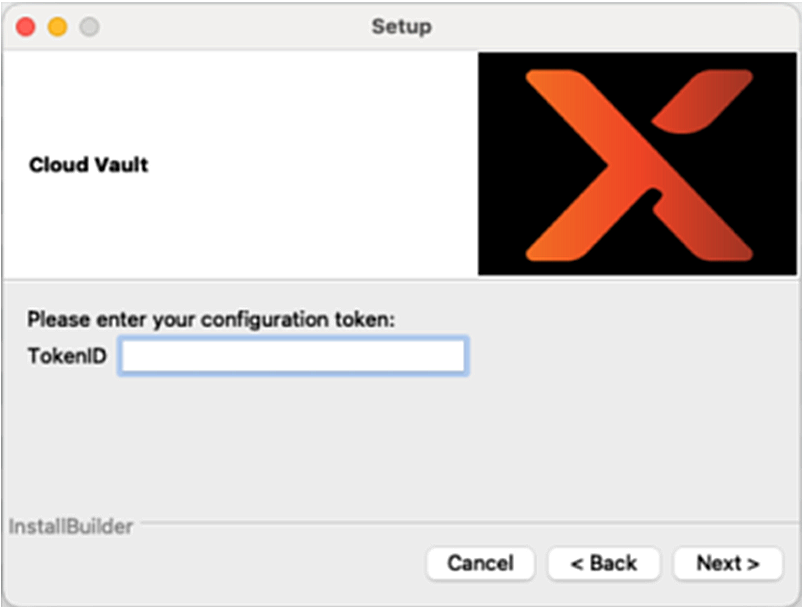
Select ‘I wish to backup directly to the cloud’ to install in Direct to Cloud mode. You will be asked to provide the TokenID specific to the Client and Vault that you wish this agent to backup to on the next page.
Note: To identify the TokenID, login to the vault you wish to backup to, navigate to the Client page from the left menu pane, and click the macOS icon in the agent download column for the client this protected system will belong to.
The TokenID can be found at the end of the command-line agent installation string in the popup window.
If you selected Appliance mode, enter the Server IP address of the local appliance.
If you selected Direct-to-Cloud mode, enter the TokenID for the client and vault this system will belong to.
Specify the folder path(s) you wish to backup. You may enter one or more folder paths, encapsulated in single quotes and separated by commas, or leave the value blank. The default value if the entry is left blank is ‘/Users’ which will back up the home folders and user data for all users on the system.

Note: Filesystem paths on macOS follow the common Linux / Unix / FreeBSD style. The top of the filesystem (called ‘root’) is represented by a forward slash ‘/’ character, optionally followed by additional folder names. (i.e. ‘/System/Data/Volumes/Users’ for example.)
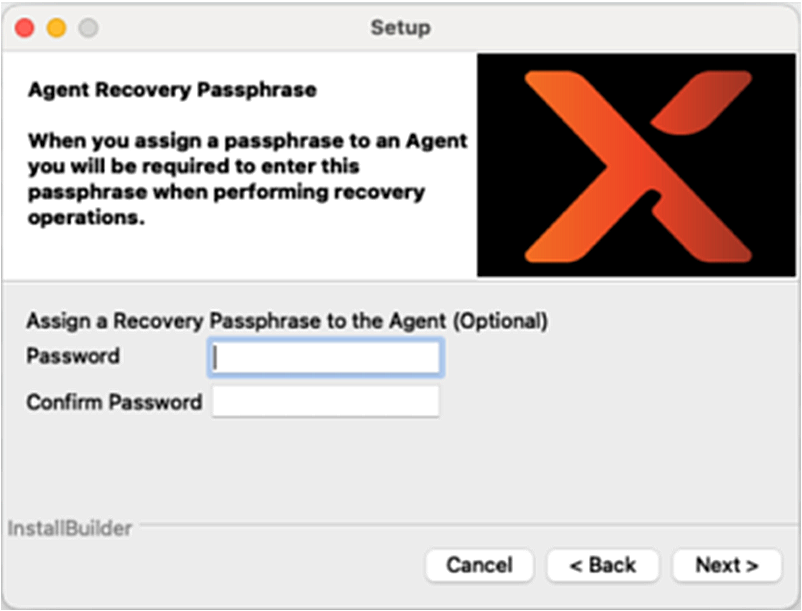
On the next page, you may optionally enter a security passphrase for the system. If you choose to enter a passphrase, you will be required to enter this password later, whenever you wish to perform recovery operations for the protected system.
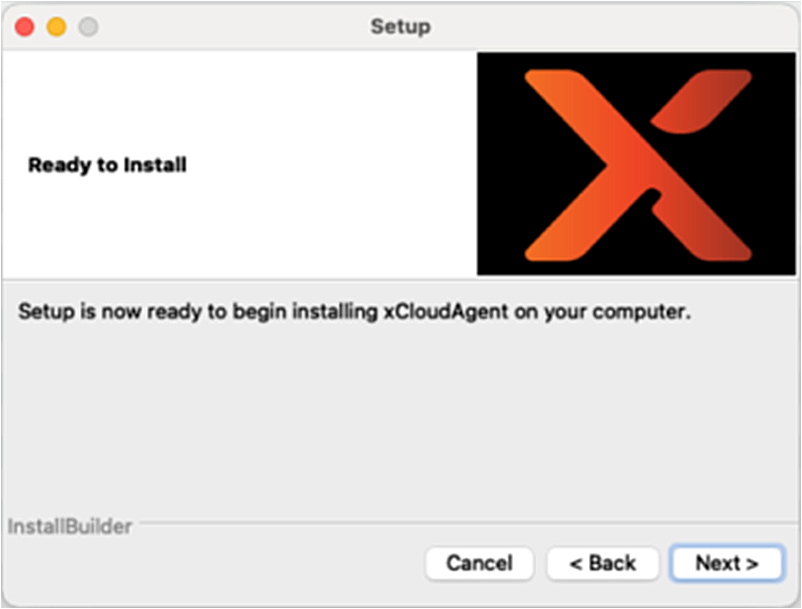
The installer is now ready to complete the installation.
Click Next to perform the installation.
Next you will be prompted to enable Full Disk Access permissions for the Agent. Click OK.
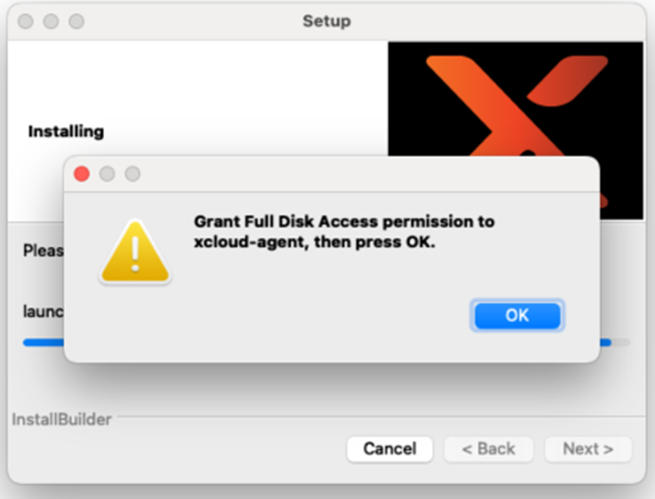
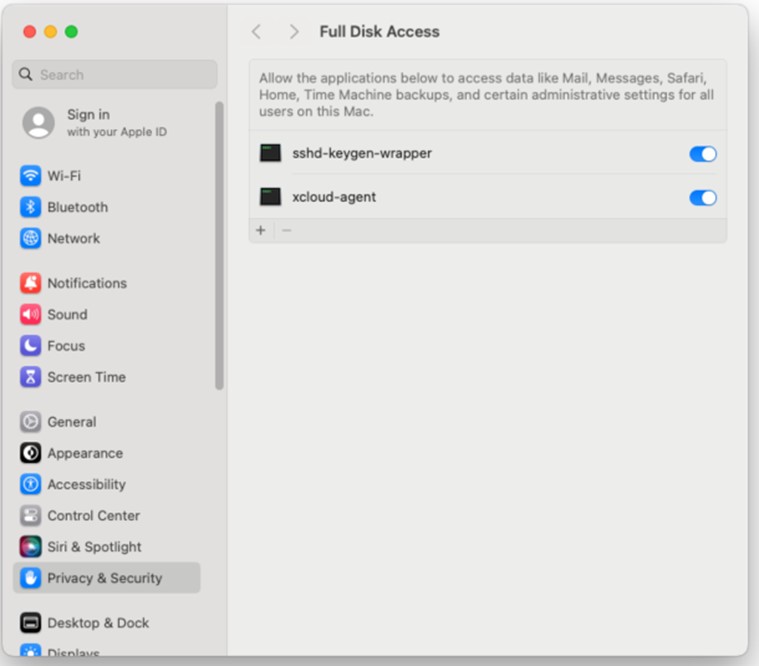
The installer will open the macOS System Settings / Full Disk Access control applet.
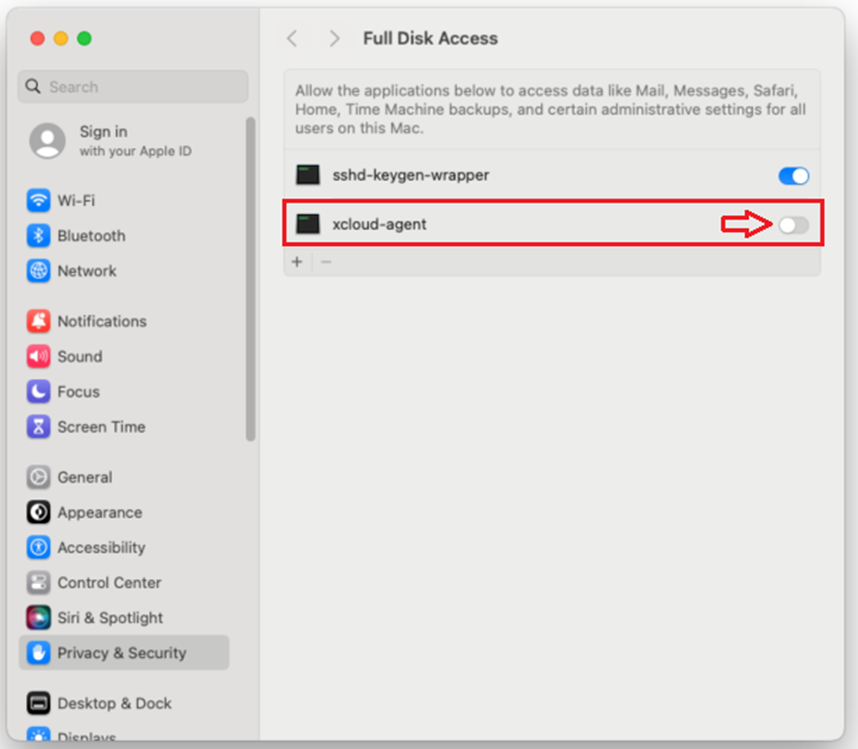
Click to enable the toggle to grant Full Disk Access permissions to the xcloud-agent.
Notes:
- You may be prompted to enter your password to allow making changes to this setting.
- Note: It is possible that the agent will not be present in the list of applications. You can manually add the agent to the list by clicking the '+' button. Browse to /Library/xCloudAgent/Contents/bin and select the xcloud-agent file. Once the agent is present in the list, click to enable the toggle.
- System administration note: When using a Remote Management utility to deploy Full Disk Access permissions via Mobile Device Manager (MDM) and a Privacy Preferences Policy Control file, Full Disk Access permissions are granted to the agent, but the agent may not be listed in the System settings panel. Policy settings deployed via MDM override settings made in the System control panel.
If you fail to enable Full Disk Access for the agent, the installer will prompt again and offer to open the Axcient knowledgebase article with further instructions.
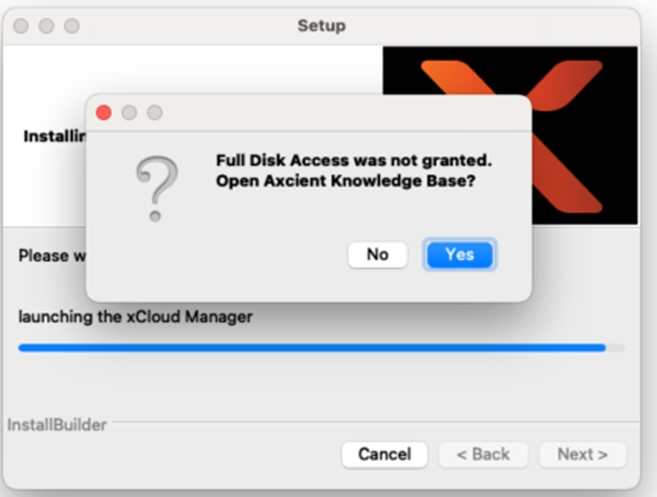
The installation requires that Full Disk Access permissions be granted to the agent before it will successfully complete.
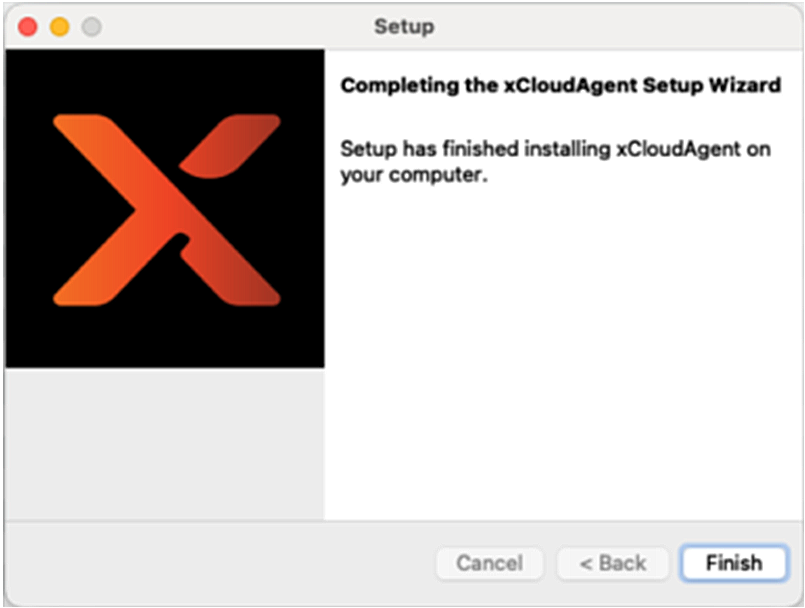
Once permissions have successfully been granted, you may click Finish to close the installation wizard
Troubleshooting
How to manually enable Full Disk Access (macOS) for agent service.
If you have deployed the agent using the command-line installation script, Full Disk Access permissions are not granted during the installation and must be manually configured.
The x360Recover Agent for macOS requires Full Disk Access to allow sufficient permissions to perform a complete backup of the system.
- Apple has strict security requirements around the assignment of Full Disk Access that requires user intervention to assign this permission.
- As it cannot be automated by the software application installer, you must complete this step manually after installing the agent.
Important: Backups for the protected system will fail if Full Disk Access is NOT granted to the agent.

For macOS 13 and newer
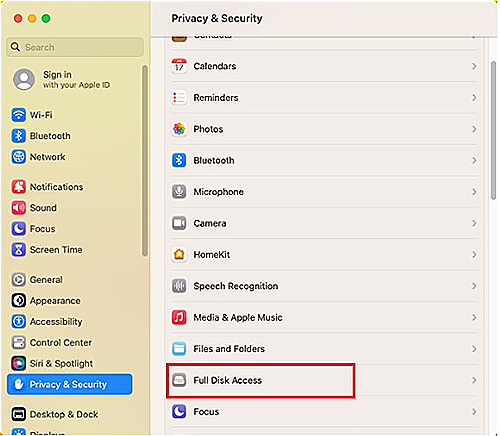
1. Click the Apple icon on the top system menu.
2. Select System Settings.
3. Navigate to Privacy & Security in the left pane.
4. Select Full Disk Access from the list on the right.
5. Locate the xcloud-agent service.
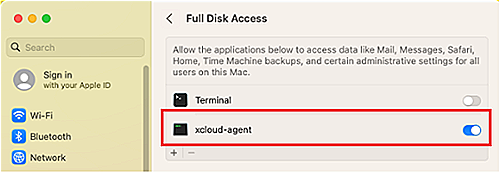
6. Click the toggle to enable Full Disk Access.
7. Enter your user password and click Unlock to authorize the change.
8. Close the System Settings window.
Backups should be completed normally now.
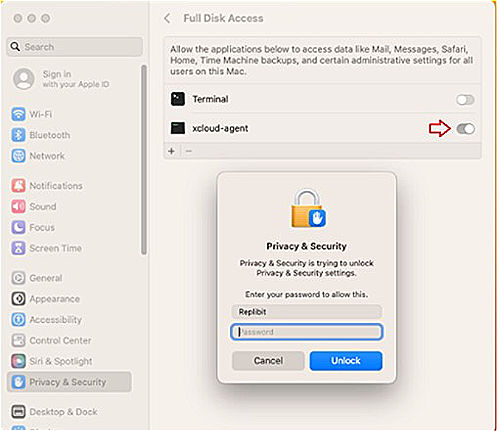
For macOS 12
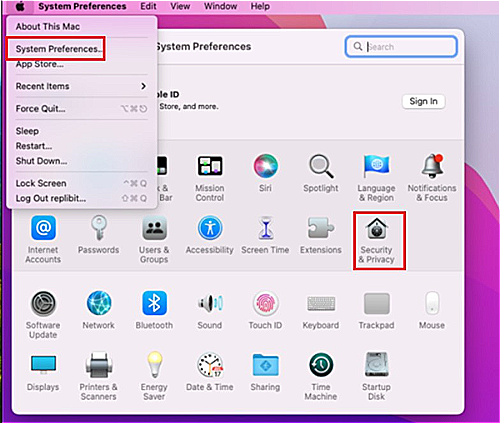
1. Click the Apple icon on the top system menu.
2. Select System Preferences.
3. Double click Security & Privacy.
4. Select the Privacy tab from the top menu.
5. Click Full Disk Access from the left menu.
6. Click the lock at the bottom of the window to make changes.
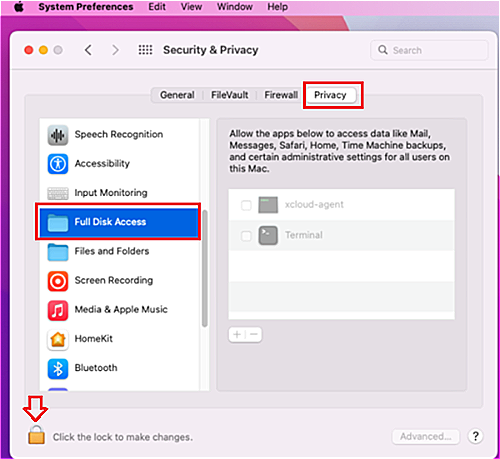
7. Enter user password and click Unlock.
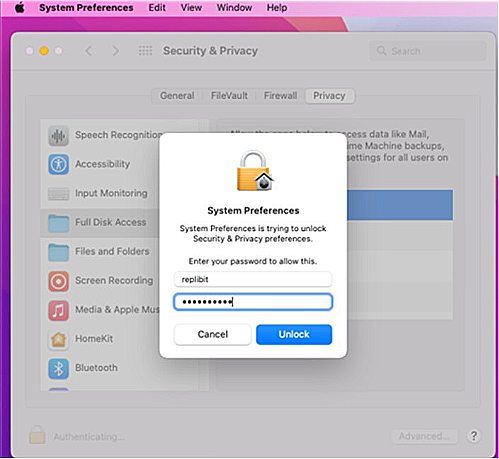
8. Click the check box to enable Full Disk Access for the xcloud-agent service.
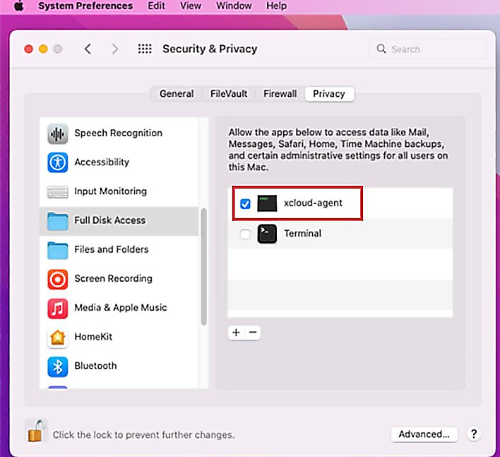
9. Close the System Preferences window.
Backups should be completed normally now.
SUPPORT | 720-204-4500 | 800-352-0248
- Contact Axcient Support at https://partner.axcient.com/login or call 800-352-0248.
- Have you tried our Support chat for quick questions?
- Free certification courses are available in the Axcient x360Portal under Training.
- Subscribe to the Axcient Status page for status updates and scheduled maintenance.
1674 | 1735 | 1760 | 1783 | 1817 | 1864