

Dashboard overview
After you log in, you can navigate the x360 Portal and take advantage of key features.
The first thing you see is the Dashboard page, which displays Axcient's products and other links. You can click each product card to access the specific product portal.
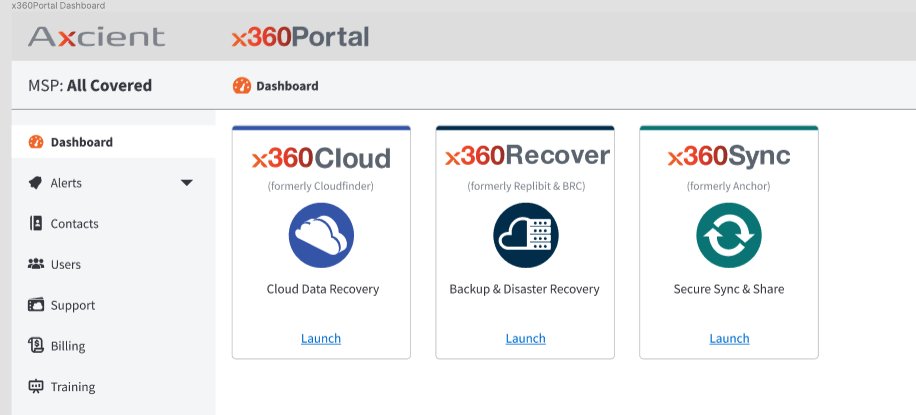
In the right navigation within the x360Portal dashboard, your choices are:
Contacts
The Contacts page lists key Axcient contacts, including your Partner Success Manager, Technical Support, Accounting, and Billing.
The Contacts page provides a consolidated view of your key Axcient relationships. You save valuable time and increase efficiency when you reference this consolidated view of your key relationships.
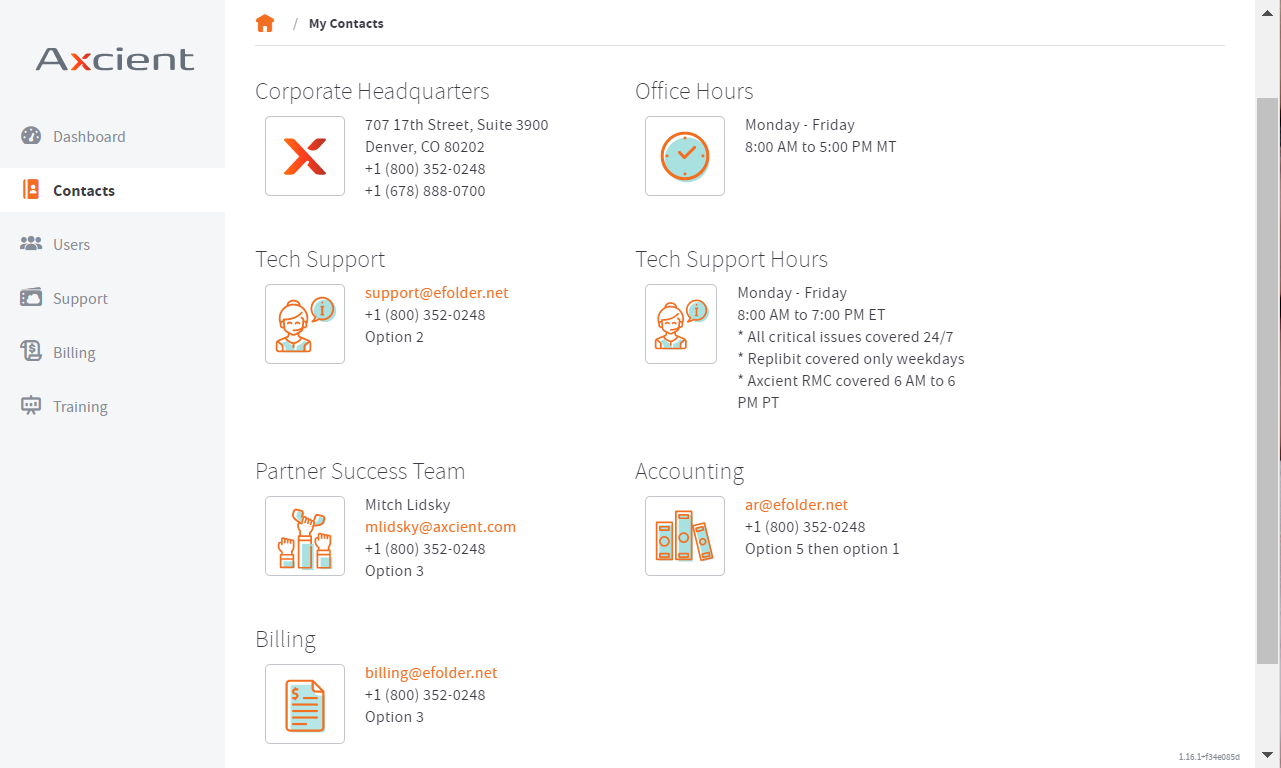
NOTE: Your Sales Representative and Customer Support Team names, email addresses, and phone numbers are customized specifically for you.
Users
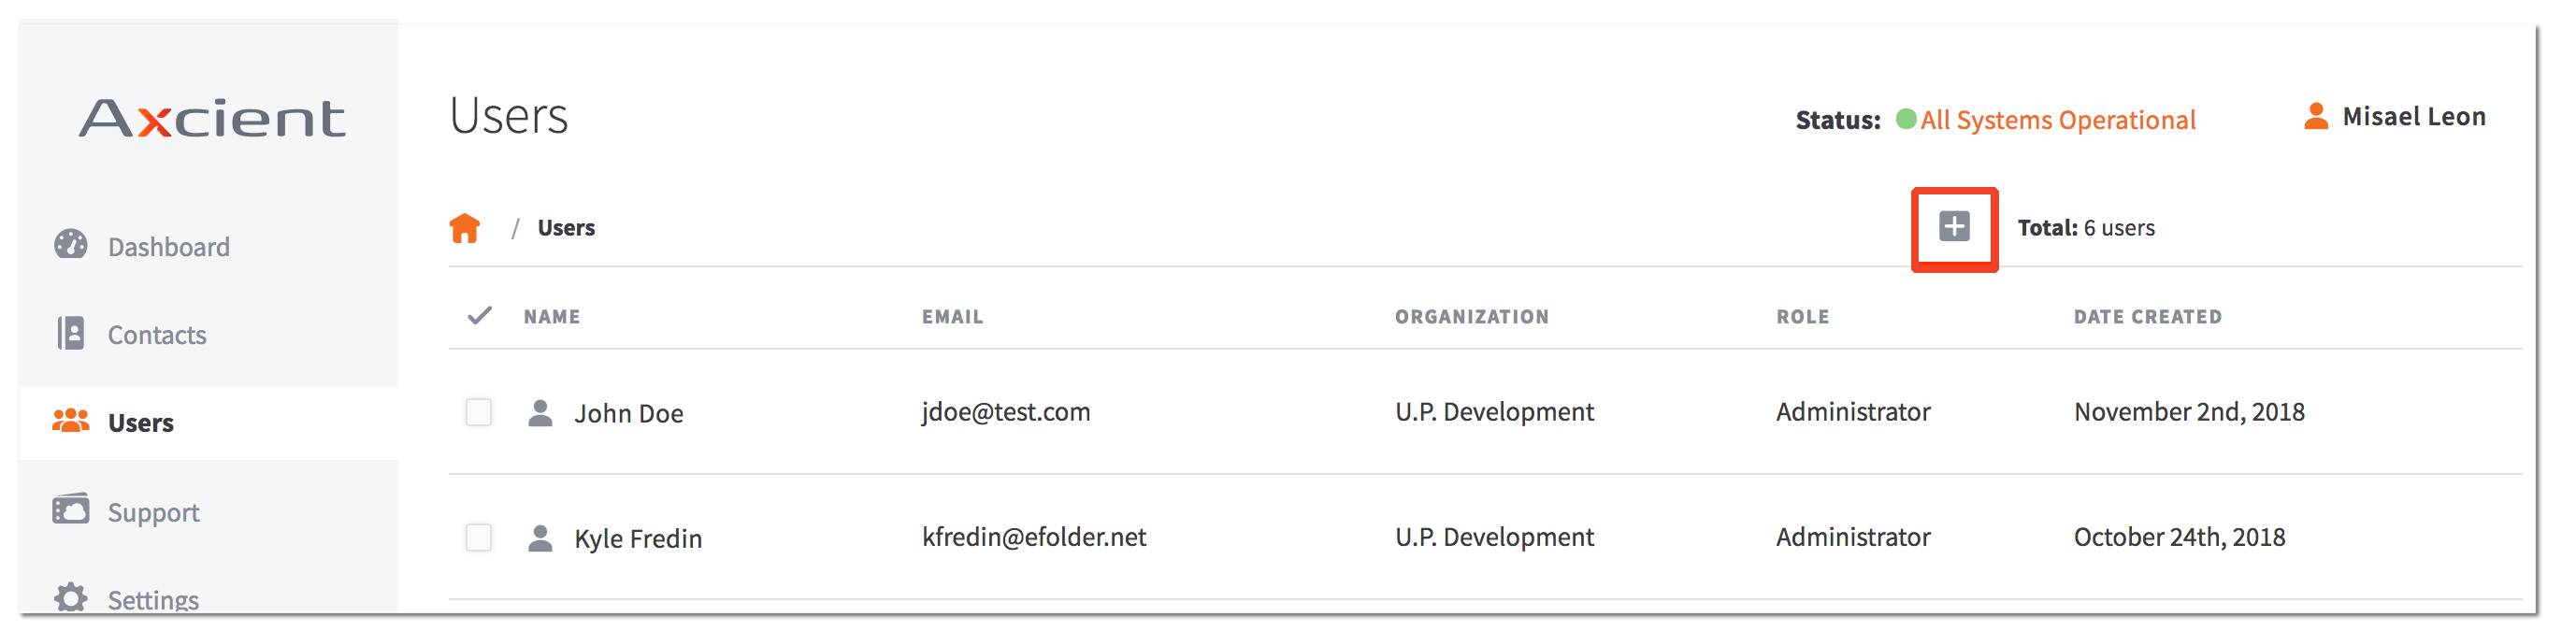
The Users page allows you to create and manage accounts for employees in your organization. You can manage which employees have access and set up different levels of permission roles.
If you are an administrator in the Axcient x360Portal, you can create, edit, and delete user accounts:
The Users page is where you can add employees to your organization, manage which employees have access, and set up their permission roles.
Create a new user account
IMPORTANT NOTE: Please create individual accounts in the x360Portal for each employee who will submit support tickets. Do not use a generic account for your x360Portal contact point or for support ticket creation. Please remove any generic support contacts you may have previously configured and ask your team to use their individual logins when they create support tickets. (Individual accounts are vital to avoid delays in Support response: We need to view who is responsible for responses, as well as their portal access level. Generic accounts delay the resolution of the support issues.)
1. In the Axcient x360Portal, click the Users tab in the right navigation.
2. Click the Create New button.
3. In the Create User screen, enter descriptive information about the new account, including:
- First name,
- Last name,
- Email address, and
- Organization.
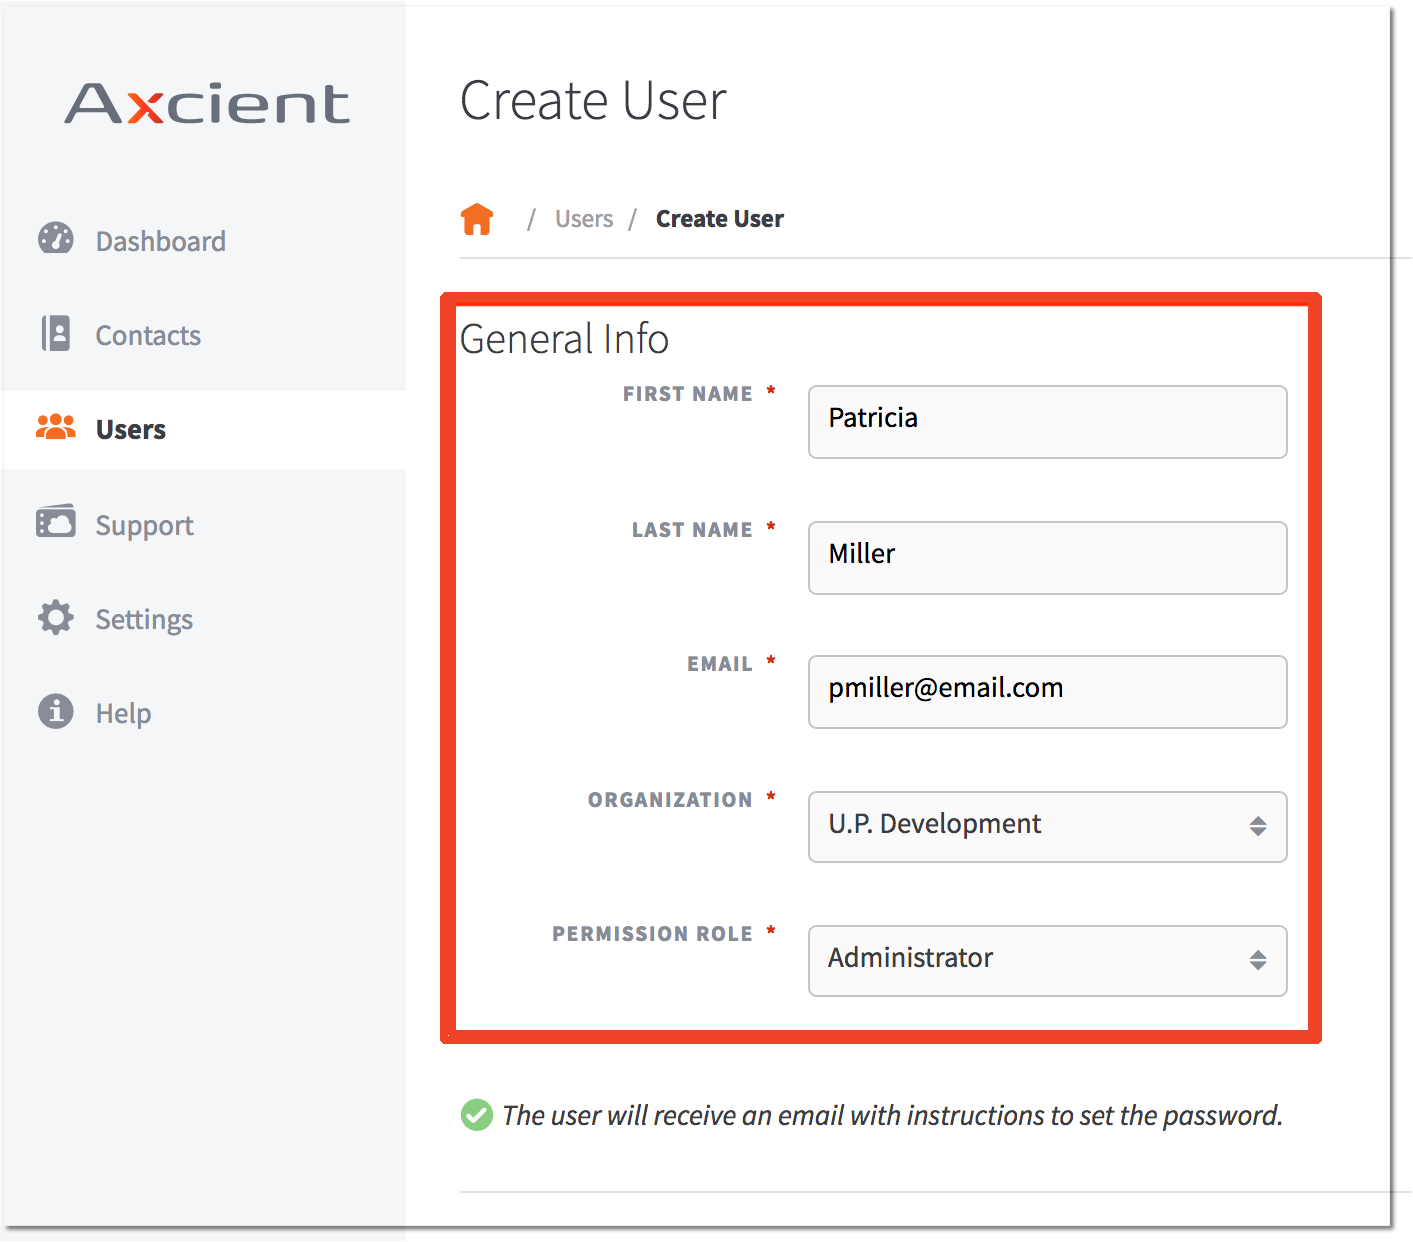
4. Assign the appropriate permission role:
- Select the Basic permission role if you want the user to view all the information on the Dashboard, My Contacts, and Support tabs (including creating and commenting on tickets). A user with basic permissions can also view and edit information related to his or her own account and newsletter preferences. However, a user assigned to the basic role cannot modify the information associated with the organization.
- Select the Accountant permission role if you want the user to have the same permissions as a basic user, with the addition of having access to manage billing. NOTE: In order for the designated Accountant user to have access to billing invoices and financial information, the administrator assigning the role must submit an email to customerservice@axcient.com and specifically request accountant access be allowed to that particular user.
- Select the Administrator permission role if you want the user to view and edit all information on the x360 Portal, including creating, editing, and deleting other users accounts. A user with Administrator permissions is also able to edit information related to the organization.
5. The new user will receive an email with instructions to set the password and log in to the x360 Portal.
You will see a confirmation that the new account has been created:
Edit an existing user account
NOTE: Only a user assigned to the the Administrator role can edit user accounts.
To edit a user account:
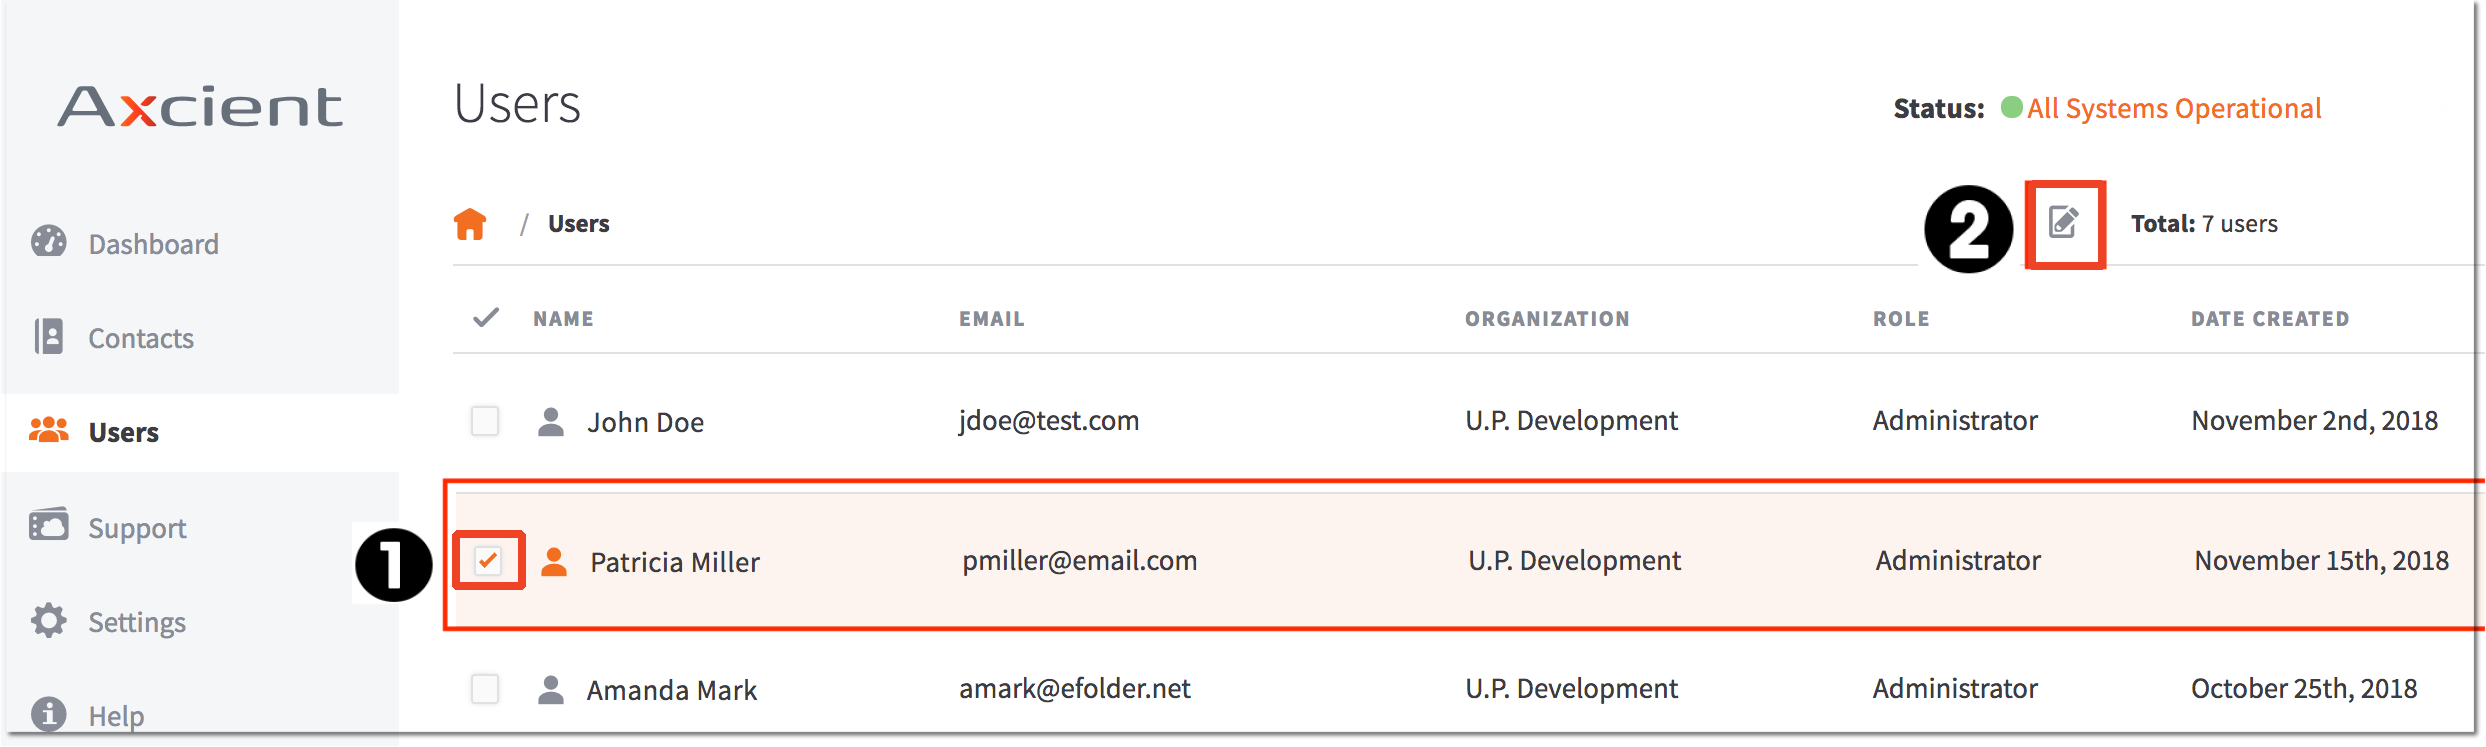
1. In the User page, click the user's name. Alternatively, click the checkbox adjacent to the user's name and click the Edit button.
2. In the Edit User page, click the Edit button and update each field as needed.
3. Click the Save button when you are finished.
Reset a password
To reset an x360 Portal password:
1. In the Users page, select the name of the appropriate user.
2. In the Edit User page, click the Edit button.
3. In the Reset Password section, click the link to reset the password.
4. In the Reset Password dialog box, confirm the password change by clicking the Accept button.
5. Click the Save button. The user will receive an email with instructions to reset the password.
Delete a user account
NOTE: Only a user assigned to the Administrator role can delete User Accounts.
As a best practice, we recommend deleting a user account if the user has left your organization or no longer needs access to the x360 Portal.
To delete a user account:
1. Find the name of the appropriate user and click the adjacent checkbox.
2. Click the Delete button.
3. In the Delete User dialog box, click the Delete button to confirm.
DeleteSupport
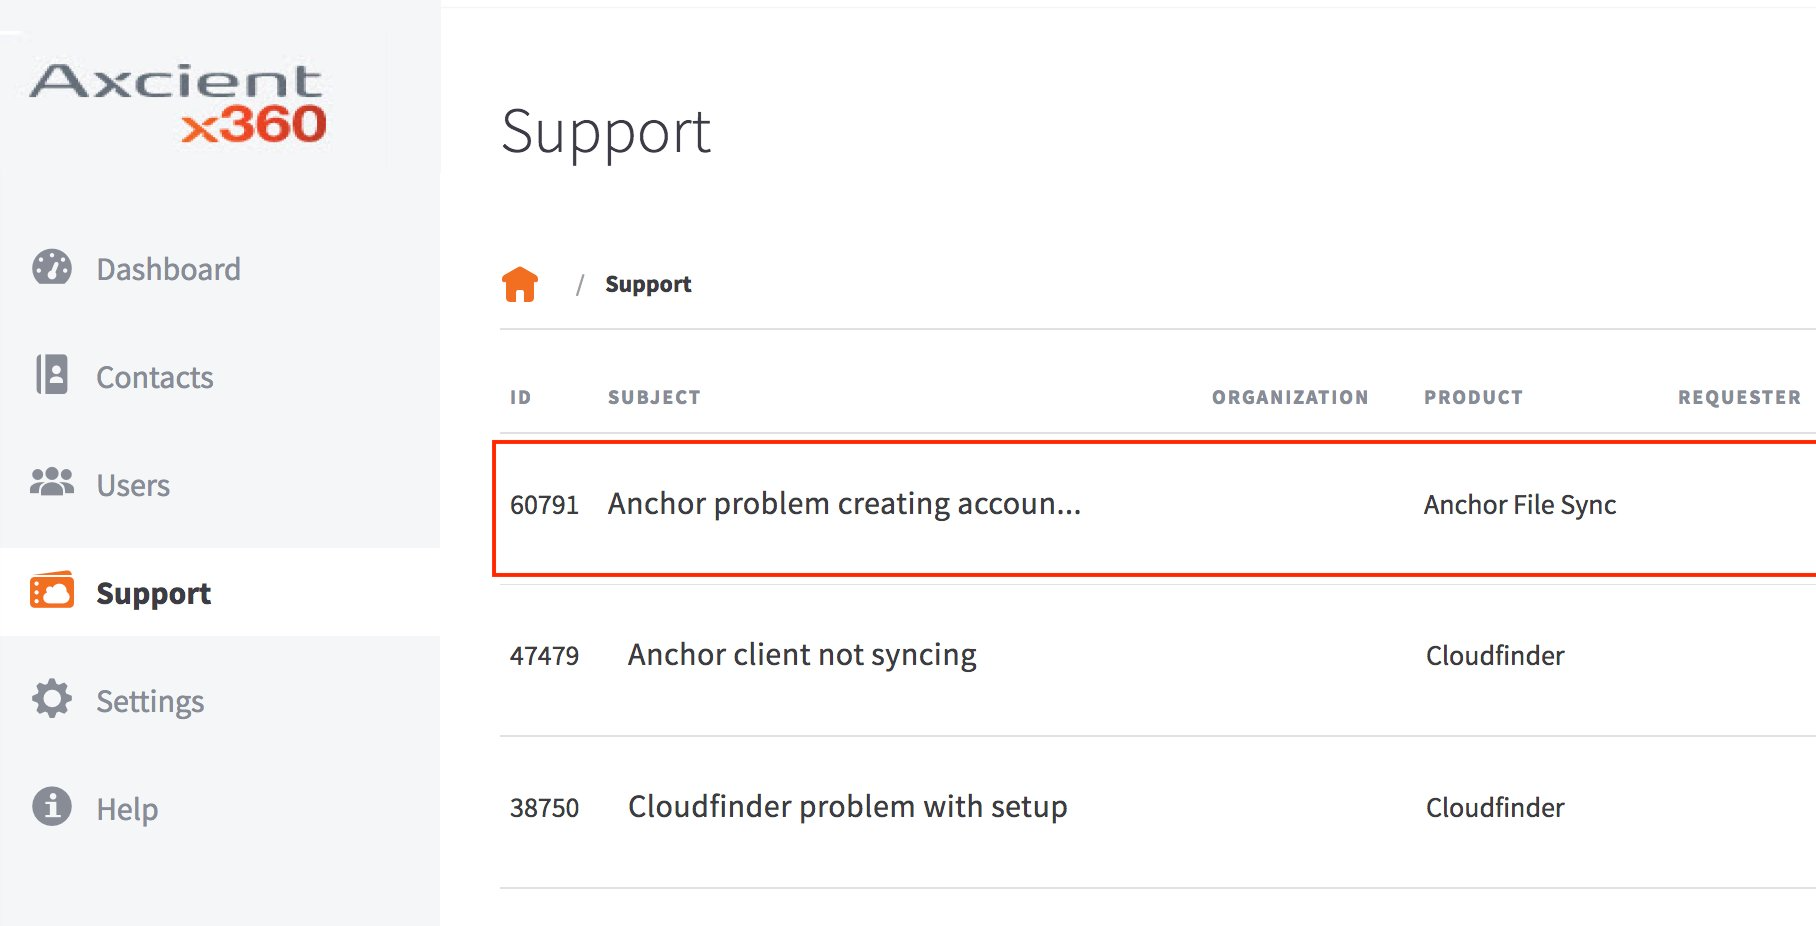
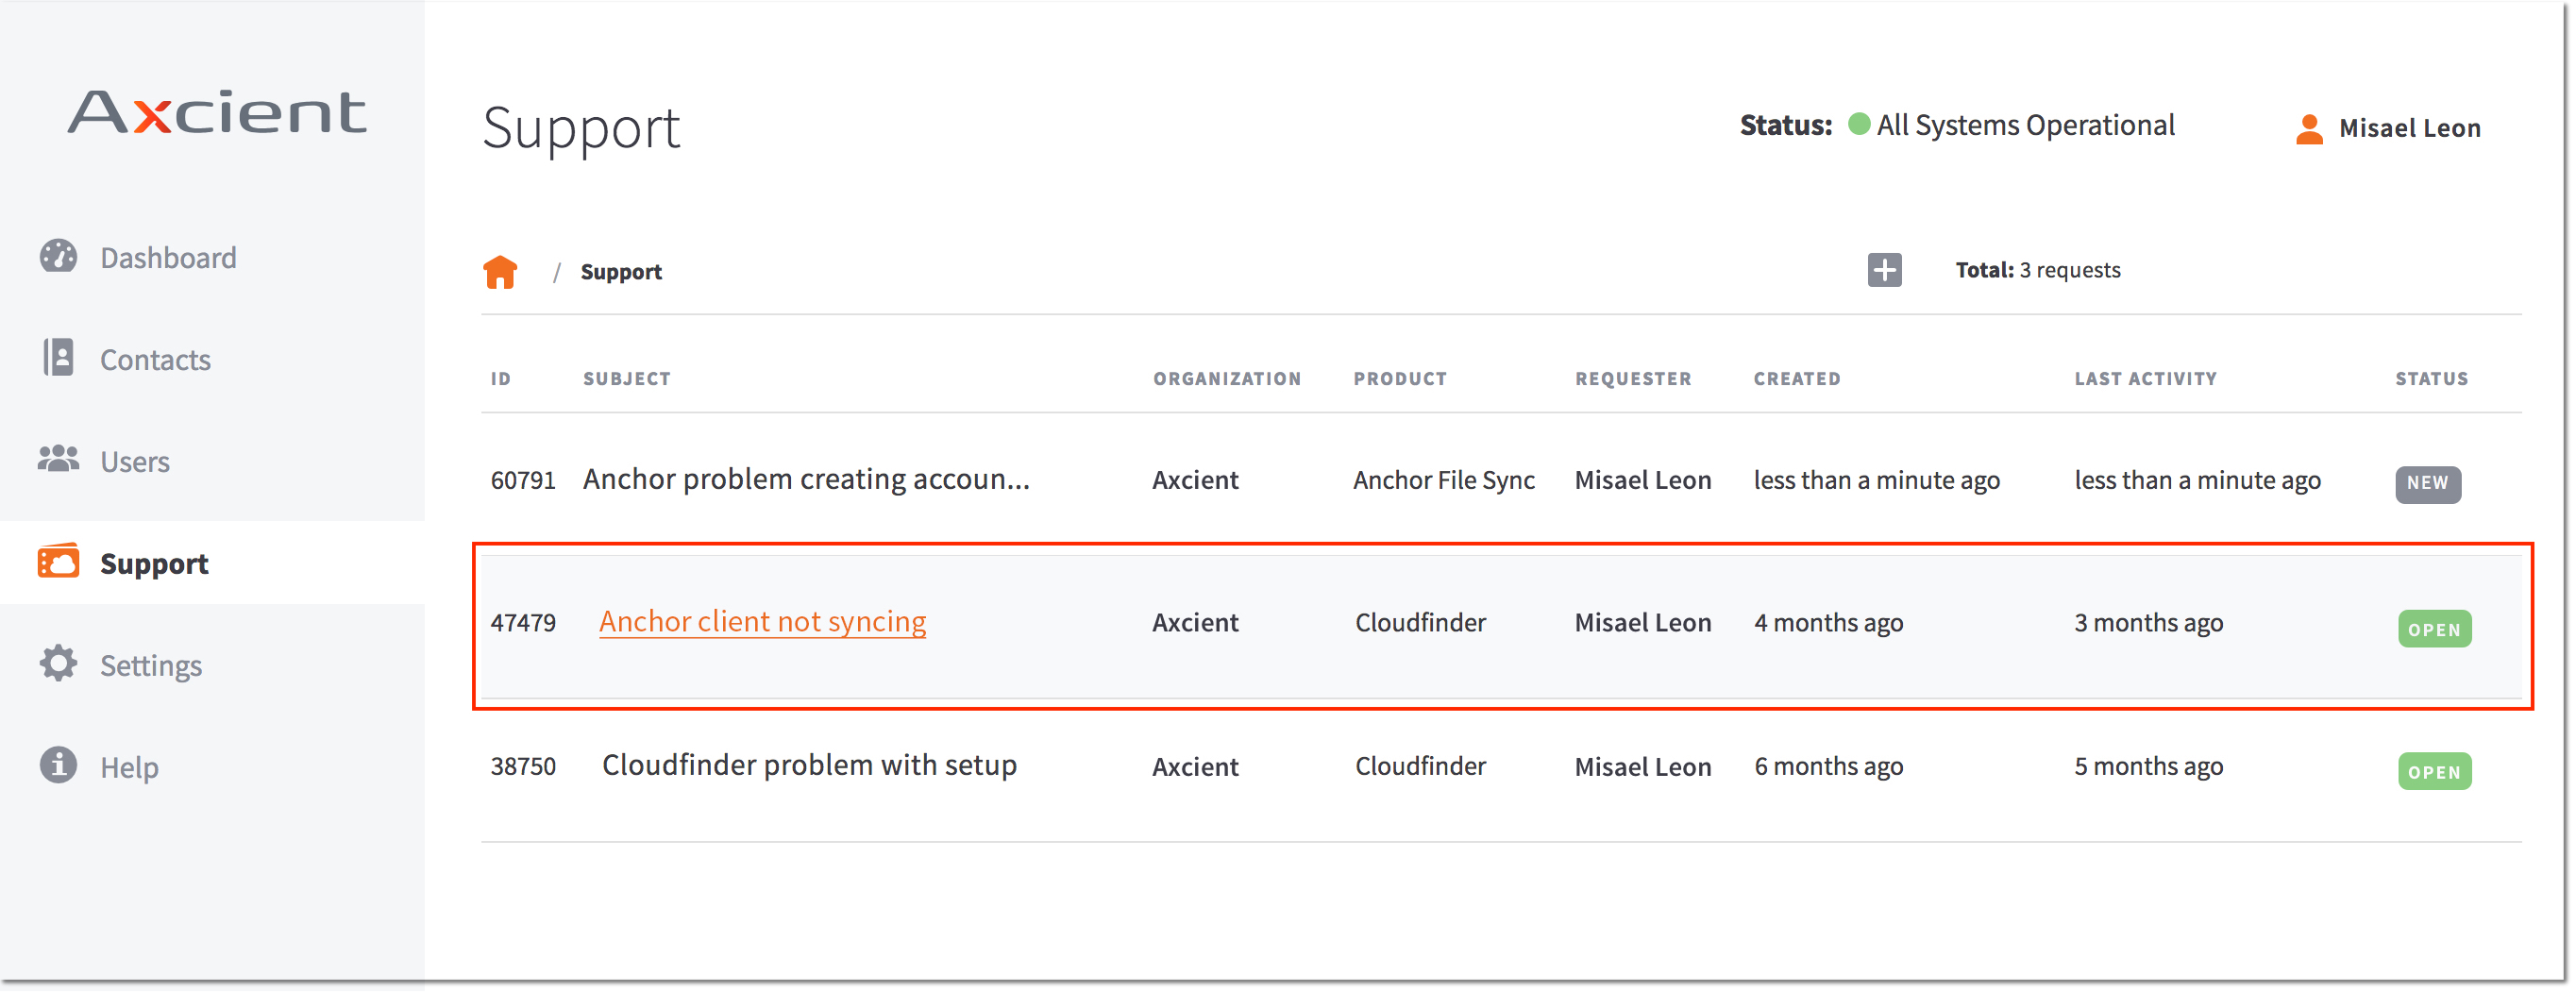
The Support page allows you to submit, view, and track the status of your Support requests. You can view the ticket ID number, the product involved, the creation date, and the status of all of your Support requests from this page. Additionally, you can attach files and add comments to your existing requests.
How do I create a new Support request ticket?
1. Log in to your x360Portal account.
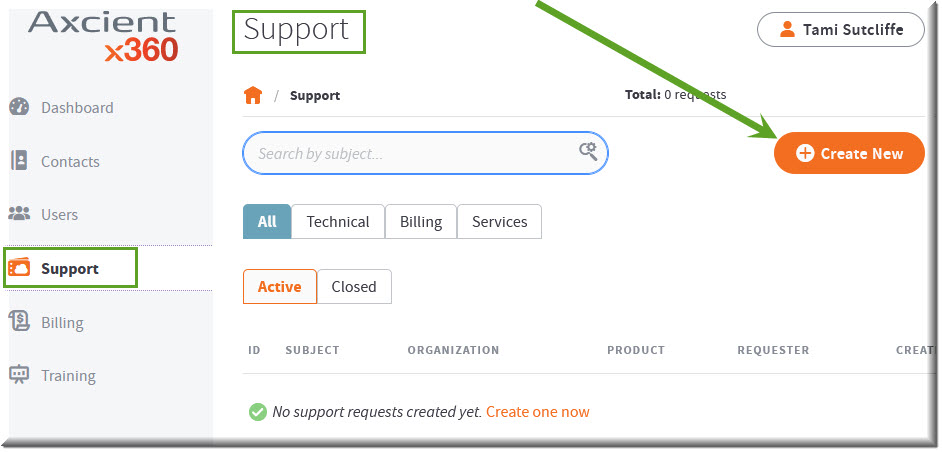
2. Navigate to the Support tab in the left navigation panel.
3. When the Support page opens, click on the orange Create New button located on the top navigation bar above the table list.
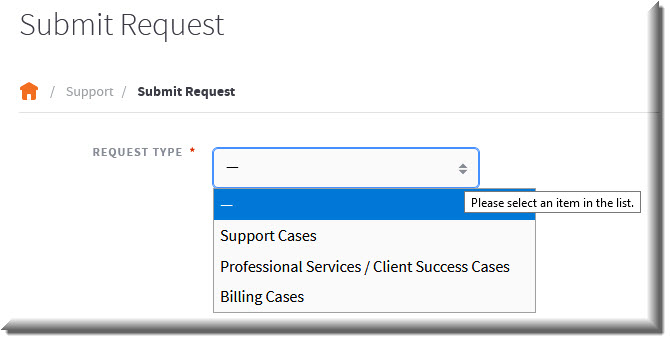
4. Select the type of support needed.
The support Request type options are:
- Support Cases (Technical help with a product)
- Professional Services (Help with customer accounts)
- Billing cases (Questions about your invoices)
5. If this is a technical support request (involving help with a product), select Support Cases and then select the specific product you are interested in:

Available options are:
- x360Cloud
- x360Recover - D2C
- x360Recover - Replibit
- x360Recover - BRC
- x360Recover - Fusion
- x360Sync
- x360Portal
- Axcient Cloud - Backup for Files
- Axcient Cloud - ShadowProtect
- Axcient Cloud - Quest
- Axcient Cloud - Veeam
- Axcient Direct Restore
- Other
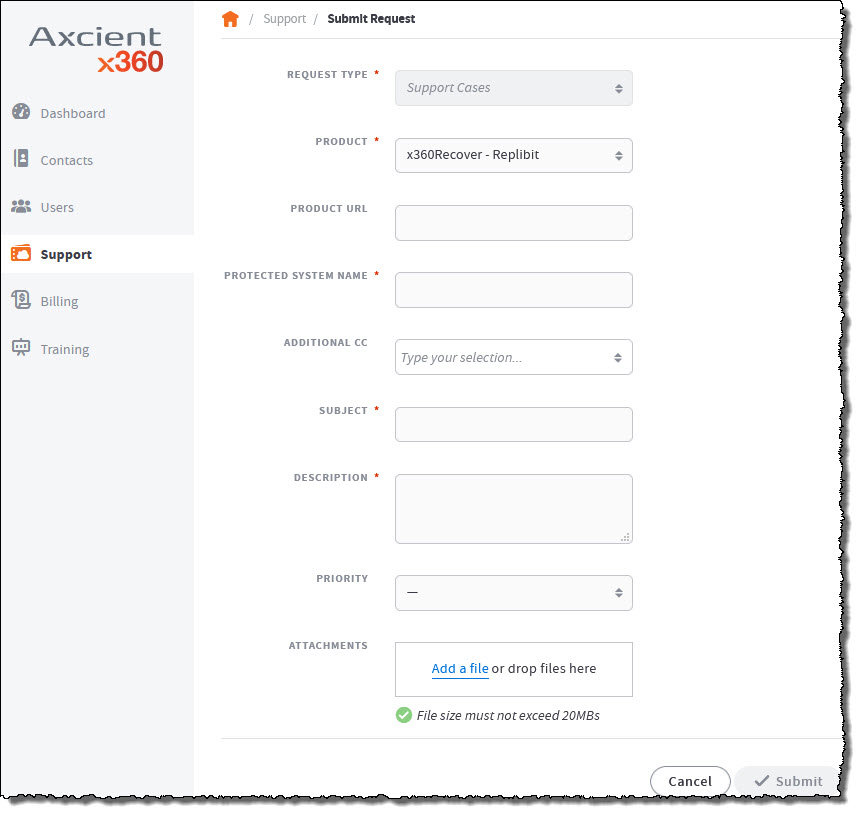
6. After you select the product to be supported, fill in the fields.
Depending on the product you have selected, you will be asked to provide varying product details.
You will also be able to include
- a short description of the issue
- the priority of the issue (Priorities are listed at Axcient Support Service Level Agreements)
- any related attachments you would like to add. (Attached file size must not exceed 20MB.)
Example:
This example displays the fields required to submit a ticket related to x360Recover (Replibit):
7. After you have completed all fields and attached any desired files, click the Submit button.
Note: The Submit button will remain grayed out until all required fields for this request type have been completed. When all required fields have been completed, the button will turn orange and can be clicked.
8. You will see a confirmation message when your Support request ticket has been successfully created.
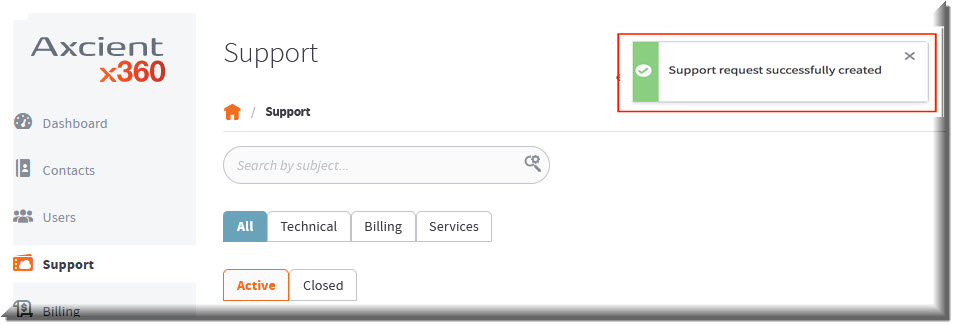
When you review your Support Requests list the next time, you will see the newly created ticket on top (because it is the ticket with the most recent activity.)
How do I review, comment or update an existing Support request ticket?
1. Click on the Subject of the Support request ticket on the table list.
2. From the Request Details screen, click on the Add to conversation field to add a new comment.
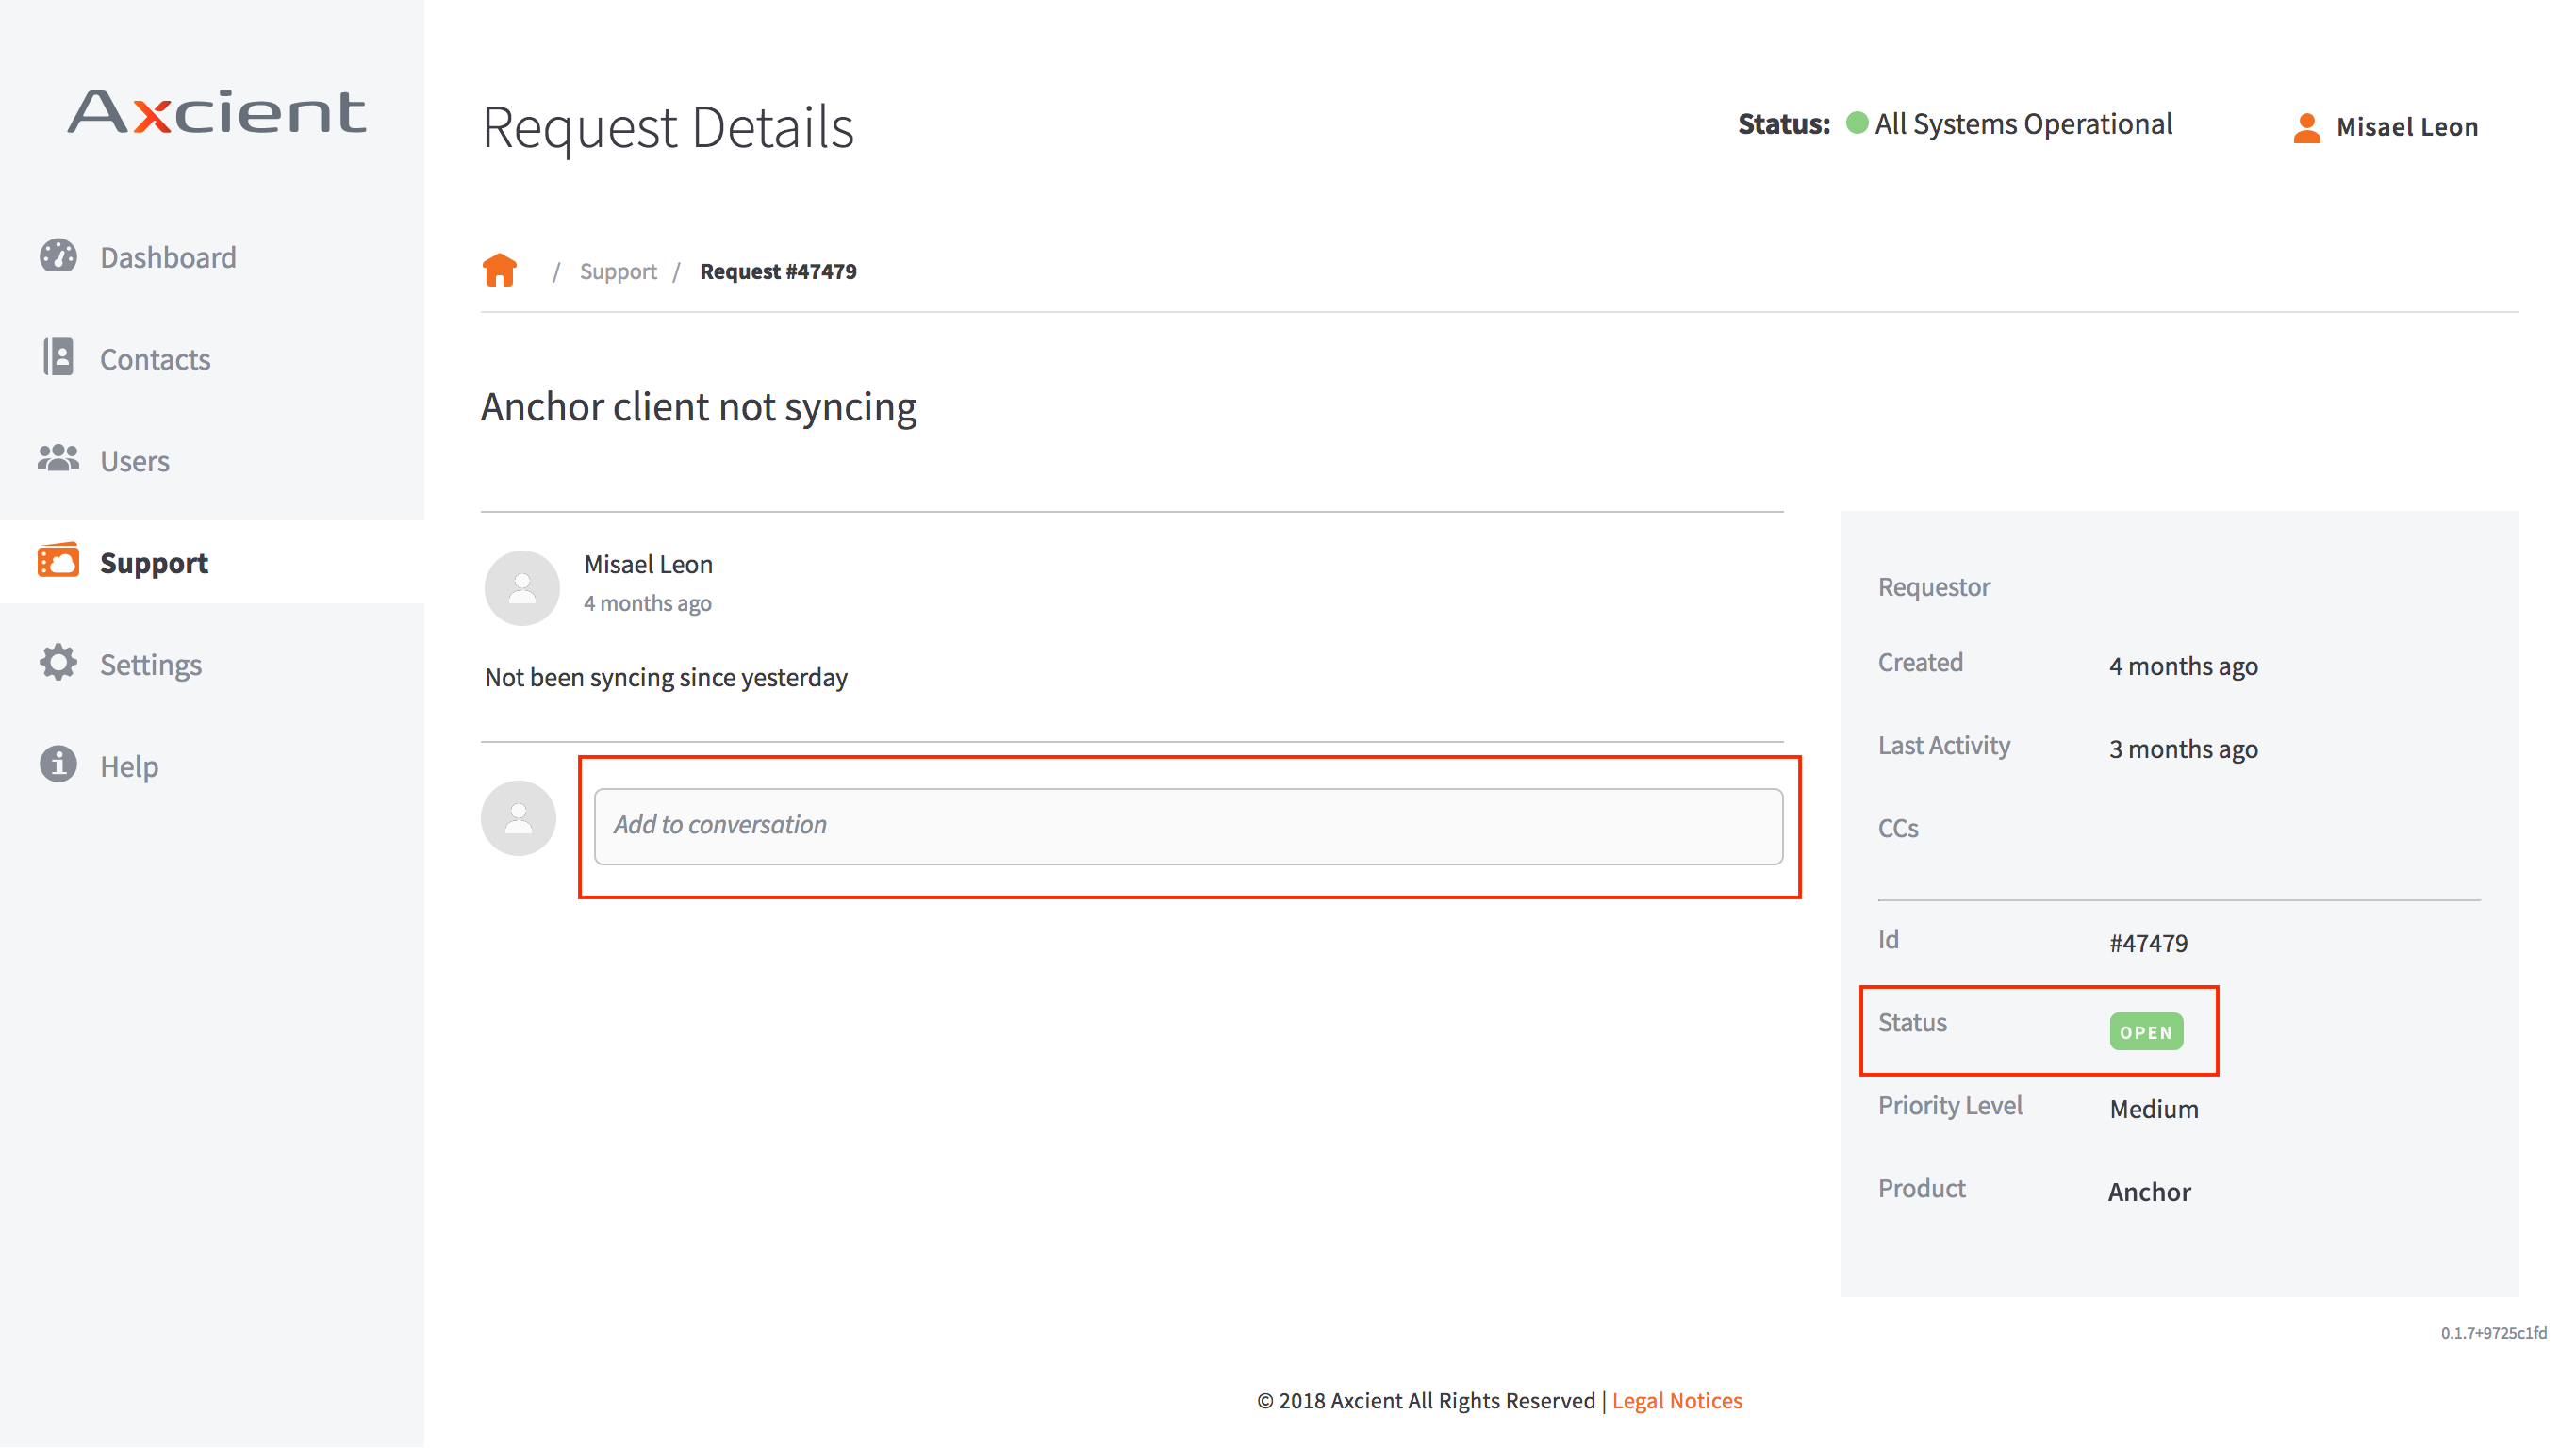
3. Add the pertinent comment on the expanded field. You may attach a file if necessary, as evidence of the issue.
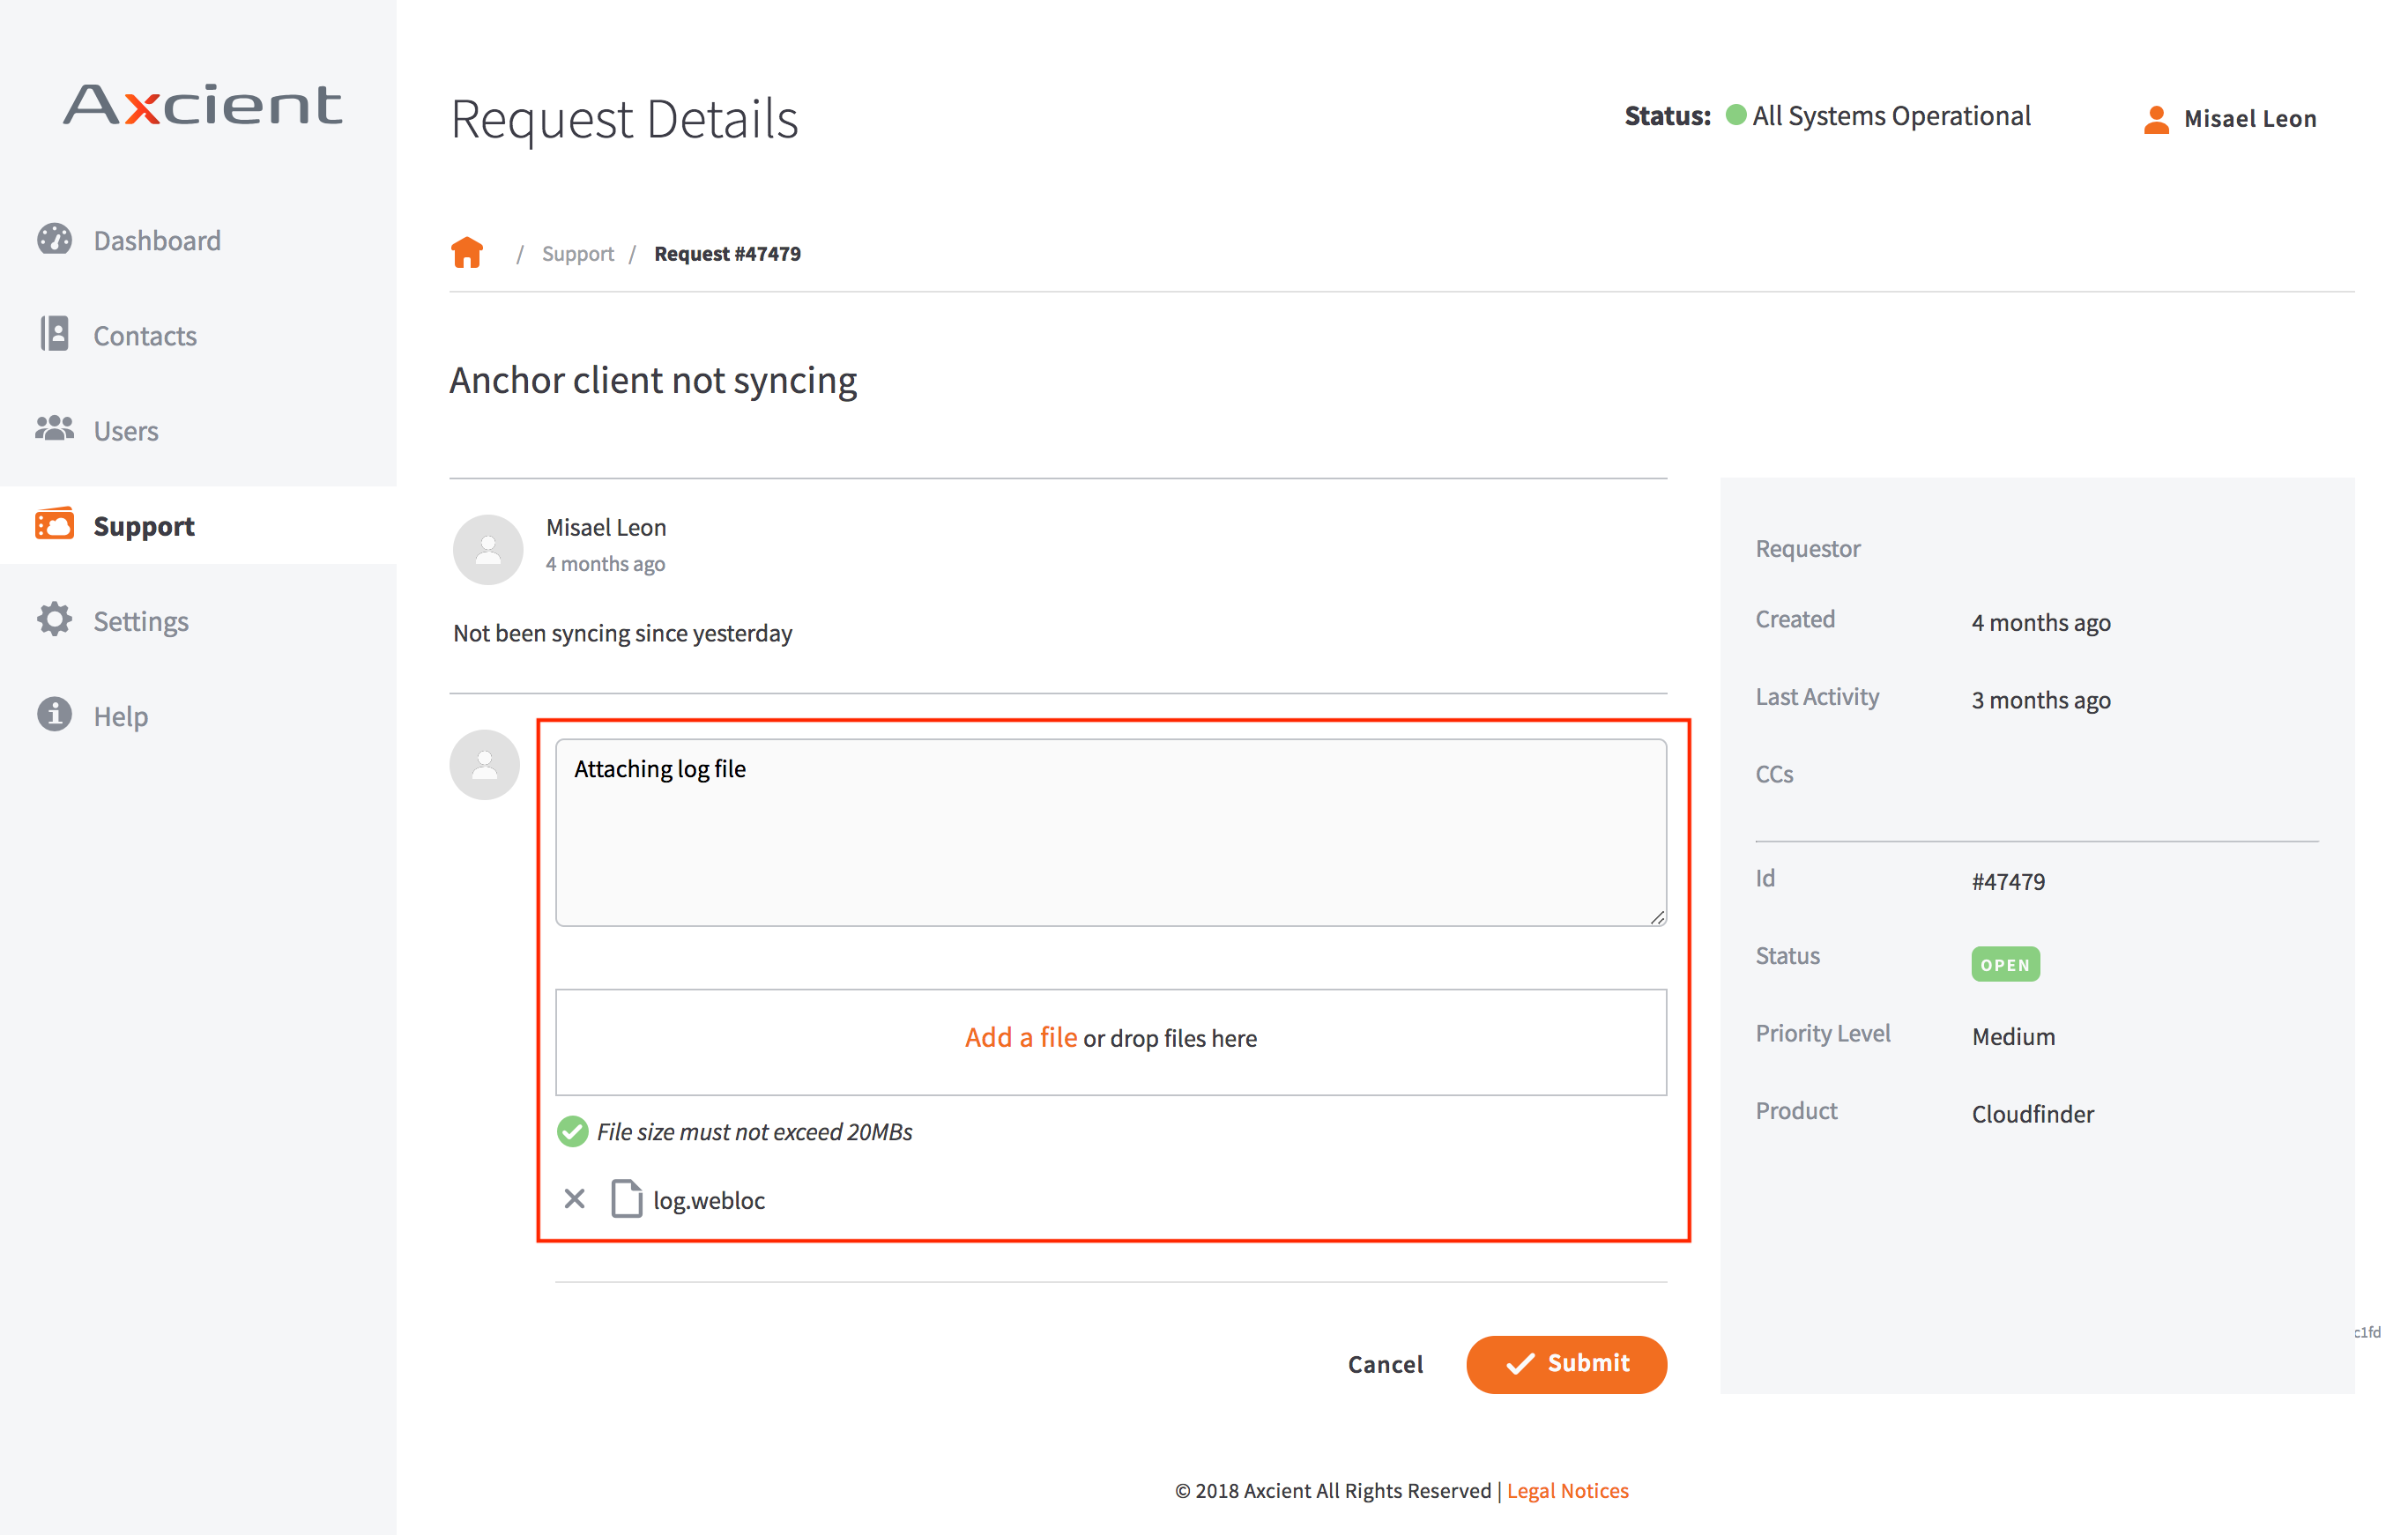
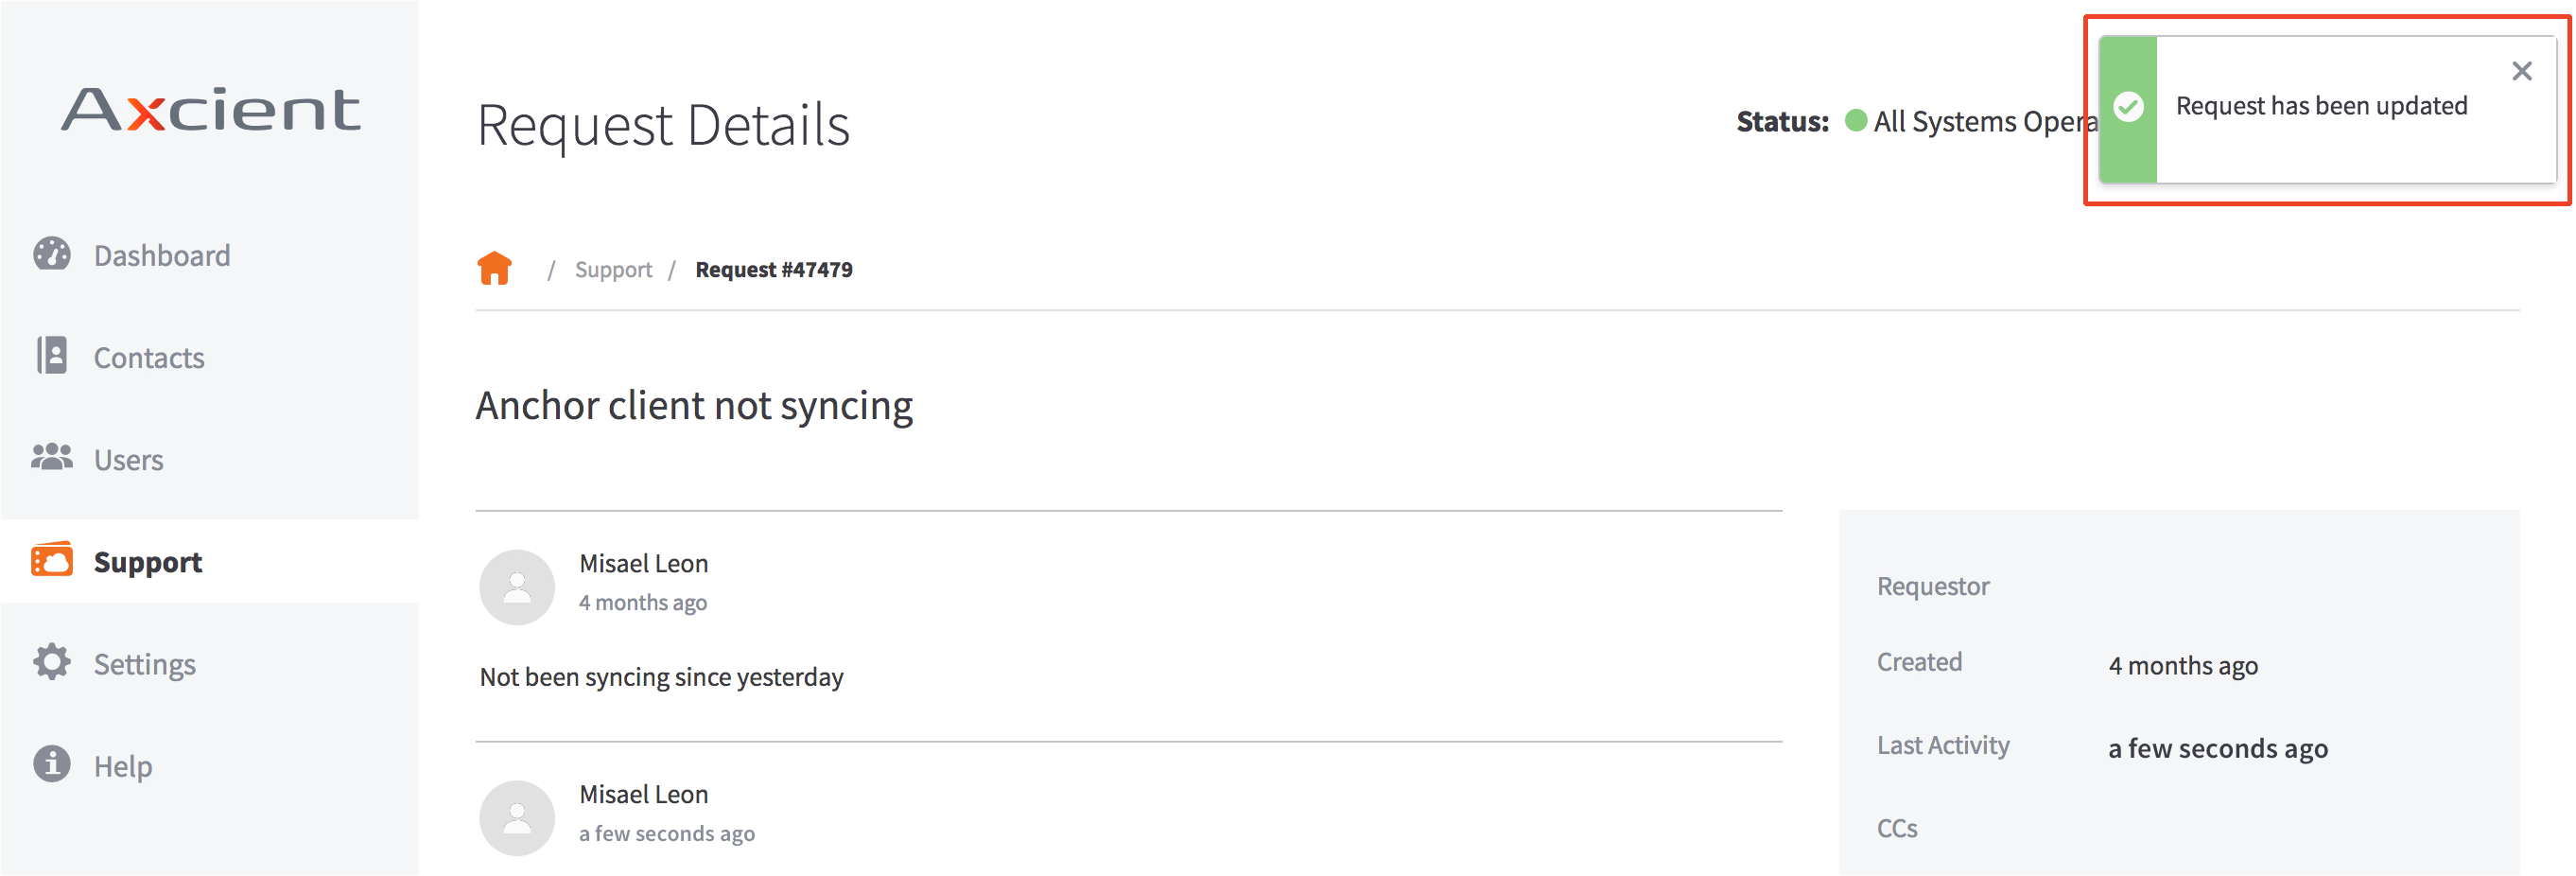
4. Click the Submit button. You will see confirmation when the Support request ticket has been successfully updated.
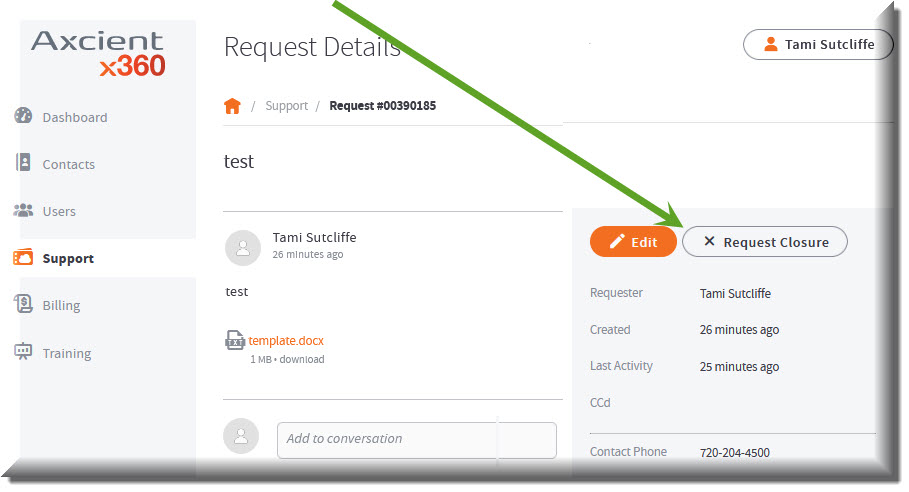
How do I close or delete a Support request ticket?
Currently, there is no way to delete Support request tickets.
To close the ticket, you may click the Request Closure button on the specific ticket.
When you click this button, you will complete a Closure Reason field, describing the situation. After you have filled in the reason for the closure, click the orange Close Ticket button.
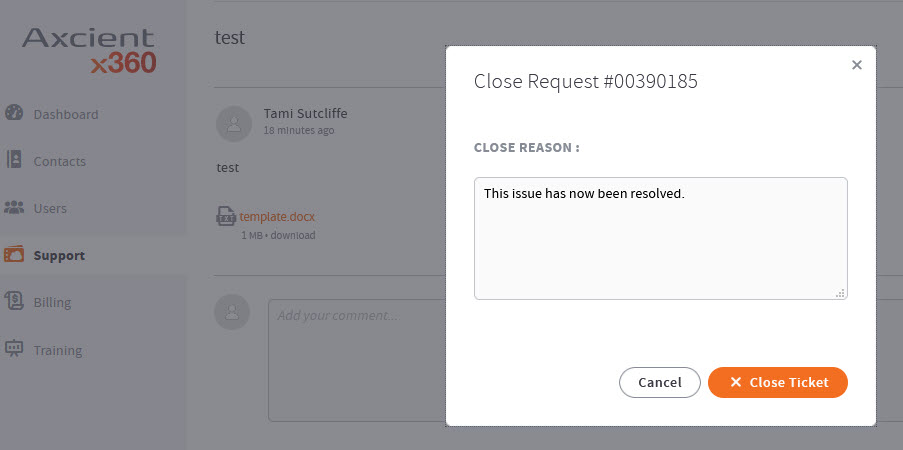
A confirmation will appear when the ticket has been closed: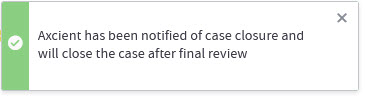
SUPPORT | 720-204-4500 | 800-352-0248
- Contact Axcient Support at https://partner.axcient.com/login or call 800-352-0248
- Free certification courses are available in the Axcient x360Portal under Training
- Subscribe to the Axcient Status page for a list of status updates and scheduled maintenance
Billing
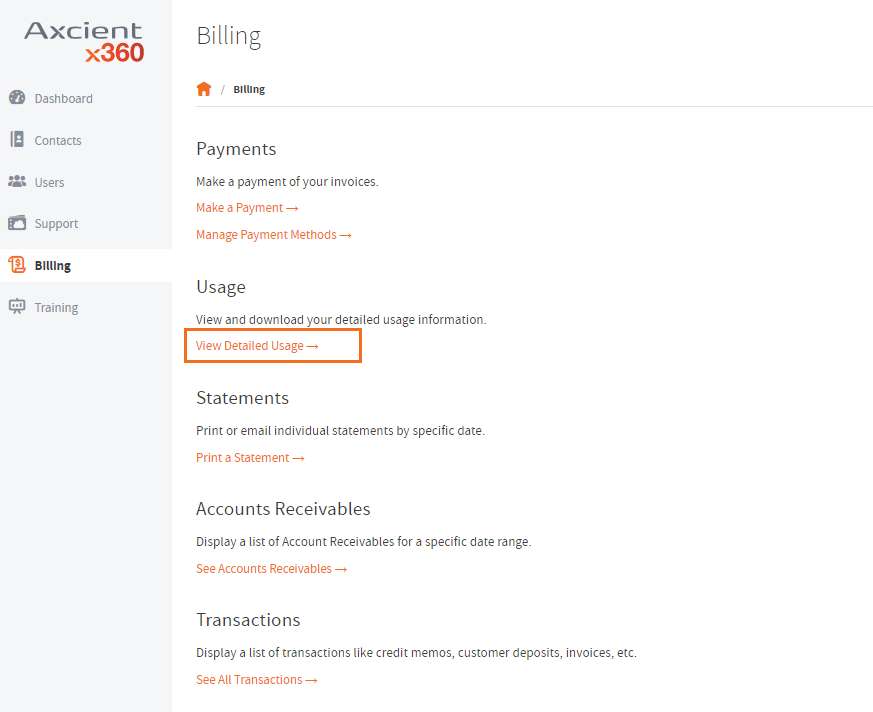
The Billing page has links to make a payment on your invoices, manage payment methods, view and download detailed usage, print or email individual statements by a specific date, display a list of accounts receivable for a specific date range, and display a list of transactions (such as credit memos, deposits, and invoices)
In the x360Portal, you can use the Billing page to complete key Axcient billing tasks. If you have been assigned an Administrator or Accountant user account, you can manage payments, usage, statements, transactions, and more using the integrated NetSuite Customer Center.
Pay your invoice
You can access the NetSuite Customer Center using your preferred Web browser.
1. In the x360Portal, click the Billing tab.
2. In the Billing page, click the Make a Payment link.

3. Select an invoice to pay.
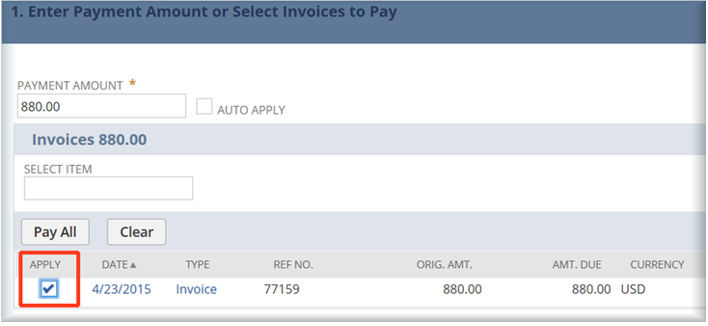
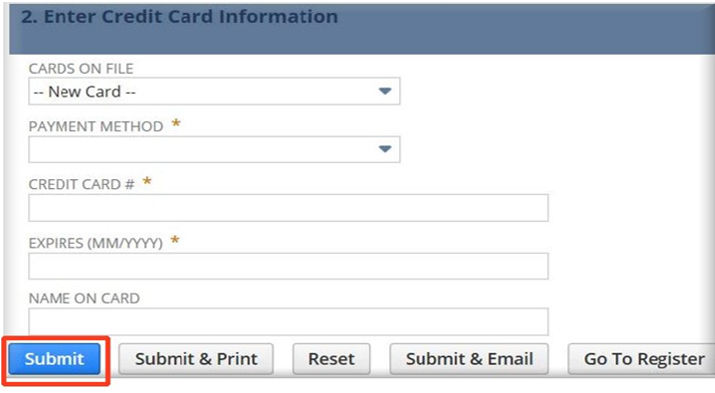
4. Enter your credit card information. Optionally, select the Save this Card checkbox to keep the card on file for future payments. You can edit your payment information at any time.
5. Click the Submit button. Or, click the Submit and Email button to receive an email copy of your receipt.
View billable usage lines
You can access billing usage details using the Usage Lines report.
1. In the Billing page, click the View Detailed Usage link.
2. To generate an HTML table of usage lines:
- Click the View List radio button.
- Enter the dates for the Start Usage Date and End Usage Date range.
- Click Submit Search. You can view and optionally copy the content in the HTML table.
Print or email statements
To print or email statements:
1. In the Billing page, click the Print a Statement link.
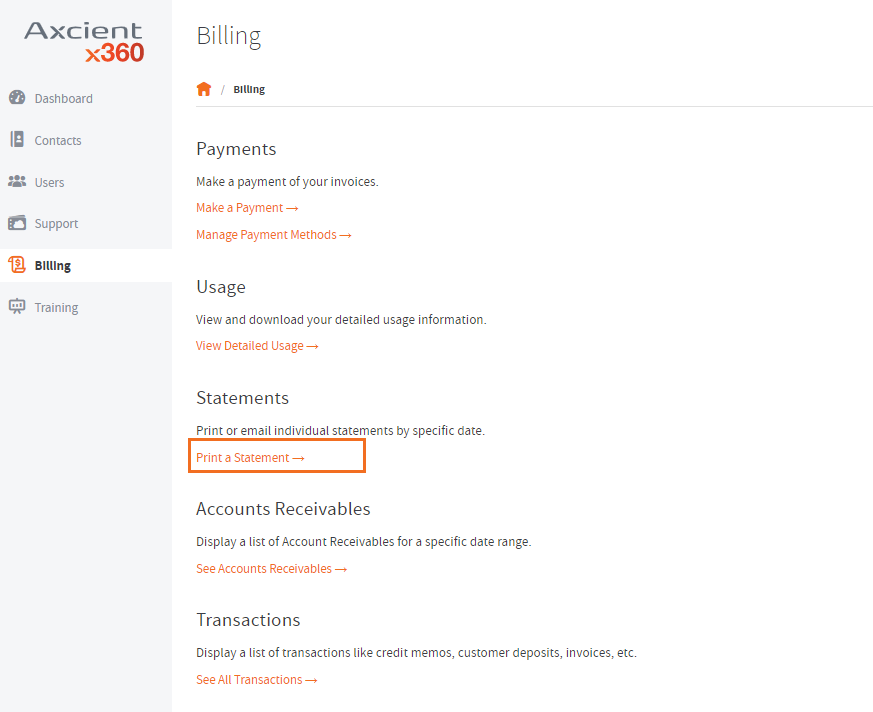
2. Use the Statement Date field to select the specific date associated with the statement you want to view.
3. Optionally, click the Show Only Open Transactions to filter out closed transactions.
4. Click the Print button to view a PDF version of your statement. You can also email or fax a statement.
View the accounts receivable register
To view the Accounts Receivable Register:
1. In the Billing page, click the See Accounts Receivable link.

2. To view all current and past due invoice amounts, use the Date filters to generate a report.
View all transactions
To view a list of all transactions:
1. In the Billing page, click the See All Transactions link.
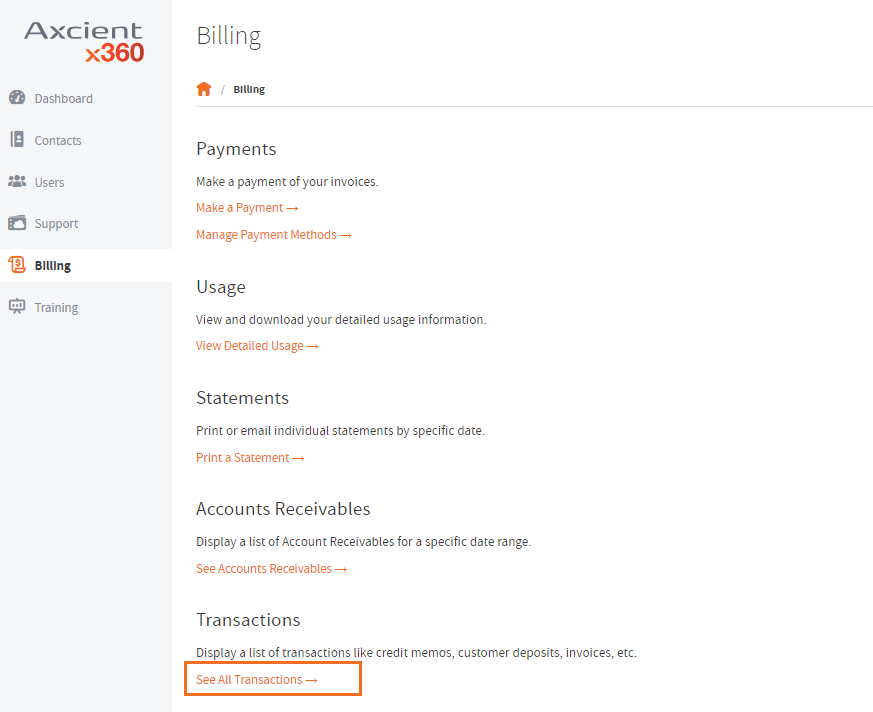
2. You can choose to export the transaction records as a text file, CSV file, or PDF file. You can also print the selected documents.
How to activate Auto Pay Settings
| IMPORTANT NOTE: Please be aware that once Auto Pay settings have been activated, it requires Axcient's intervention to turn those settings off. You cannot disable the auto payment feature yourself once it is activated. |
1. Log in to the NetSuite Customer Center
2. Click the Auto Pay Settings section in the upper right corner:

3. When the data entry screen opens, enter the desired credit information for the auto payment.
Once the credit card information is submitted, check the box for autopayment to enable it.

- Please be aware that once Auto Pay settings have been activated, (once the box is checked) it requires Axcient's intervention to turn those settings off.
You cannot disable or uncheck the auto payment feature yourself once it is activated.

Training
The Training page provides instant access to all Axcient training. On the Available tab, you can self-enroll in available product certifications; Axcient offers full product certification courses for all core products.
The Training page provides instant access to all Axcient Product Certification courses and training resources. In the Training page, you can:
- Browse Product Certification courses and training resources.
- Complete Product Certification courses.
- Track progress.
To view all available Product Certification courses and start a new Product Certification path:
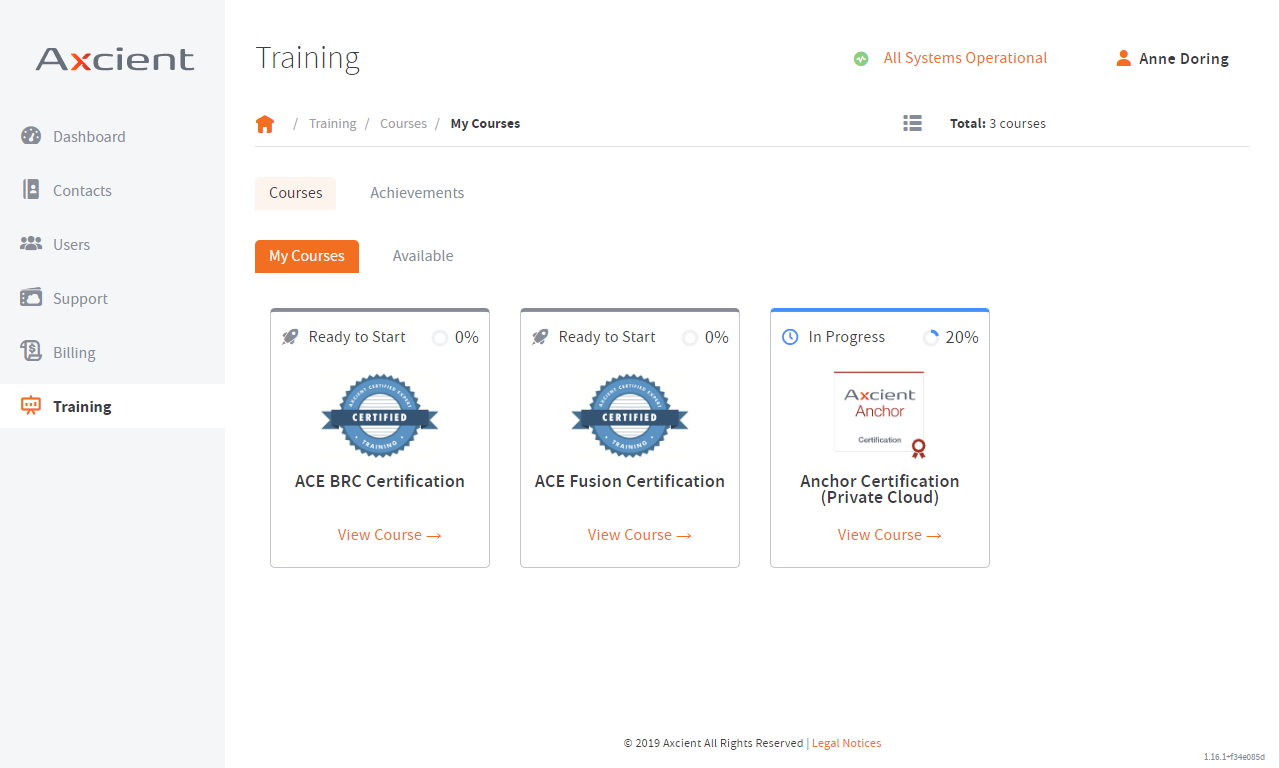
1. In the x360 Portal, click the Training tab. You will see all Product Certifications in which you are currently enrolled listed under the My Courses subtab.
2. Click the Available subtab. You will see additional Product Certification courses in which you are not currently enrolled.
3. Click the Product Certification card to begin product certification for a specific product. You will see a list of all courses that make up your selected product certification. You will also see the status of each course, as well as the overall status of product certification.
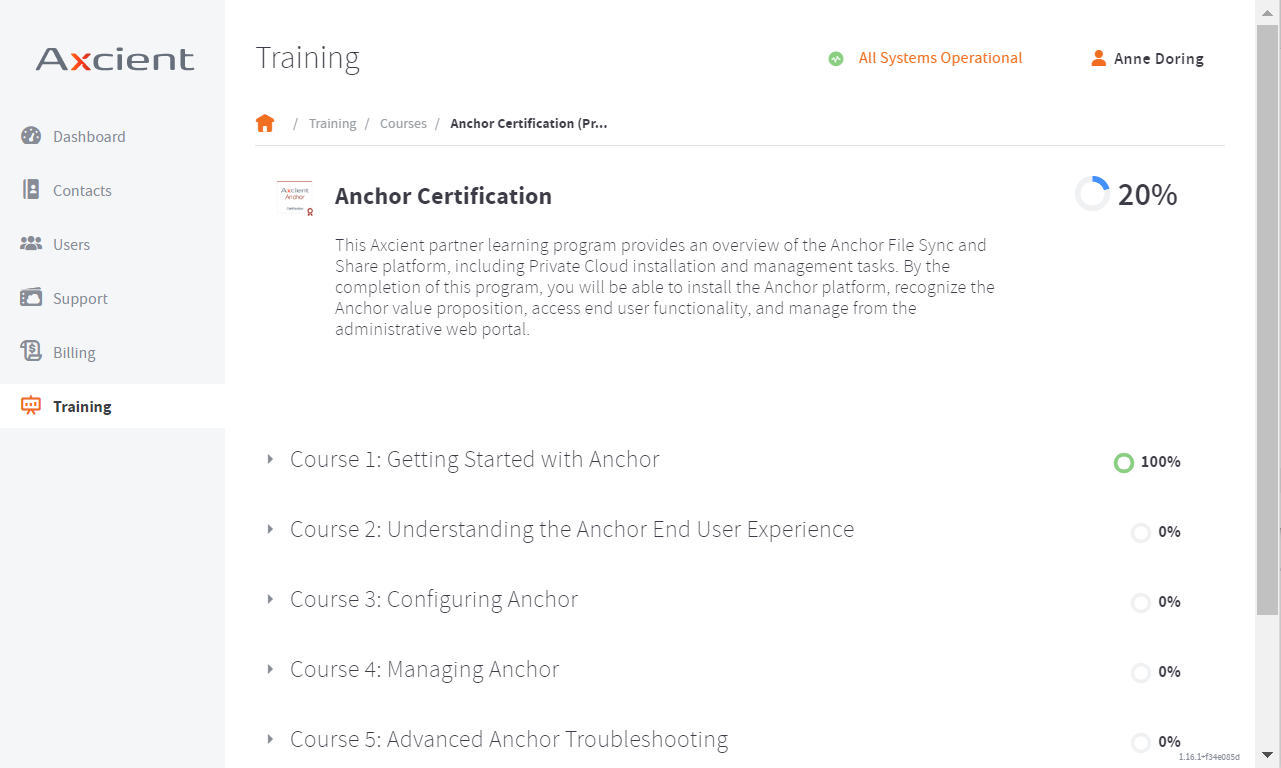
4. Click to launch a course. When you have completed all required courses for the Product Certification path, you are considered certified.
To view your achievements:
- In the Training page, click the Achievements subtab. You can view all completed courses and the date you completed the course.
SUPPORT | 720-204-4500 | 800-352-0248
- Contact Axcient Support at https://partner.axcient.com/login or call 800-352-0248
- Free certification courses are available in the Axcient x360Portal under Training
- Subscribe to the Axcient Status page for updates and scheduled maintenance
1605 | 2025