
When will I need this?
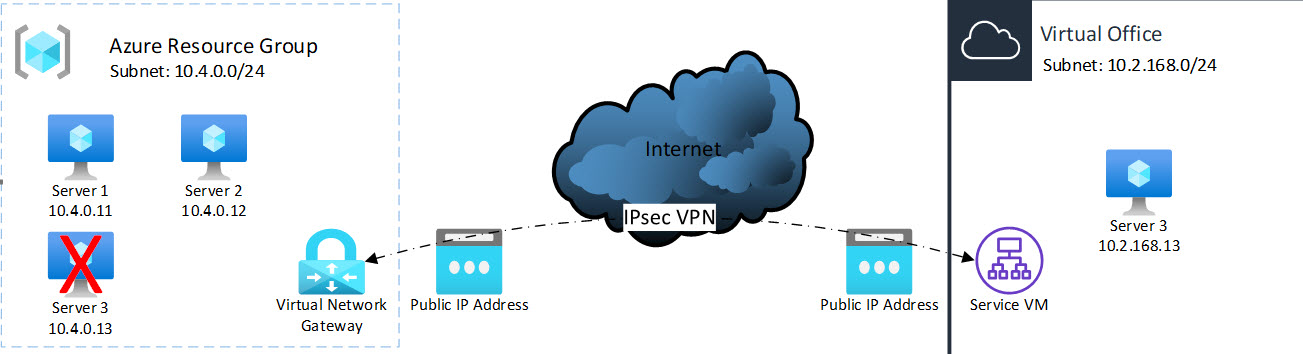
Partners running virtual machines in Microsoft’s Azure cloud might need to failover a compromised or corrupted protected system in Axcient’s Virtual Office environment.
When you only want to failover a subset of your Microsoft Azure protected systems, you will need to link the two network environments. The easiest way to do that is by deploying an IPsec site-to-site VPN between both clouds.
These process involves three distinct parts:
Part 1: Set up configurations for IPsec in Virtual Office
A. Start Axcient Virtual Office
STEP 1. To start an Axcient Virtual Office, log in to x360Recover Manager.
- Log in directly at https://my.axcient.net or
- Log in via the x360Portal at https://portal.axcient.com
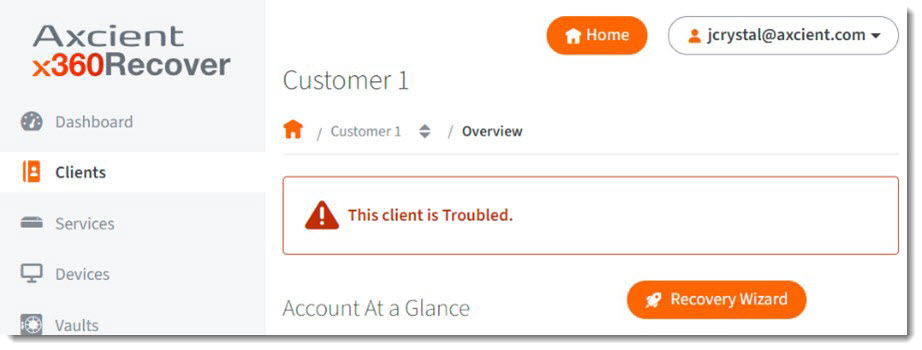
STEP 2. Navigate to the desired client and click Recovery Wizard.
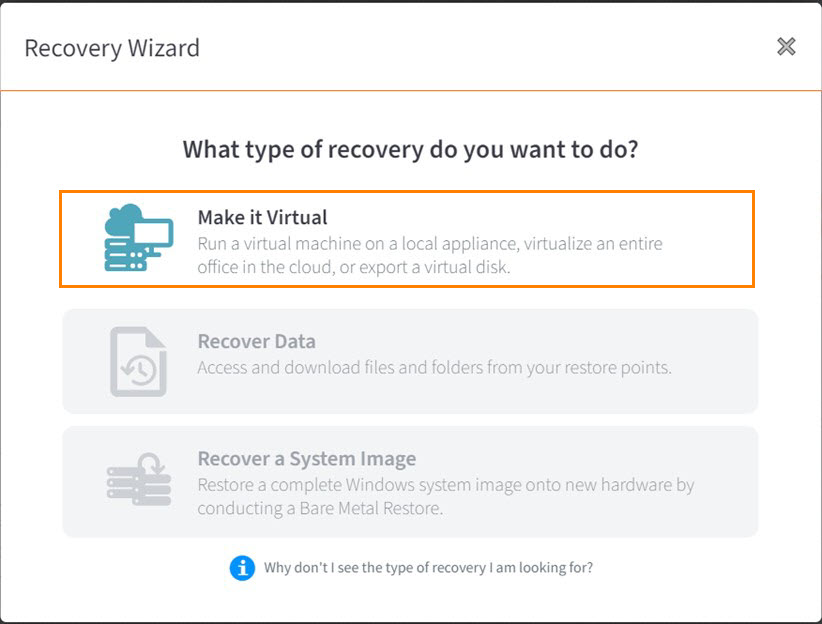
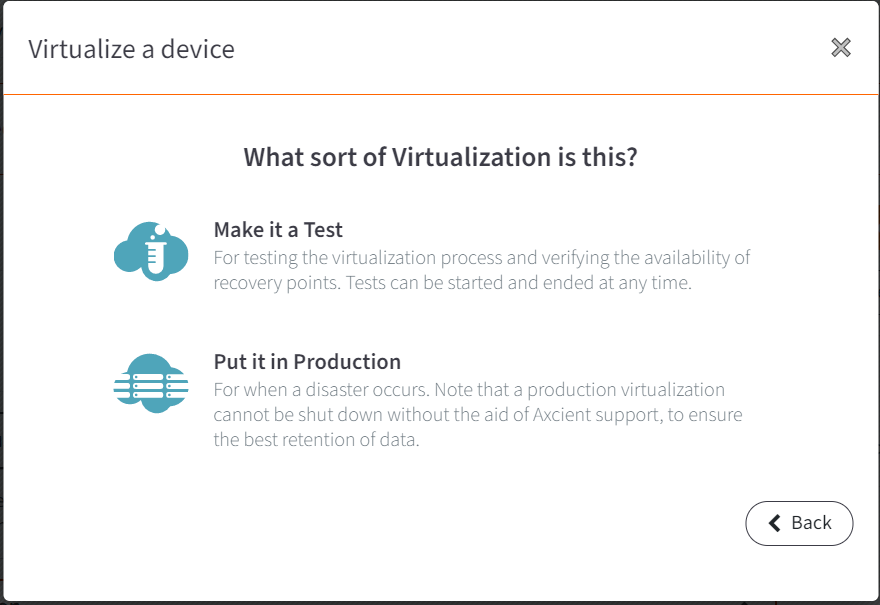
STEP 3. When the Recovery Wizard opens, select Make it Virtual:
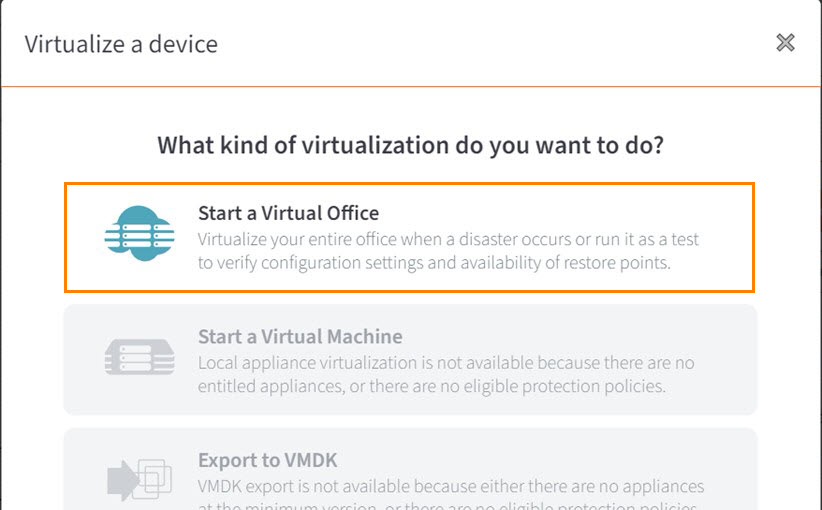
STEP 4. When the Virtualize a device window opens, select Start a Virtual Office:
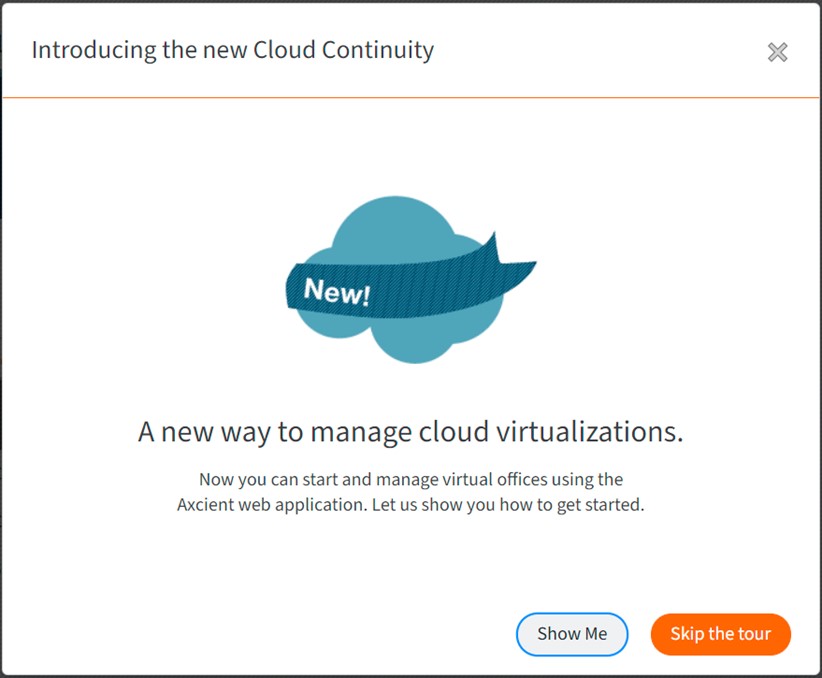
STEP 5. When the Introducing the new Cloud Continuity window opens, click Skip the Tour (or click through the Virtual Office tour, if you wish.)
STEP 6. When the Virtualize a device window returns, you can choose whether to Make it a Test (for testing) or Put it in Production (for a real failover)
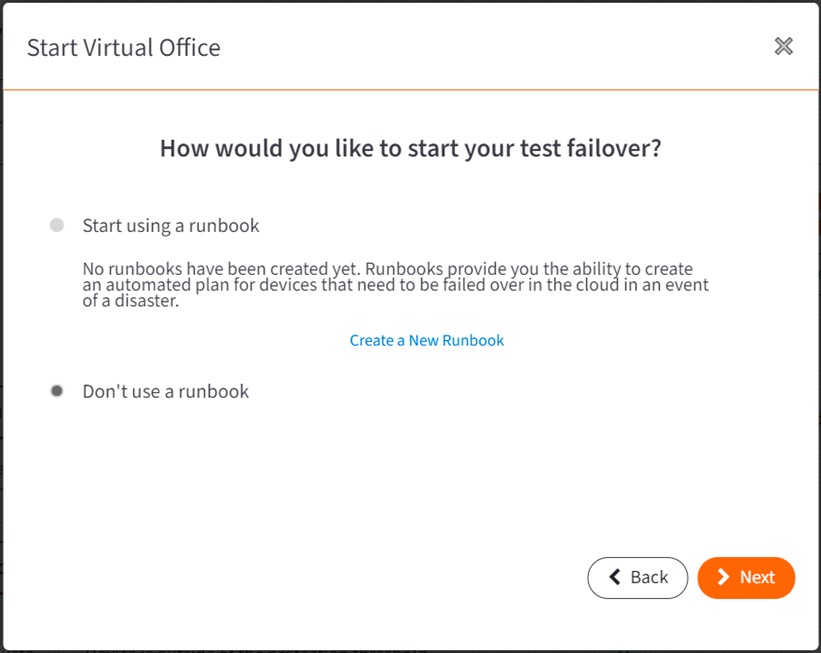
STEP 7. When the Start Virtual Office window opens, decide if you wish to start using a runbook and click Next to continue.
[Documentation on using Virtual Office is here:]
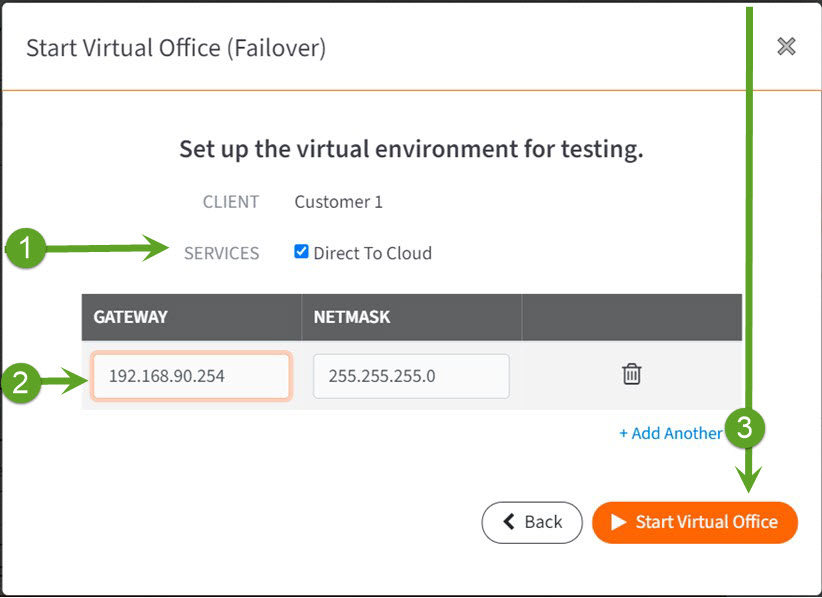
STEP 8. When the Start Virtual Office (Failover) window opens, select which Services have protected systems you wish to virtualize. For example, services might include appliances or Direct-to-Cloud (D2C).
Then, enter a default gateway / subnet address for the Virtual Office LAN.
- Note that this IP subnet should be different from the Azure LAN subnet, in order to allow route-base IPsec VPN traffic between the sites. You will have to manually update the IP address settings of protected systems running in Virtual Office to make them compatible with IPsec partial failover routing.
- Also: keep a record of this subnet address for later. Be sure to capture not the Gateway address, but the implied subnet address. For example, if you enter 192.168.0.1 for the Gateway, with a subnet Mask of 255.255.255.0, the subnet address to record for later use would be 192.168.0.0/24. You will need this subnet address later for Azure IPsec configuration.
STEP 9. Finally, click Start Virtual Office.
Wait for Virtual Office to start. This might take several minutes.

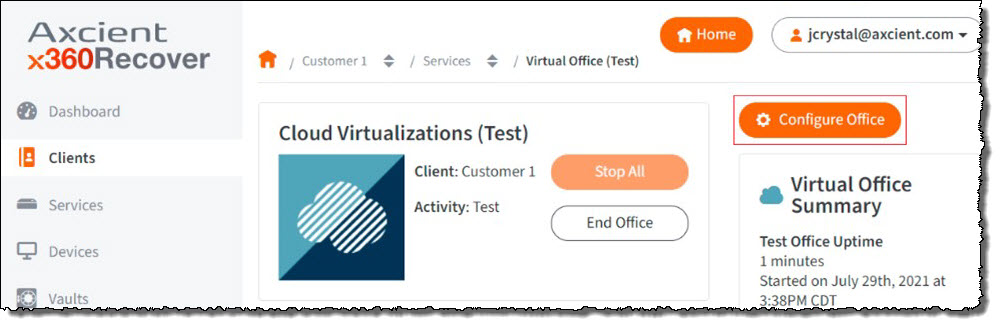
B. Configure Axcient Virtual Office
Once Axcient Virtual Office has started, click on Configure Office:

To do this, you must first enable port forwarding.
STEP 1a. Scroll down to Port Forwarding and click Edit.
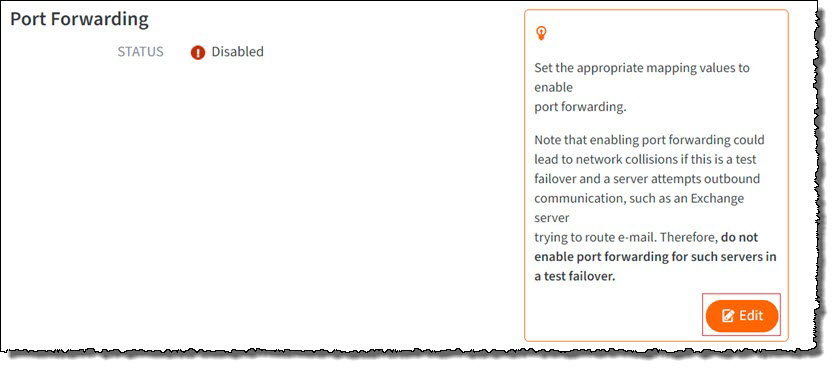
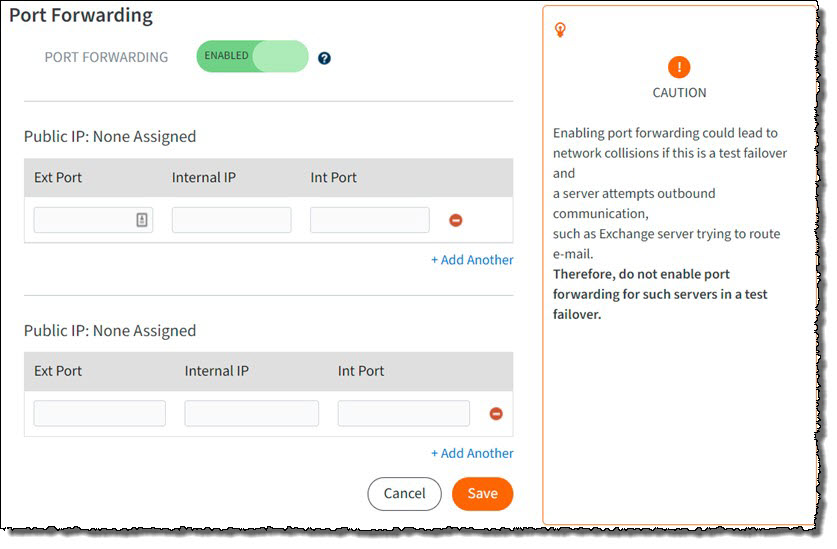
Wait for the changes to be saved. This might take a minute or two.
STEP 1c. Make a note of the Public IP address. You will need this later during the Azure IPsec configuration.
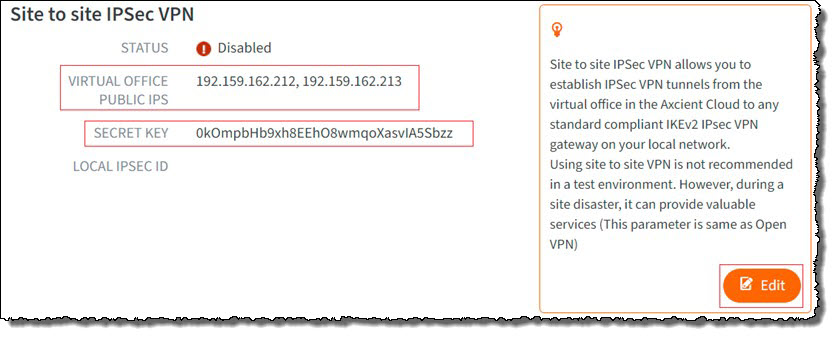
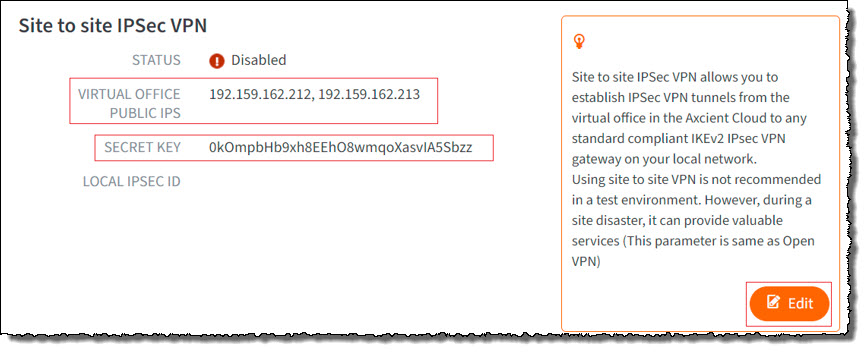
Now that port forwarding is enabled, the next step is to enable IPsec VPN.
STEP 1d. Scroll down to Site to Site IPsec VPN and note the Virtual Office Public IPS addresses and the secret key.
You will need these later when configuring the Azure IPsec connection.
Okay, you've made a good start.
Continue to the next section (Part 2. Configure IPsec in Azure).
These instructions will walk you through the process of configuring IPSec within Azure.
Part 2: Configure IPsec in Microsoft Azure
A. Select a resource group in Microsoft Azure
IPsec tunnels are configured within a resource group in Microsoft Azure.
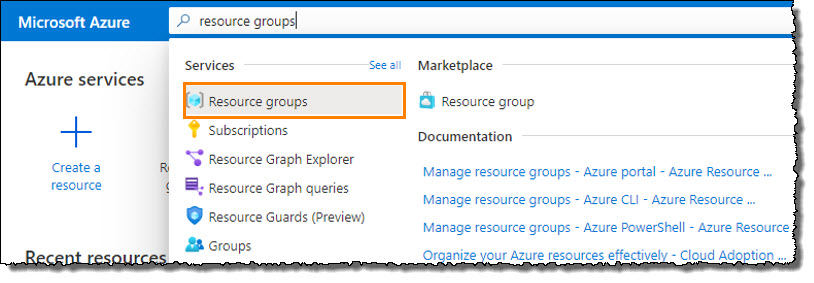
STEP 1. Login to the Microsoft Azure portal at https://portal.azure.com/#home
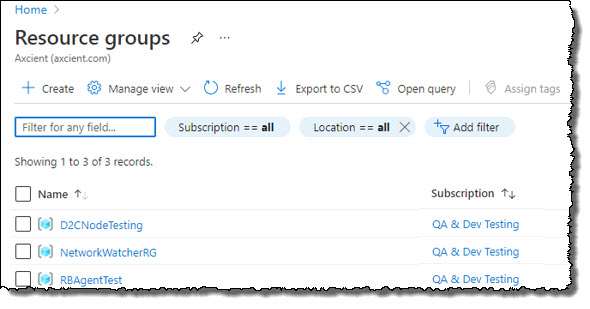
In the search bar, type resource groups to begin a search.
Select Resource Groups from the Services pane.
 Choose the resource group containing the protected systems and network environment you wish to link to Virtual Office.
|
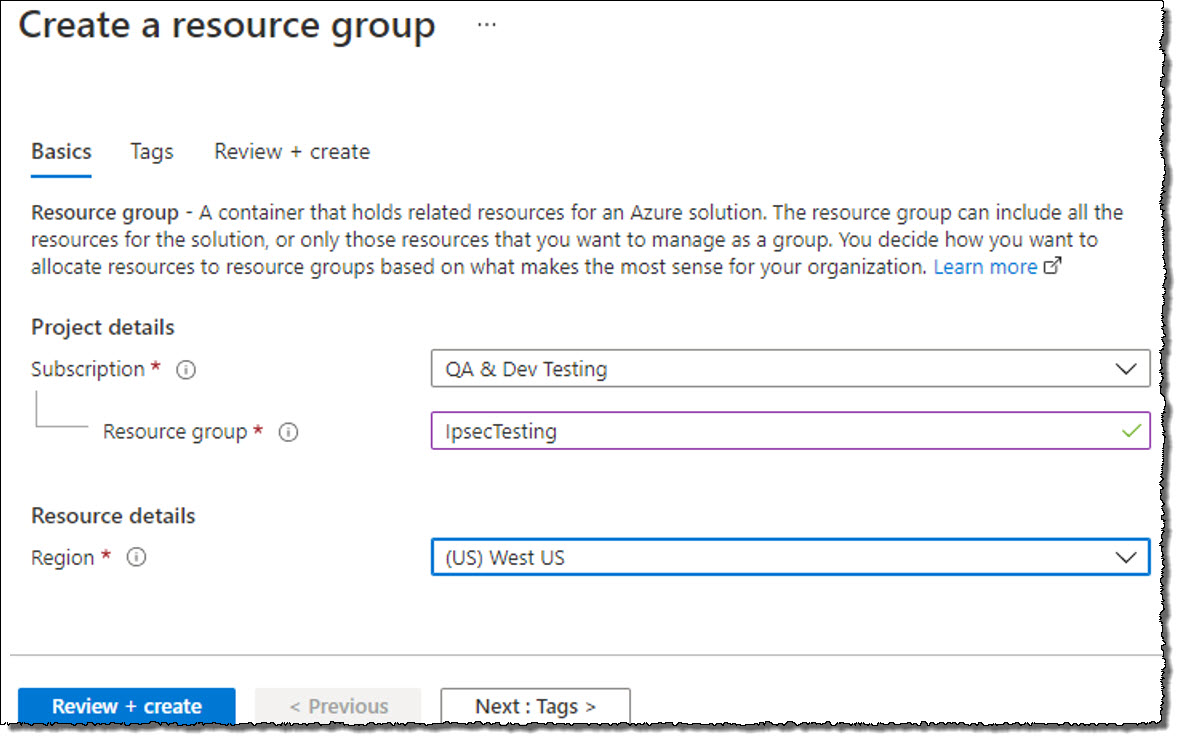
Optional: Create a resource group in Azure If you wish to create a new resource group for testing, click Create.
Click Review + Create.
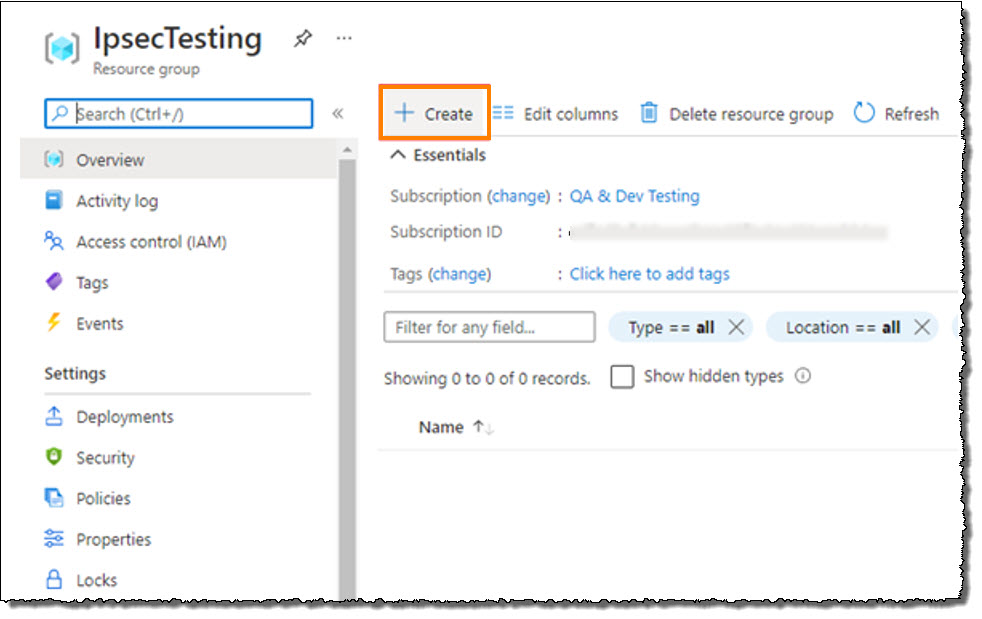
Click on your selected resource group to open it |
 Once you are satisfied with your selections, click Create.
B. Deploy and configure a virtual network gateway in Microsoft Azure (It’s a long adventure...)
STEP 1. Within your desired resource group, click Create.
|
Note: If you are creating a new resource group, you'll first need to create a virtual network. Enter virtual network in the search bar and click to select ‘Virtual Network’. Enter a name and click OK. |
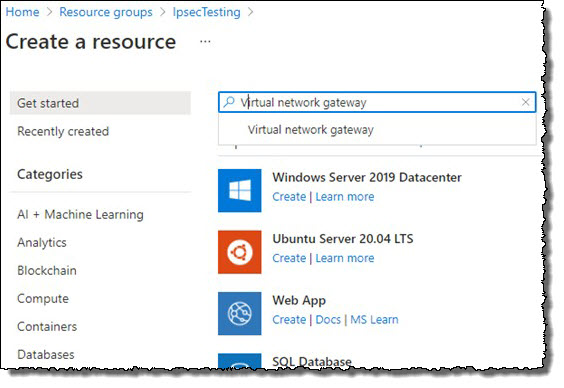
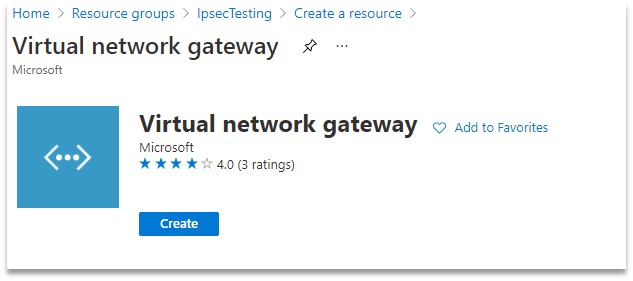
STEP 2. Next, if your resource group does not yet have a virtual network gateway, you need to create one. (A virtual network gateway is used by the virtual environment to access the internet.)
- Within the resource group, click Create.
- Type Virtual network gateway in the search box.
- Click to select Virtual network gateway.
Click Create.
- Enter a name
- For Gateway Type, select VPN
- For VPN Type, select Route-based
- For SKU, select any option except ‘Basic’. Note: Do NOT select 'Basic'
- For Virtual Network, select Azure LAN Network
- For IP address, select any existing address (if any) or create a new one
Note: Make a note of this Public IP address. You will need it later when you complete the Axcient Virtual Office IPsec configuration.
Click Review + Create.
When all selections are correct, then click Create.
Note: It can take up to 40 minutes for creation of the virtual network gateway.
STEP 4. Once the virtual network gateway is created, return to your resource group.
- Click Create and then type Local network gateway in the search box.
- Click to select the local network gateway..
This will create a VPN tunnel gateway.
STEP 5. Configure the local network gateway as follows:
- Enter a Name
- For Endpoint type, select IP address
- For IP address, enter the Virtual Office IPsec public IP address. (This is the Public IP address of Virtual Office that you saved in Part 1.)
- For Address Space, enter one or more subnets. (This is the Virtual Office LAN network)
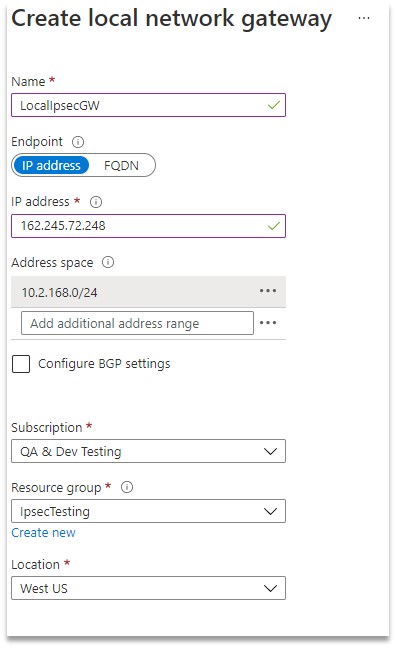
Save your settings.
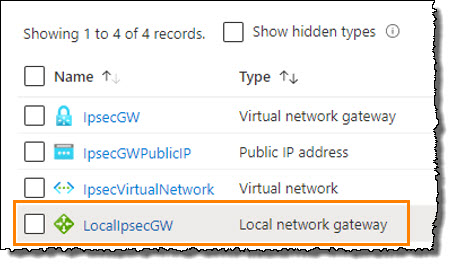
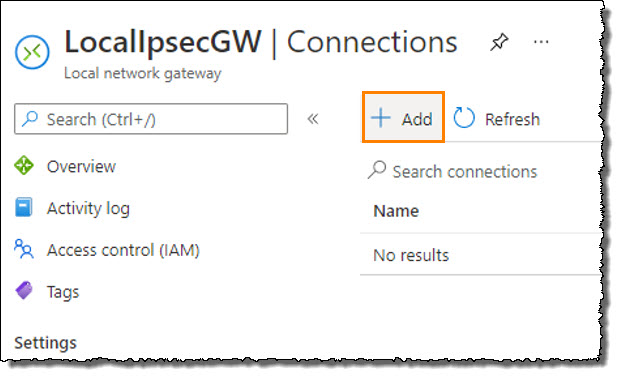
STEP 6. From your resource group, select the Local network gateway.
STEP 7. Under Settings in the navigation, click on Connections.
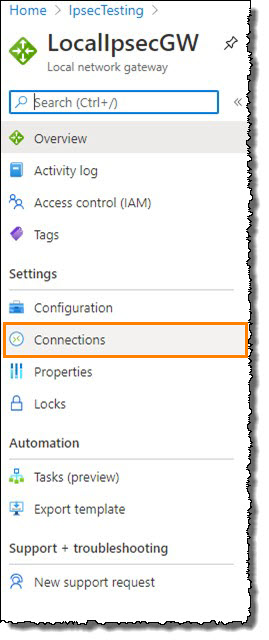
STEP 8. Click Add.
STEP 9. When the Add connection window appears, complete the following:
a. Enter a Name for the connection.
b. In the Virtual network gateway field, select the gateway you created
c. Enter a Pre-Shared Key (PSK)
This is the Shared Key from your Virtual Office IPsec.
d. In the IKE Protocol field, select IKEv2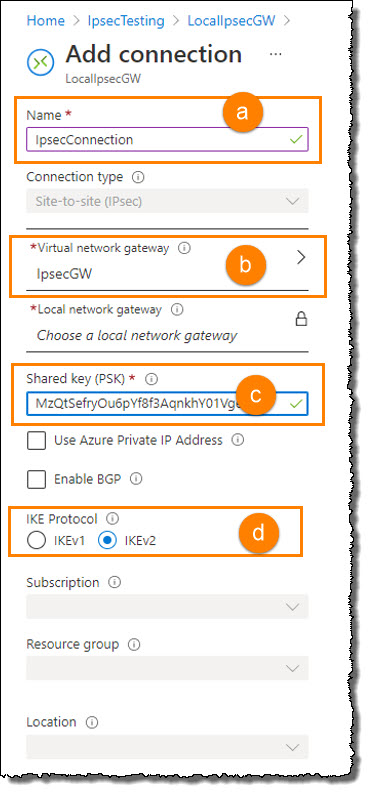
STEP 10. Under Settings in the navigation, click on Configuration.
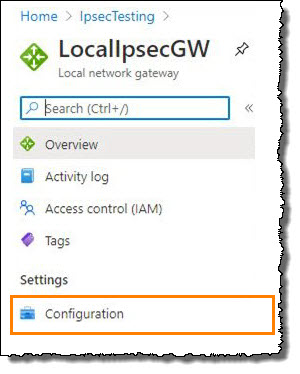
STEP 11. When the Configuration window appears, add the following settings:
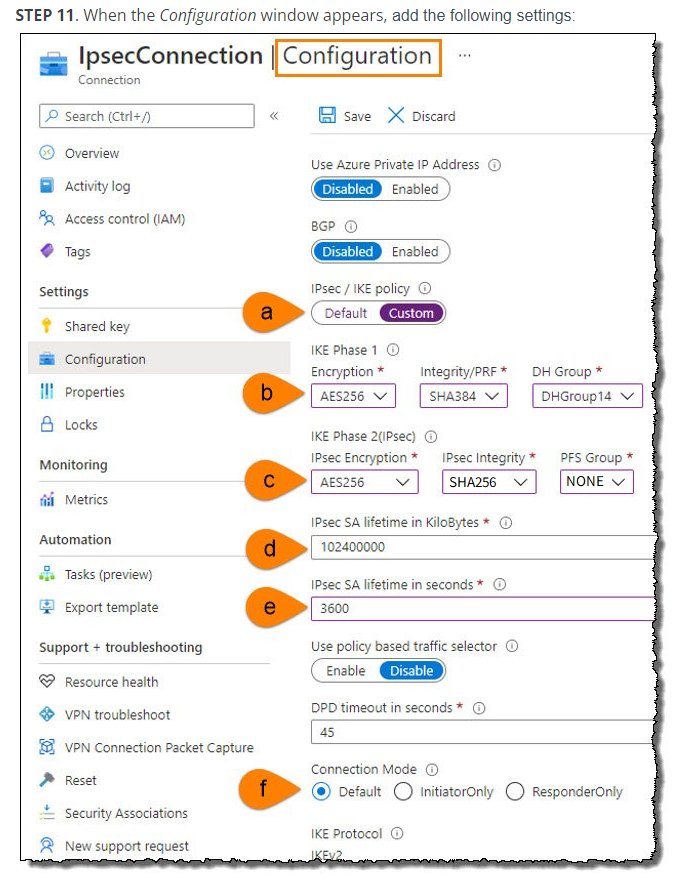
a. In the IPsec/IKE policy field, select Custom
b. In the IKE Phase 1 fields, choose the following:
| Encryption | AES256 |
| Integrity/PRF | SHA384 |
| DH Group | DHGroup14 |
c. In the IKE Phase 2 fields, choose the following:
| Encryption | AES256 |
| Integrity/PRF |
Select either SHA256, SHA384 or SHA512 |
| PFS Group | PFS14 |
d. In the IPsec SA Lifetime in Kilobytes field, select 102400000
e. In the IPsec SA Lifetime in seconds field, select 3600
f. For the Connection Mode, select the radio button marked Default
Now, the final steps are to enable site-to-site IPsec VPN in Axcient Virtual Office.
Part 3. Complete configuration for IPsec in Virtual Office
Now, the final steps are to enable site-to-site IPsec VPN in Axcient Virtual Office.
STEP 1. Return to the Virtual Office you created within Axcient x360Recover Manager.
Click on Configure Office.
 STEP 2. Scroll down to the Site to Site IPsec VPN settings and click Edit.
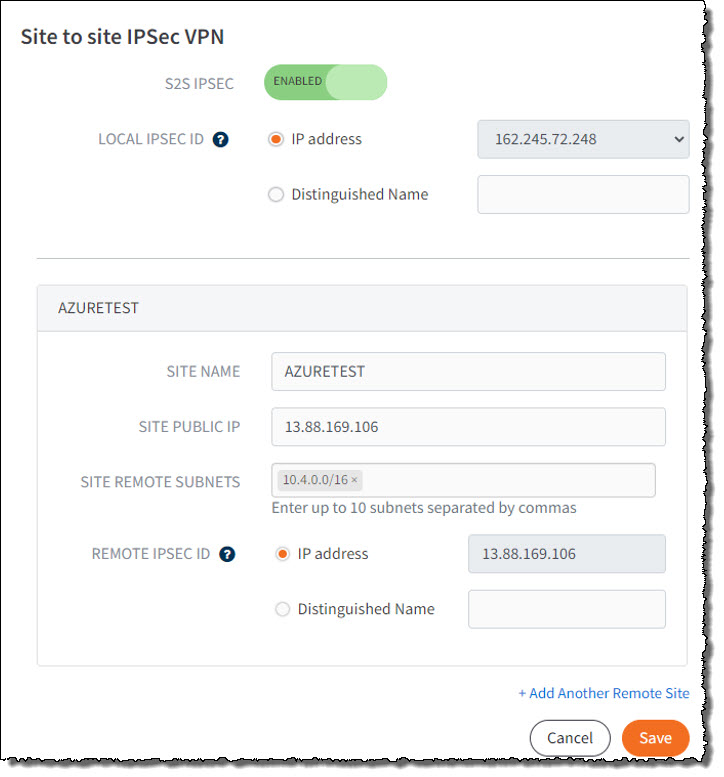
STEP 3. Complete the Site to Site IPsec VPN settings
- Click the toggle to enable S2S IPSEC
- In the Local IPSEC ID field, select the IP Address radio button and then select an available Public IP address. Note: This IP address should match the IP address you specified in Azure for the Local Network Gateway.
- Enter a friendly name for the Site Name (to identify Azure as the remote site)
- Enter the Site Public IP address. (This is the Public IP address you assigned to the Virtual Network Gateway in Azure)
- Enter one or more Site Remote Subnet addresses. (This is the Local network subnet address in Azure.)
- In the Remote IPsec ID field, select the IP address radio button. This value should automatically populate with the value entered above for Site Public IP address.
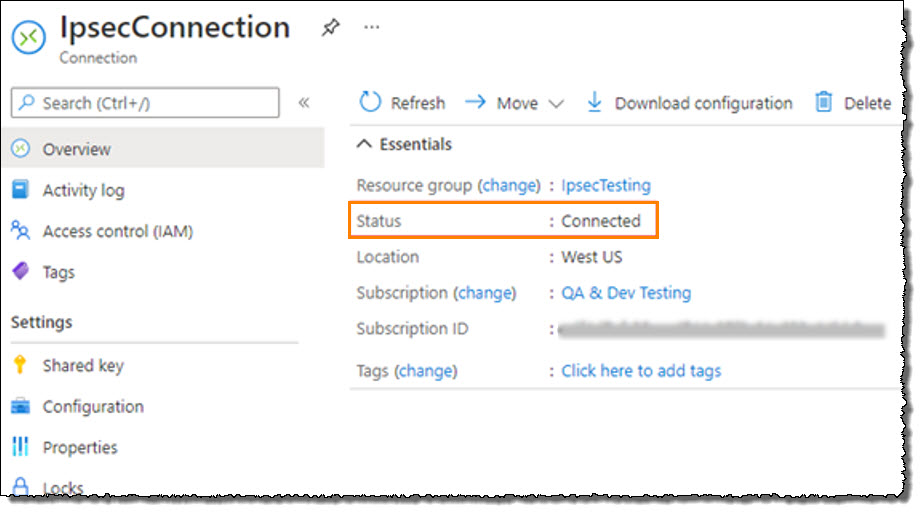
After you have rendered and booted the protected systems in Axcient Virtual Office, update the machine IP address settings to match the new network subnet that you selected for Virtual Office. Check the IPsec connection status from within Microsoft Azure:
- Navigate to your Resource Group.
- Open the Local Network Gateway
- Click on the IPsec Connection.
- Inspect Status to review the connection status.
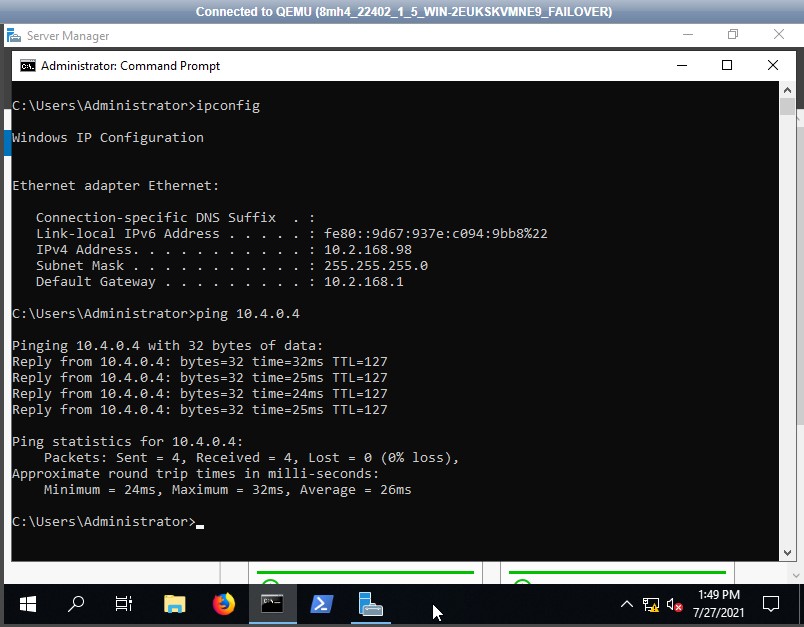
Try to ping a machine in the remote network.
Log in to a system in Virtual Office and attempt to ping the IP address of a system running in Azure or vice versa.
SUPPORT | 720-204-4500 | 800-352-0248
- Contact Axcient Support at https://partner.axcient.com/login or call 800-352-0248
- Free certification courses are available in the Axcient x360Portal under Training
- Subscribe to the Axcient Status page for a list of status updates and scheduled maintenance
871