
You can create organizations and suborganizations for each of your customers. You can also create an organization for internal use.
To create an organization:
1. In the navigation menu, select the organization under which you want to create the new organization. For example, if you want to create a new organization under the master organization, select the master organization. The selected organization displays.
2. Click the Organization button in the navigation menu. 
3. In the Organization Settings section, enter information including:
- In the read-only Parent Organization field, view the name of the higher-level organization. If you want to change where your new organization will be created within your organization hierarchy, use the Organization navigation menu to select the parent organization. For example, if you want to create an organization under the master organization, select the name of your master organization.
- In the Organization Name field, enter a descriptive title for the organization.
- Select the Trial Mode checkbox if the organization should be created as a trial for a customer. Trials expire after a specified number of days.
- In the Trial Until field, select the date on which the trial should expire for the customer, if applicable. If you select a date in the past, the trial to expire immediately, and lock out users.
- In the Hostname field, enter a unique URL that will be used when linking to the organization. Links to resources and shares will be prepended with this hostname (for example, customer.syncedtool.com). The Hostname field value can be edited after you create an organization.
- In the Organization Slug field, enter a unique identifier, which will be used to link to your organization(for example, customer.syncedtool.com/customer-organization). The Organization
Slug field value cannot be edited after you create an organization. - In the Description field, provide a description of the organization that can be used to organize and identify the organization.
- In the Contact Email field, enter the email address that will be used as the main contact for the organization.
- In the Default Language field, select the preferred site language for the organization, which controls the language settings displayed in the web portal and mobile apps, as well as number formatting. Leave this field blank to use the default language set for the system.
- In the Default Timezone field, select the preferred timezone for the organization, which affects dates and times displayed across the system. Leave this field blank to use the default timezone for the system.

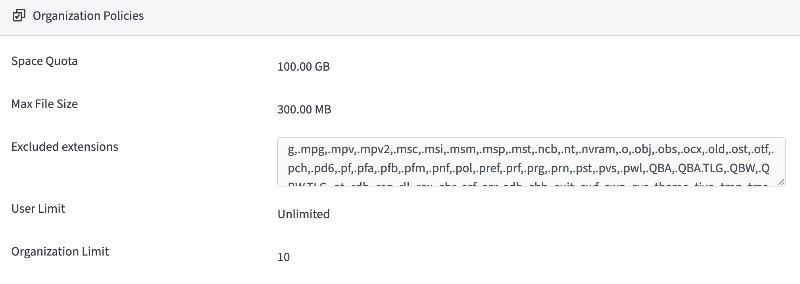
4. In the Organization Policies section of the page, configure policies for this new organization, including:
- In the Space Quota field, set the space limit for the organization. Space quota values must be greater than 0 and less than 10000000. As a best practice, ensure that this limit is enough to account for personal files and folders, Team Shares, backups, deleted files and folders, revisions, and so forth. The sync process will stop if this limit is reached. Additionally, you might consider configuring an alert so that you are notified when the organization is reaching its set limit. For more information, please reference the How to Create Activity Alerts section of this guide.
- In the Max File Size field, set the maximum size of individual files that can be uploaded into the system through desktop clients, mobile apps, and the web portal. By default, this is set to 300MB.
- In the Excluded extensions field, enter file extensions that you want added to the list of default excluded extensions, making sure that each extension is separated by a comma. Files with excluded extensions cannot be synced by the system. If an excluded extension is upload through the web portal, end users will receive an error messaging notifying them that their file is on the exclusion list.
- In the User Limit field, enter a user limit that will be allowed for the organization. Alternatively, enter 0, which represents an unlimited number of users. Suborganizations cannot exceed the maximum number of users set for the parent organization.
- In the Organization Limit field, enter a limit that will be allowed for the organization
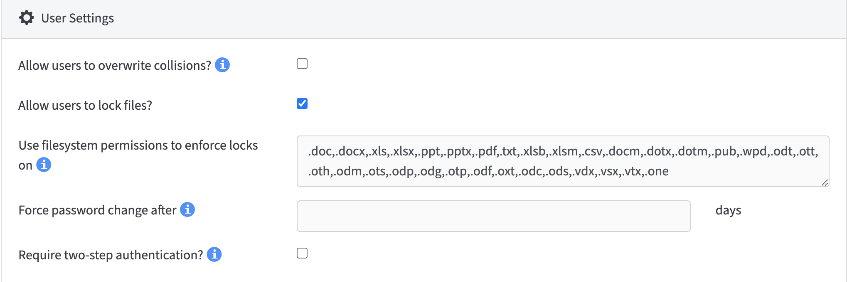
5. In the User Settings section of the page, you can define the user rights granted to administrators and standard accounts, including:
- Select the Allow users to overwrite collisions? checkbox to allow end users to resolve collisions by syncing their own local copy as the latest server revision.
- Select the Allow users to lock files? checkbox to allow end users to lock files. A suborganization will inherit this policy from its parent. Organization administrators will be able to lock and unlock files even if this setting is disabled.
- The Use filesystem permissions to enforce locks on field allows you to specify extensions on which you would like the desktop client to enforce locks through filesystem permissions (also called hard locks). This field is important for File Server Enablement environments where mapped drive users must be notified by the filesystem when a file is in use. When a lock is placed, the desktop client will change the NTFS permissions on Windows, or HFS Plus permissions on Mac, in order to prevent changes by other users. These permissions still allow administrators to modify files, but they prevent standard end users from doing so, and makes for a much stronger lock. This field can only be edited if you previously selected the Allow Users to Lock Files checkbox.
- In the Force password change after field, enter the number of days that end users can keep their passwords. End users with expired passwords will be required to change their passwords when logging into the web portal.
- Select the Require two-step authentication? checkbox to add an extra layer of security to user accounts. With Two-Step Authentication (MFA), end users will be sent an authentication code through a mobile authenticator app, text message, or email; they must then enter their authentication code, along with their username and password, before they can access the web portal or register a desktop client, the Outlook add-in, or a mobile device. They will also be required to set up a passcode for any of their registered mobile devices. End users must configure their own authentication settings. If you turn off this setting for an organization, end users must individually disable their own configuration settings.
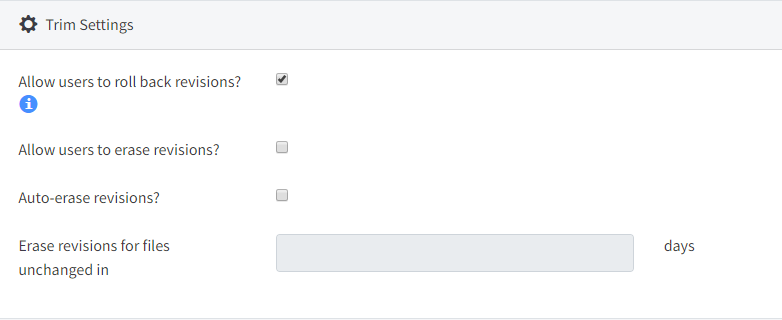
6. In the Trim Settings section of the page, you can define how the organization retains file revisions (file versions), including:
- Select the Allow users to roll back revisions? checkbox to give end users access to the Revision Rollback feature. If this policy is turned off, administrators will still retain the ability to utilize this feature for end user support.
- Select the Allow Users to erase revisions? checkbox to allow end users to delete previous revisions of files within the system.
- Select the Auto-erase revisions? checkbox to automatically delete previous revisions of files within the system. If this option is selected, you will need to enter the number of days that revisions should be stored. By default, the system retains all revisions.
- In the Erase revisions for files unchanged in field, enter the number of days that revisions should be stored for unchanged files, if you previously selected the option to auto-erase revisions. By default, the system retains all revisions. Note that it's not possible to set the period to less than 7 days for safety reasons. When an item is purged from the system, it cannot be restored.
7. In the Purge Settings section of the page, you can define how the organization retains deleted files, including:
- Select the Allow users to erase deleted files? checkbox to allow end users to permanently remove files that have been deleted from the system.
- Select the Auto-erase deleted files? checkbox to automatically remove deleted files from the system after a specified number of days. If you select this option, you will need to specify the number of days that deleted files should be stored before being erased. By default, the system retains all deleted files.
- In the Erase deleted files after? field, enter the number of days the deleted files should be stored before being removed, if you previously selected the option to auto-erase deleted files. By default, the system retains all deleted files. Note that it's not possible to set the period to less than 7 days for safety reasons. When an item is purged from the system, it cannot be restored.

8. In the Backup Settings section of the page, you can define how the organization retains files and revisions in backups, including:
- Select the Auto-erase revisions? checkbox to automatically delete previous versions of files within backups. If this option is selected, you will need to enter the number of days that revisions should be stored.
- In the Erase revisions for files unchanged in field, enter the number of days the that revisions should be stored for unchanged files in backups, if you previously selected the option to auto-erase revisions
- Select the Auto-erase deleted files? checkbox to automatically remove deleted files from backups after a specified number of days. If you select this option, you will need to specify the number of days that deleted files should be stored before being erased.
- In the Erase deleted files after field, enter the number of days the deleted files should be stored before being removed from a backup, if you previously selected the option to auto erase deleted files. Note that it's not possible to set the period to less than 7 days for safety reasons. When an item is purged from the system, it cannot be restored.

9. In the API Settings section, use the Deactivate API tokens after field to enter the number of hours that an API token should be set as active. By default, API tokens expire after 30 days.
- NOTE: API tokens expire immediately after initial use for certain sessions initiated from the desktop client, including:
- Launching the web portal
- Viewing an item in the web portal
- Backing up a folder
- Sharing a link
- Viewing revision
- In these instances, API tokens will expire immediately after they are used, allowing desktop clients to securely connect to the web portal without requiring a username and password. API tokens for other sessions, including mobile and Outlook connections, will expire according to your API policy settings.

10. In the Bandwidth Settings section of the page, configure bandwidth settings. For example:
- Select the Throttle Bandwidth checkbox to help regulate traffic and minimize bandwidth congestion. Restricting bandwidth will mitigate the impact that large files and shares might have on business-critical applications. You can also restrict bandwidth on individual machines.
- Select the Enable Throttle Exception checkbox to configure times when bandwidth throttling is not enabled. If you select this option, you will be prompted to specify a time period during which exceptions will be scheduled.

11. Click the Save button when you are finished. Your organization is now created.
SUPPORT | 720-204-4500 | 800-352-0248
- Contact Axcient Support at https://partner.axcient.com/login or call 800-352-0248
- Have you tried our Support chat for quick questions?
- Free certification courses are available in the Axcient x360Portal under Training
- Subscribe to Axcient Status page for updates and scheduled maintenance
1911