
Why integrate Autotask with Axcient's BDR for ShadowProtect?
Autotask is all-in-one web-based Professional Services Automation (PSA) software designed to help you run your business more efficiently and profitably.
Configuring Axcient with the Autotask API allows you to speed up billing by linking your Axcient customers to their accounts in Autotask. You can also push and monitor severity-based backup notifications to Autotask as service tickets.
These instructions will help you:
- Prepare your existing Autotask accounts for connection with Axcient BDR for ShadowProtect
- Complete the Axcient Integration Setup screen
- Add Autotask accounts to the Axcient Customer Map
- Assign Autotask contracts to customers in the Axcient Customer Map
- Synchronize Autotask billing with Axcient
- Create Autotask service ticket notifications in Axcient
- Configure or confirm Autotask service ticketing settings in Axcient
Please direct additional questions to your Account Manager.
= = = = = = = = = = = = = = = = = = = = = = = = = = =
Preparing Autotask to integrate with Axcient
What to do before you add Autotask accounts to Axcient:
- If you are new to Autotask, please be aware that you must create and configure a variety of Autotask settings before you add your Autotask accounts to Axcient.
- If you currently use Autotask, you probably have already performed most of these steps.
- But review the following checklists for both billing and ticketing, to ensure you understand each requirement before you begin to add any accounts to Axcient.
= = = = = = = = = = = = = = = = = = = = = = = = = = =
How to set up billing with Autotask:
MINIMUM Autotask setup requirements for Axcient billing:
One-time-only Autotask setup:
- Select or create an Axcient administrative user in Autotask and assign API permissions to that user. Make a note of this administrative user’s credentials (API Username and API Password.) You will need these credentials to add Autotask accounts in Axcient.
One-time-only Autotask activities required for each customer added to Axcient:
- Ensure that you have generated an Autotask account for each customer to be added to Axcient, including a unique Autotask Account ID#.
- Verify that all of your Autotask customers appear in your Axcient account listing. Note: To integrate with Axcient, the Autotask Account Type must be Customer. Otherwise, Autotask account types (for example, Leads) may not behave as expected.
- In Autotask, create a service for each Axcient product. Note: The service Period Type must be set to Monthly.
- We recommend the service Billing Code be Recurring Service Revenue or Managed Service Contract, but you can customize this code as desired. However, please be sure to understand the Contract Requirements for each service.
- In Autotask, define a contract for each customer using an Axcient Service. Note: Contract Type must be a Recurring Service Contract . Any attached services must be directly attached as "Services". They cannot be attached as a subset of a "Service Bundle".
Understanding Autotask Billing Settings in Axcient 's BDR for ShadowProtect
Every partner configures their billing settings within Autotask differently, depending on which services they sell.
However, remember that there is always a one-to-one relationship between
- Axcient services you configure in Autotask, and
- Billing settings available on your Axcient Integration page.
Service choices configured in Autotask mirror the service choices available in Axcient Billing Settings.
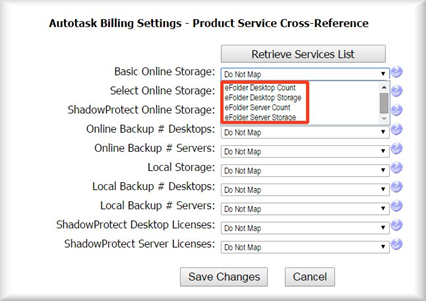
For example: One partner’s Axcient services might look like this within their Autotask setup:
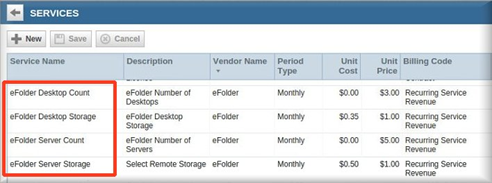
This is how those same services look within that partner’s Billing Settings setup in Axcient:
Your Autotask accounts, services and contracts are set up correctly. Now what?
After you have (a) created your Autotask administrative API credentials for Axcient and
(b) set up all of your Autotask customer accounts, services and contracts, you are ready to complete the final two steps to start billing in Axcient:
Step 1. Configure your Integration Setup in Axcient.
Step 2. Add Autotask accounts to the Axcient Customer Map
Configure your Integration Setup on the Axcient Portal
Visit the Axcient Web Portal.
Under the My Partnership tab, select Integration Setup from the menu.

The Integration Setup screen appears.
There are five steps involved in completing this screen:
- Check Autotask as the integration provider.
- Provide the Autotask API Username and Password.
- Select the Autotask Ticket Settings you prefer. (Ticketing settings are explained later in this document.)
- Select the appropriate billing settings. (Billing settings are explained on the next page.
- Finally, when all settings are completed, click Save Changes.

Configure your Autotask Billing Settings
- Click on the Retrieve Services List button.
- Next to each setting, the Axcient products assigned to this Autotask service appear.
- When you have made choices for all fields, select Save Changes to complete setup.
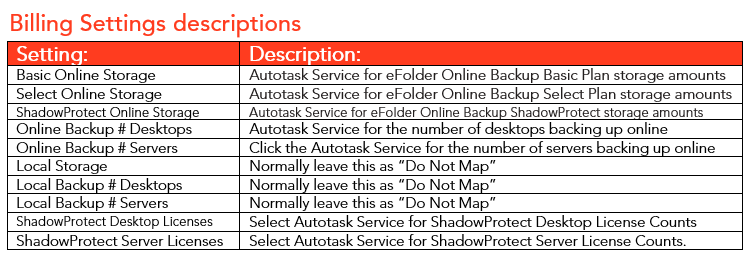
(A chart of descriptions of these settings is shown below.)

Integrating Autotask accounts and contracts in Axcient
After you have completed and saved all settings on the Integration Setup screen, the next step is “mapping” each Autotask Account ID number to the corresponding Axcient Customer ID.
- Visit the Axcient Web Portal.
- Under the My Partnership tab, choose the Customer Map menu option.
Note: The Customer Map drop-down will only be visible after the Integration Setup is completed.

Adding Autotask accounts to the Axcient Integration Map
- The Integration Map displays all of your customers with an Axcient Customer ID
- Each Axcient customer will have a blank Autotask PSA Account ID
- Enter each customer’s Autotask PSA Account ID# here.
- Retrieve and select the Customer Contract
- When you are finished, click the Save Changes button

How to assign Autotask contracts to customers in the Integration Map
Note: There are “cloning” tools available in Autotask which will allow you to work with an entire frequently-used contract list at one time.
- Locate the desired customer in the Axcient Integration Map, and enter that customer’s Autotask PSA Account ID number. Now, click the Get Contracts button. All contracts which you previously configured for this customer in Autotask will appear.
- Select the contract to be linked to Axcient and click Save Changes.
Example #1: How contracts look in the Axcient Integration Map: In this example, two contracts for ACME Insurance can be selected: (a) Onsite Maintenance and (b) Select Storage Contract

Example #2: How contracts look in the Autotask setup: In this example, two contracts for ACME Insurance can be selected: (a) Onsite Maintenance and (b) Select Storage Contract

Synchronizing with Autotask
Axcient synchronizes storage amounts and license counts for billing purposes during event processing. Ideally, syncing occurs every time there is activity on an account. For Axcient to synchronize accurately with Autotask, you must set up a specific syncing notification.
Step 1. Under the My Partnership tab, choose the Partner Notifications menu item.

Step 2. Select the Synchronize with Autotask dropdown choice.

Step 3. Leave all settings at the value of Yes and then click Create to save the synchronization request.
NOTE: The only Partner Notification which needs to be created for billing integration is the Synchronize with Autotask setting , as described in this step. Other Partner Notifications (such as those related to Autotask ticketing procedures) are not required to successfully complete billing integration.
Validating your new Axcient + Autotask billing setup
Congratulations! Your new Axcient + Autotask billing integration is now complete.
You should notice billing statistics pushed from Axcient within 12 hours of completing the integration.
To validate that all billing information is being integrated properly, please check your customer contracts within Autotask. Relevant Axcient billing information (such as the number of licenses or the amount of storage used) should now be visible.
= = = = = = = = = = = = = = = = = = = = = = = = = = =
Did you know there are “cloning” tools available in Autotask that allow you to work with an entire frequently-used contract list at one time? This is useful if many of your customers have contracts with the same services. Refer to Autotask documentation or contact Autotask support for further help.
= = = = = = = = = = = = = = = = = = = = = = = = = = =
How to set up ticketing with Autotask:
Configuring Axcient with the Autotask API allows your Axcient backup notifications to be viewed in Autotask as service tickets.
Your backup-related Axcient service tickets can then be efficiently managed alongside your other Autotask activities, allowing you to focus on one interface.
To successfully integrate your Axcient service tickets to Autotask, you must:
- Create a customer account in Autotask for each Axcient customer,
- Have access to each customer’s Autotask Account ID number, and
- Enable a notification for Autotask service tickets
Preparing Autotask accounts for service tickets from Axcient
If you are new to Autotask, be aware that you must create and configure a variety of Autotask settings before you add your Autotask accounts to Axcient.
If you currently use Autotask, you probably have already performed most of these steps.
Nevertheless, review this checklist to ensure you understand each requirement before you begin to add any accounts to Axcient :
MINIMUM Autotask setup requirements for Axcient ticketing:
One-time-only Autotask setup:
- Select or create an Axcient administrative user in Autotask and assign API permissions to that user. Make a note of this administrative user’s credentials (API Username and API Password.) You will need these credentials to add Autotask accounts in Axcient.
One-time-only Autotask activities required for each customer added to Axcient:
- Verify that all of your Autotask customers appear in your Axcient account listing. Note: To integrate with Axcient , the Autotask account type must be “Customer”.
- Generate an Autotask account for each customer, with a unique Account ID#.
- Autotask ticket settings to be selected or customized for use by Axcient:
- (Optional) Select a Ticket Subject Prefix to identify a ticket from Axcient.
- Autotask Queue name: Leave default setting or customize
- Autotask Priority name: Leave default setting or customize
- Autotask Status New name: Leave default setting or customize
- Autotask Status Complete name: Leave default setting or customize
Enter Autotask API credentials for ticketing
Before you can set up any ticketing choices, you must first enter the Autotask API credentials.
First, visit the Axcient Web Portal.
Then, under the My Partnership tab, select Integration Setup from the menu options.

- Check Autotask as the integration provider.
- Provide the Autotask API Username and Password.

Finally, when all entries are completed, remember to click the Save Changes button at the bottom of the Integration Setup page to store your API credentials.

Adding Autotask ticketing accounts to the Axcient Integration Map
After you have entered and saved your Autotask API credentials on the Integration Setup screen, the next step is “mapping” each Autotask Account ID number to the corresponding Axcient Customer ID.
- Visit the Axcient Web Portal.
- Under the My Partnership tab, choose the Customer Map menu option.
Note: The Customer Map drop-down will only be visible after the Integration Setup is completed.

- The Integration Map displays all of your customers with an Axcient Customer ID
- Each Axcient customer will have a blank Autotask PSA Account ID
- Enter each customer’s Autotask PSA Account ID# here.
- When you are finished, click the Save Changes button
Create notifications for Autotask service tickets
As events related to your customer accounts are generated in the Axcient portal, it is possible to send those events to Autotask to create tickets. To assign the triggering conditions which send event information to Autotask, use the Partner Notifications menu option.
1. Select the My Partnership > Partner Notifications menu item.

2. Click the Create a New Notification link at the bottom of the Partner Notifications page.

In the Notification Action field, select Open an Autotask ticket.
4. Decide which events should trigger an Autotask ticket notification. Typically, you will only want to be notified about a ticket when there is a warning or error. In most cases, we recommend that you leave the Subscribe to OK Events field set to its default value of No and leave the Subscribe to All Event Types field set to its default value of You will then be notified only about warnings or errors (including backup failure, archiving failure, BDR hardware failure, and so forth.)

5. When all selections are correct, click Create to accept these new settings. You can revisit this page to change these settings at any time.
NOTE: The only Partner Notification which needs to be created for ticketing integration is the Open an Autotask ticket setting, as described in this step. Other Partner Notifications (such as those related to Autotask billing procedures) are not required to successfully complete ticketing integration.
Confirming or customizing Autotask ticketing choices
Several settings on the Axcient Integration Setup page must be confirmed or customized before ticketing can be fully integrated from Axcient to Autotask.
- Visit the Axcient Web Portal.
- Click the My Partnership tab and then select Integration Setup from the menu options.

Now, confirm or customize these Autotask ticket settings on the Integration Setup page, using the detailed instructions that immediately follow:

1 = (OPTIONAL) Ticket Subject Prefix
This is an optional setting and can be left blank. This prefix will be prepended to the ticket subject, allowing you to customize the subject line of incoming tickets if desired.
2 = Autotask Queue name
- Select the Retrieve Queue button to see all of the available queue name choices.
- Choose the name you prefer from the drop down menu.
- The default queue name is Managed Services Alerts.
Caution: This field must contain a selection for ticketing to occur.
Setting this field to Do Not Map will disable ticketing, even if a Partner Notification has been created to enable ticketing.
3 = Autotask Priority Name
- Select the Retrieve button to see all of the available priority name choices.
- Choose the name you prefer from the drop down menu.
- The default ticket priority is Medium.
4 = Autotask New name and Autotask Complete New name
- Autotask Status New name is the text which will indicate a newly-created ticket.
- The text can be configured by you in Autotask.
- Select the Retrieve button to see all choices.
- Autotask Status Complete name is the text indicating that Axcient has closed a ticket.
- Select the Retrieve button to see all choices. The text can be configured by you in Autotask.
- You may prefer a customized text label, to differentiate tickets you have closed yourself.
Validating your new Axcient + Autotask ticketing setup
Congratulations! Your new Axcient + Autotask ticketing integration is complete.
As backup notifications occur, Axcient will now begin pushing information to Autotask.
To validate that all of your expected Axcient backup notifications are being created and displayed in Autotask, please review the Event Log for several of your Axcient accounts.
In Autotask, you should begin to see new tickets being created within the designated Ticket Queue, based on the triggers you specified in the Partner Notifications.
= = = = = = = = = = = = = = = = = = = = = = = = = = =
I’m new to Autotask. Where can I find help more with Setup?
For specific questions about performing Autotask steps, please refer to Autotask documentation or contact Autotask support for further help.
= = = = = = = = = = = = = = = = = = = = = = = = = = =