
View or change replication configuration
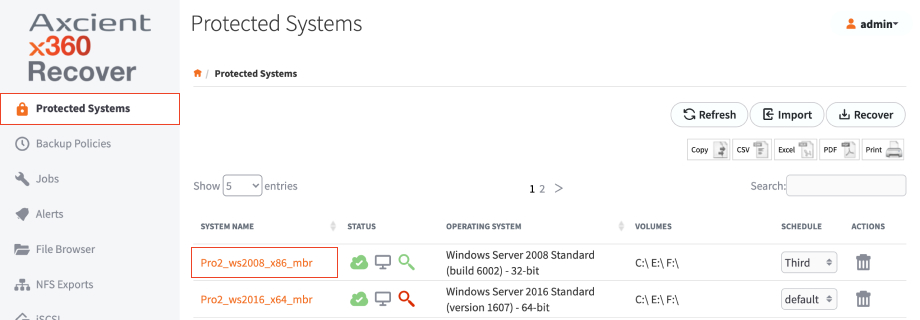
1. Click on Protected Systems on the left hand navigation. You will see a list of the systems currently being backed up and protected by the appliance.
2. Click the required System Name to see details.
3. In the Protected Systems Details page, click the Replication button.
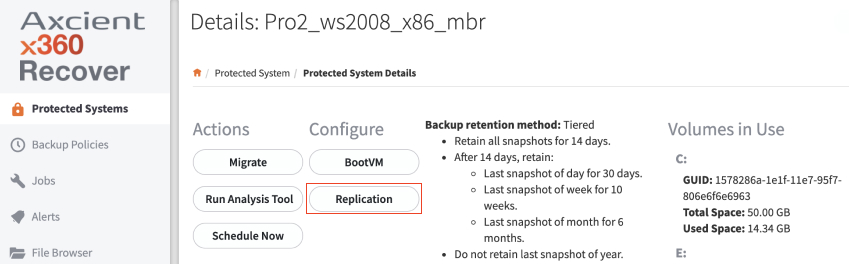
The Replication Settings page displays, allowing you to manage settings.
Add vault replication targets
In the Replication Settings popup, you can manage and add vault replication targets.
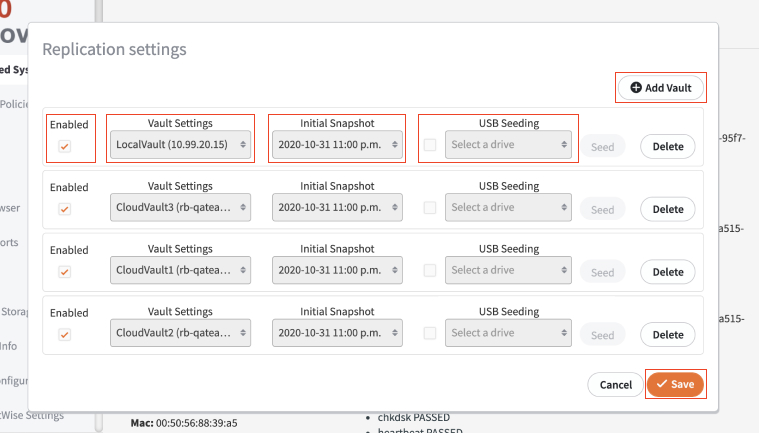
- To add a new Vault Replication Target, click the Add Vault button.
- Use the Enabled checkbox to enable or disable replication to this vault.
- Click the Vault Setting dropdown menu to select an available vault. To configure a vault, please reference the Adding Vaults and Managing Vault Settings article.
- Use the Initial Snapshot dropdown menu to select the snapshot that should be used as the base image when replicating to the vault.
- Optionally, if you would like to use USB seeding to deliver the protected system base Image to the data center on a USB hard drive for this vault, click the USB Seeding checkbox.
- Click Save to save your replication settings.
Delete vault replication target(s)
In the Replication Settings page, you can delete vault replication targets.
1. Click the Delete button for the vault replication target that you wish to remove.
Important: Deleting a vault replication target also deletes the protected system from the target vault.
2. Click Save to save changes and begin the deletion process; or click Cancel to abort.
Export a USB Seed Disk
- Connect a USB hard disk to the appliance.
- Click the Replication button in the Protected Systems Details page.
- In the Replication Settings page, click the USB Seeding dropdown menu select the target USB disk.
- Click the Seed button to start the seeding export job. Monitor the progress of the seeding export from the Seeding tab of the Jobs menu pane.
Import a seed disk on the vault
- When the seeding job has successfully completed, transport the USB disk to the datacenter and connect it to the vault.
- From the Menu pane, select Protected Systems.
- Click the Seed button in the actions pane of the target protected system to begin importing the seed data from the USB disk.

- Monitor the seed import process from the Replication tab on the Jobs Menu pane on the vault.
- If the same base snapshot was selected for all vaults when configuring replication (above), you may use the same USB Seed export disk for all vaults, if desired.
Temporarily disable replication
- Click the Replication button from the Protected Systems Details page.
- Click to clear the Enabled checkbox.
- Click Save to save changes.
- To re-enable replication, click to enable the Enabled checkbox and save changes again.
SUPPORT | 720-204-4500 | 800-352-0248
- Please contact your Partner Success Manager or Support if you have specific technical questions.
- Subscribe to the Axcient Status page for a list of status updates and scheduled maintenance.