
|
Overview There are several different approaches available for hardware migration from BRC to x360Recover. This document provides a step-by-step guide for migrating from Axcient BRC to x360Recover using (a) your existing BRC hardware appliance and (b) another temporary appliance. This migration method helps prevent interruption of local backup during the migration process.
|
x360Recover "swing migration" - with optional Axcient cloud retention
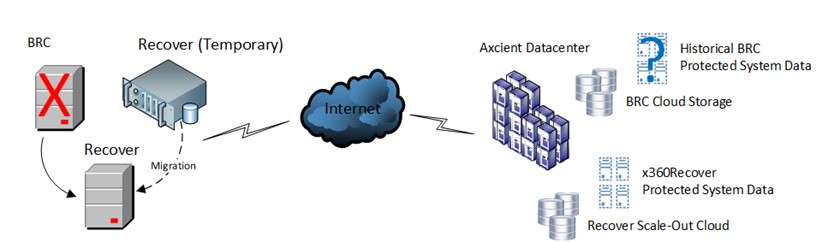 This migration method deploys (a) a temporary x360Recover appliance at the customer site, in addition to (b) the existing BRC appliance.
- BRC and x360Recover run side by side while establishing the initial base image backup of your protected systems to the x360Recover appliance.
- Optionally, you may choose to continue to run BRC and x360Recover side by side while you complete seeding the x360ecover backups to the Cloud.
- Once x360Recover is fully established, the existing BRC appliance is wiped and reloaded with x360Recover.
- Backup data for each protected system is migrated from the temporary hardware to the original customer appliance. The temporary hardware can then be retrieved.
You may then choose to (a) delete the BRC data in the Axcient Cloud or (b) retain he BRC data in the Axcient Cloud for long term historical recovery operations. Axcient will host the BRC Cloud data at no additional charge for up to 1 year.
Pros and cons of this migration method
| Pros: | Cons: |
|
|
The following steps are required to complete this migration method:
STEP 1. Deploy the temporary appliance
The first step is to provision and deploy a temporary loaner appliance to the client location.
Most of our MSP partners have access to older, spare hardware which makes ideal temporary BDR appliances for this type of migration.
Requirements for the temporary appliance
|
Create two locations
Create both a permanent and a temporary location for your client account in the License Portal. You will need two locations for one client.
For example, if your client Widgets Inc. is in Seattle, you might choose ‘Seattle’ for the location you wish to use permanently, and ‘Temp’ for the location you'll initially use to deploy and capture backups temporarily during migration.
Use any naming convention you like, but it is a good practice to be consistent across all of your clients.
When provisioning the temporary appliance, choose the ‘Temp’ location in the provisioning wizard.
For this phase, assign sufficient licenses to the temporary location for the systems you intend to protect. Leave the permanent location empty of licenses.
- Details on managing client locations and licensing are in the License Portal Guide.
- Details on deploying x360Recover onto your own hardware are in Install the x360Recover OS.
STEP 2. Complete first time setup and login for the temporary appliance
After building a suitable temporary BDR appliance and installing the x360Recover OS, you will complete the appliance first-time setup and login steps. These steps will provision the appliance to the 'Temp' location of the client.
The process of first time setup will
- provision the device as an appliance
- assign the device to the selected client
- register the device with the License Portal.
After provisioning is complete, the unit will reboot.
a. Enable Remote Assist
During the first login process, you will be asked if you wish to automatically enable Remote Assist after every update. (Remote Assist allows a x360Recover technician to access your appliance through a secure SSH connection to help with troubleshooting and resolution of certain problems.) We recommend that you select Yes to activate Remote Assist, as this will allow the Axcient support team to monitor your devices and proactively address any problems that might occur during an upgrade.
b. Create the storage pool
During the first login process you will also be prompted to create the storage pool.
To create the storage pool, you will
- Select drives to use from the Unused Disks section
- Choose the desired RAID settings
- Select the desired compression settings

- When all settings are complete, click Create Storage.
Details on creating and configuring the storage pool are here
STEP 3. Deploy the x360Recover agents
After you complete the initial login to the temporary appliance and configure the basic settings, you'll install software agents onto your protected systems.
You must install and configure an x360Recover agent on each system you wish to protect.
a. Login to the appliance and navigate to the Agent Downloads page.
b. Download the agent installer to a convenient location (such as a USB thumb drive or network share). The agent must be installed on each system you wish to backup with x360Recover.
- Details on agent installation are here
- Details on silently deploying agents using an RMM or other tool are here
c. In this migration scenario, the existing BRC platform will continue to be the primary backup, performing its existing scheduled backups.
Limit the impact of dual backups on your users
Although x360Recover can peacefully coexist with BRC, there are options you can use to limit the impact of dual backups on users:
- Schedule x360Recover full backups to occur only after business hours. This is suggested for server systems that will be available 24/7
- Set Disk IO throttling to limits in the Backup Policy to reduce the performance impact of x360Recover backups. This is preferred for workstation or other systems that may not be available after business hours.
STEP 4. Complete initial backup, then configure cloud replication
Complete initial full backup
Once all agents have been deployed and scheduling has been configured, allow time for all protected systems to complete their initial full backup.
Replicate each protected system to the cloud vault
After the initial full backups are completed, you will configure replication to the Cloud vault for each protected system.
You may choose to (a) replicate directly over the internet or (b) use a USB seed drive to deliver the initial full backup data to the vault.
- Seed with Webseed
If you choose not to send your initial full backup data over the internet, we recommend uploading your seed data to the cloud via Webseed. Use your own USB device to capture seeding data and see the Webseed Guide for details on uploading the full backup images to the cloud.
Note: Webseed uploads are typically performed from a location such as your office, where Internet access speed is substantially higher than at your client site. (If the internet connection speed is sufficient at the client site, we generally recommend enabling direct replication over the internet, rather than configuring the seed process.)
Details on configuring replication with USB seeding are here
- Seed with a preload drive shipped to our data center
Alternatively, you may request a preload drive from Axcient and ship the data to our datacenters. Refer to How to Request a Preload Drive for more details.
Note: During seeding, the appliance will immediately replicate to the cloud all subsequent incremental backups taken after the initial full backup is completed. This data cannot be ingested by the vault until the full initial backup arrives and is ingested. Incremental backup data will queue up on the storage pool and will begin ingestion once the full initial backup ingestion is complete. Ensure that you successfully complete uploading your full initial images via Webseed or consult Axcient Support for assistance in tracking your preload seed drive and verifying its ingestion into the vault.
| Important: When seeding, DO NOT delete the replication configuration within the vault. Deleting the replication configuration before the seed data has been received by the vault will INVALIDATE your seed data. You will then have to create a new seed export and ship it to the data center again. |
Verify replication synchronization
Once the initial full backup has been ingested, you can monitor the progress of the ingestion of the incremental backups on the vault from the Jobs -> Replication page.
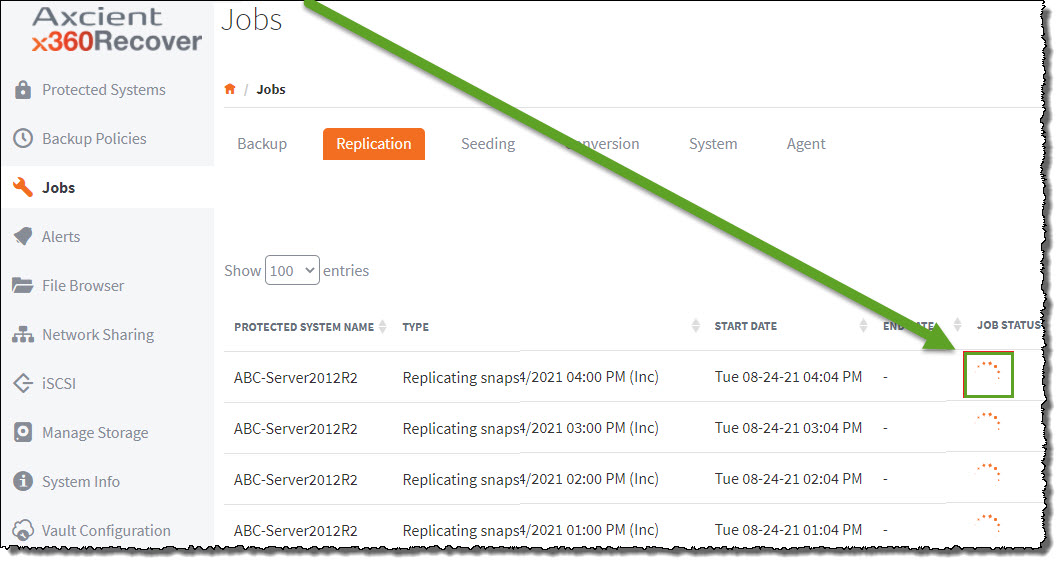
Incremental snapshots that have not yet been ingested will display a waiting icon in the status column.
![]()
- Allow time for all snapshots to be ingested.
- Verify that the most recent snapshot on the vault is in sync with the most recent snapshot on the appliance.
This may take some days after the initial full backup image is ingested, depending on the amount of data waiting in queue.
Once all local backups have been fully synchronized with the cloud, you may proceed with shutting down BRC backups and reloading your BRC hardware with x360Recover.
STEP 5. Perform a clean shutdown of BRC services
- Disable all backup jobs scheduled for all devices.
- Verify that any running jobs have completed.
- Confirm that all off-site replication jobs have complete successfully.
- Once all job activity is complete and the appliance is in a stable state, you can shut down and power off the BRC appliance.
| Important note: DO NOT factory reset the BRC appliance before wiping and reloading with x360Recover. Performing a factory reset of the appliance will destroy the SID for the unit and delete your cloud data. |
Verify the state of your protected system data in the Axcient Cloud and ensure that all data is recoverable.
- Verify that all of the cloud protected systems are parked.
(Disabling backup jobs on the appliance should park the endpoints) - Perform a file and folder recovery.
- Browse and validate that all volumes are accessible
- Perform a Virtual Office test run
- Ensure that all protected systems will boot in the cloud to test data integrity
Once you are satisfied that the Axcient Cloud copy of your data is in good health, proceed with wiping and reloading your BRC appliance with x360Recover.
The x360Recover installation ISO will deploy the basic operating system along with all x360Recover application components.
- x360Recover runs on the Ubuntu 64-bit Linux operating system.
- BRC runs on the Debian 64-bit Linux operating system.
- Ubuntu is a child distribution build on Debian and shares the same Linux kernel tree, so hardware compatibility between the two Linux operating systems should be identical.
When you are ready to migrate from BRC to x360Recover, we offer two ISOs:
- For BRC hardware < two years old, please use the Hardware Enablement version of the ISO (v10.8.0 or newer)
- For BRC hardware > two years old, please use the standard ISO (v10.8.0 or newer)
Both types of ISO downloads (with EULA) are available here:
Once you have downloaded the ISO, make a bootable image of the installer on a USB flash drive.
Instructions for creating a bootable USB flash drive are here
The following steps describe the installation of the underlying x360Recover operating system.
Boot the installation ISO
|
Important note: Installing x360Recover will erase the entire contents of the hard drives on this system. Be sure you are ready to proceed before continuing. |
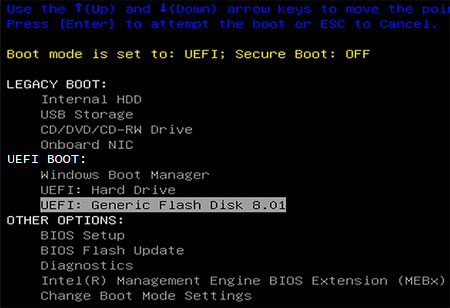
Typically, BRC Dell and HP appliance hardware will be configured for EFI BIOS mode by default.
Note: EFI BIOS mode does not normally opt to boot first from available CDROM or USB removable media. When powering on the appliance, you may need to press the appropriate key to enter BIOS settings or bring up the Boot Manager, and then choose to boot from the removable media containing the x360Recover installer.
On HP servers, press <F11> during boot to bring up the Boot Menu:

On Dell servers, press and hold the <F12> key during power up to open the one-time boot menu.
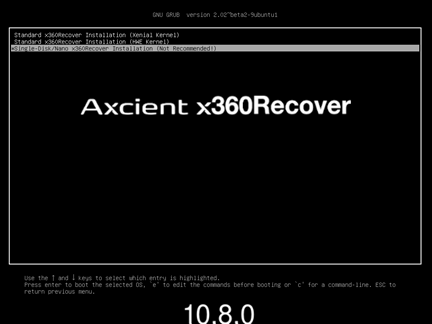
When you boot from the installation ISO/USB, the Linux grub boot menu will appear.
Select the Single-Disk/Nano x360Recover Installation option, to allow loading x360Recover onto a system with only a single disk volume.
Important note: Installing x360Recover will erase the entire contents of the hard drives on this system. Be sure you are ready to proceed before continuing!
===Erase the disk, install x360Recover and reboot
The x360Recover splash screen will appear while the installer loads.

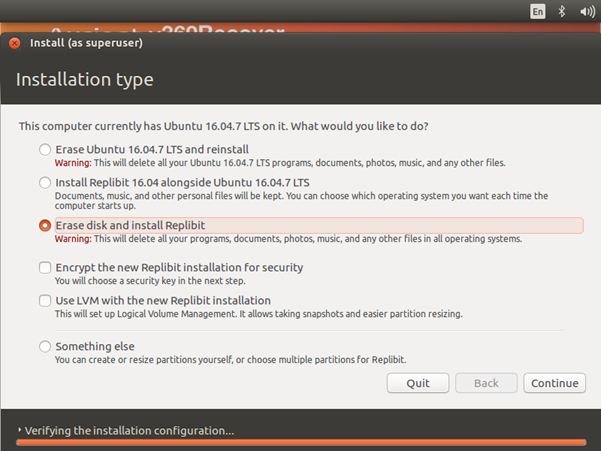
If the Installation menu appears, select Erase Disk and Install Replibit then click Continue.
In most cases, if there is only a single disk present in the system, the installer will immediately begin deploying x360Recover.
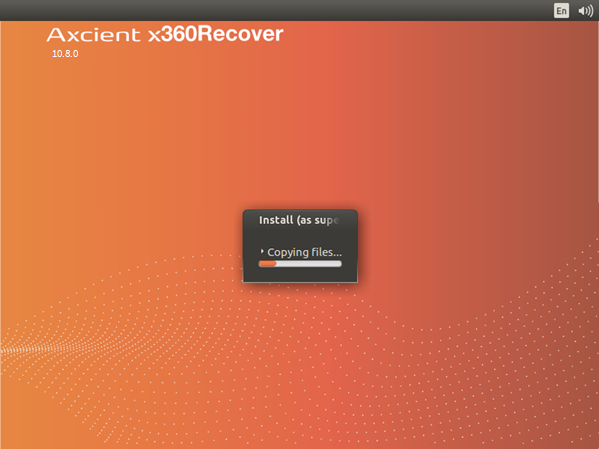
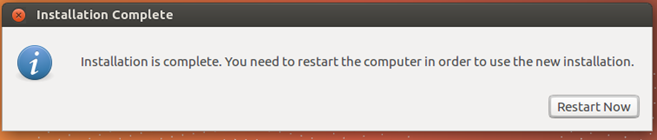
Once the installation is complete, the system will reboot.
If prompted, click Restart Now to reboot the system.
You may remove the USB boot media once the system post screen appears during the reboot.
STEP 8. Provision the appliance
a. Once the system has been rebooted, the Login prompt will appear on the console.
b. Note the IP address displayed and continue with the appliance setup and first-time login.
Complete instructions for appliance setup and first-time login are available here
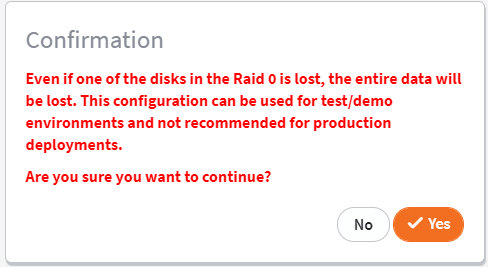
Note: When creating the storage pool during your first appliance log in, select RAID0.

c. Ignore the warning about RAID0. (Your data volume is protected by the underlying hardware RAID disk configuration.)
d. Click Yes to confirm and continue.
STEP 9. Transfer licenses from the temporary appliance to the permanent appliance
a. Login to the License Portal.
b. Expand Client Management from the left menu pane and click Licenses.
c. Search for your client in the main window and click Manage on the Temporary location.
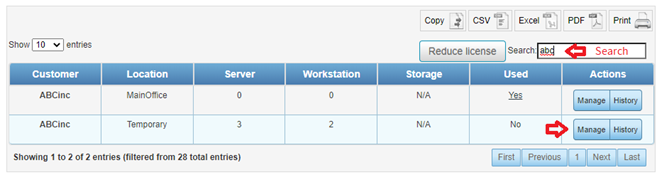
d. Remove the licenses assigned to the Temporary location.

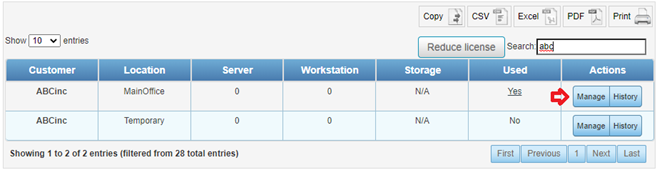
e. Search for your client again and locate the permanent location.
f. Click Manage to assign licenses.
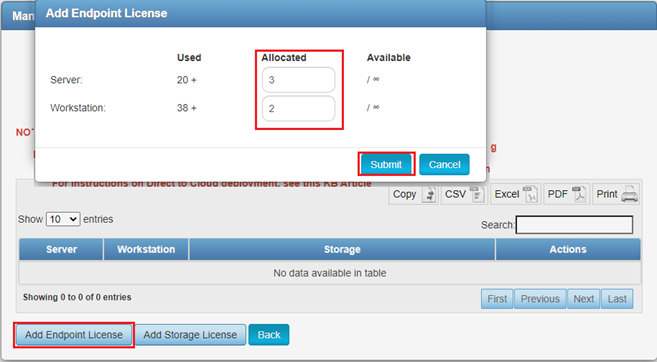
g. Click Add Endpoint License
h. Set the appropriate number of Server and Workstation licenses for the site and click Submit
Licensing has now been transferred from the temporary appliance to the permanent appliance.
STEP 10. Migrate data from the temporary appliance to the permanent appliance
After you have deployed the agents and configured x360Recover on your former BRC appliance, the last steps involve migrating the backup data from the temporary appliance and decommissioning that device.
Important: Perform the following steps for each protected system, one at a time.
A. Stop the agent service
Stop the agent services on the protected system and set them to Disabled while the data migration is in progress.
a. From Control Panel -> Administrative Tools open Services.
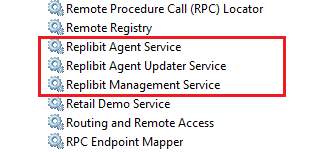
b. Stop and disable the following services, as shown:
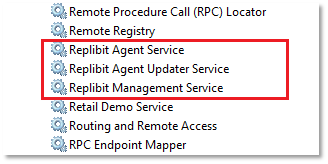
- Replibit Agent Service
- Replibit Agent Update Service
- Replibit Management Service
B. Migrate the protected systems
a. Login to the temporary appliance.
b. Navigate to the protected systems page.
c. Click the desired protected system's name from the table view to open the Protected Systems Details page.
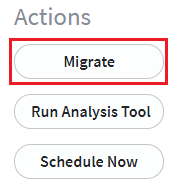
d. Click Migrate from the Actions menu.
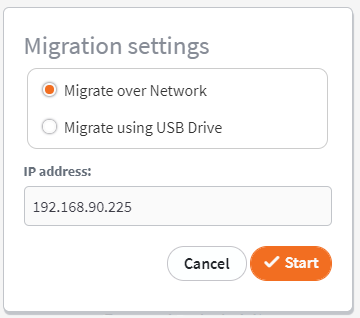
e. Then, select Migrate over Network and enter the IP address of the former BRC appliance.
Click Start to begin the process.
f. The migration job will proceed in two stages:
- First, the protected system will be exported to the new appliance from the temporary appliance.
You can monitor the export job from the Jobs -> System page of the temporary appliance.

- Then, once the export phase completes, the import job will run on the receiving appliance.
Monitor the import job progress from the Jobs -> System page of the new appliance.

g. The final step in this particular migration task is to verify that the migration import job has completed successfully.
- When the migration job completes successfully, the protected system should appear on the Protected Systems page view.
Open the Details page and verify that the replication settings have been preserved:
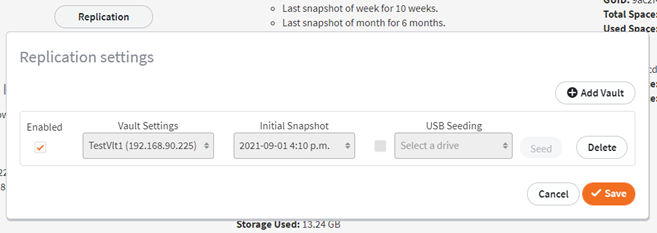
If not already present, the vault settings from the original appliance should also be imported.

STEP 11. Update and start the agent settings
a. Edit the aristos.cfg file in the agent installation folder and change the SERVER=<IP address> value to the IP address of the new appliance.
b. Enable and start the agent services:
The services to start are:
- Replibit Agent Service
- Replibit Agent Update Service
- Replibit Management Service
STEP 12. Verify the successful migration and repeat as needed
- Verify that the new appliance can successfully continue to backup the protected system.
- Verify that new backups are successfully replicated to the Cloud vault.
Once you have confirmed the migration was successful, repeat the migration process for the next protected system, until all been moved to the new appliance.
STEP 13. Decommission the temporary appliance
Once you have finished migrating all protected systems to your former BRC hardware appliance, you may now decommission the temporary loaner appliance.
Factory reset the appliance
Log in to the console (or connect remotely using ssh).
Perform a factory reset to wipe the data and detach the device from the License Portal.
a. Login as the root user.
b. Run the following commands:
flask
repenv
python resetFactory.py
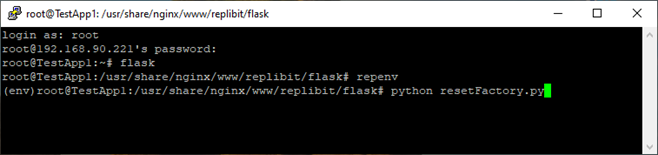
Once the system reboots, it is wiped and ready to be redeployed at another customer site.
Remember: you have choices when you migrate
This guide summarizes one method you can choose when migrating existing Axcient BRC clients and appliances to x360Recover.
Please keep in mind that you don’t have to pick just one migration method.
You are free to select different options for different customer sites. Remember: you can use any of these methods to best meet your customer’s needs.
SUPPORT | 720-204-4500 | 800-352-0248
- Please contact your Partner Success Manager or Support if you have specific technical questions.
- Subscribe to the Axcient Status page for a list of status updates and scheduled maintenance.
910