
Overview
The following guide presents a basic example template for creating a multipath iSCSI environment using TrueNAS.
The steps presented here are specific to TrueNAS as documented on the Getting Started guide on the TrueNAS web site.
Exact steps to connect to your iSCSI server may differ slightly but should generally be similar.
While the principles presented here should be applicable to other iSCSI storage solutions, set up and support of TrueNAS (and other) storage servers is completely beyond the scope of x360Recover support. This document is presented as an example only.

Install TrueNAS
Installation and basic setup of TrueNAS is outside the scope of this document. Please refer to the Getting Started guide on the TrueNAS web site.

Configure TrueNAS for multipath iSCSI
After you have installed and set up your TrueNAS storage server, follow these recommended steps to prepare a set of disk volumes with multipath iSCSI connectivity.
1. Ensure that your TrueNAS has at least 2 physical network adapters configured on separate LAN subnets

2. (Optional) Set the MTU size limit for each physical network adapter to 9000.
Note: Changing the MTU size to a value larger than 1500 must also be supported on any network switches over which the traffic will be passed. See your managed switch documentation for details on configuring the switch to support larger MTU traffic.
3. From the Services page, make sure iSCSI is running and set to start automatically:


Create ZFS Volumes and iSCSI Disk LUNs
Before creating an iSCSI Disk LUN, you must first create a physical ZFS volume in the storage pool.
1. From the left menu, select Storage -> Pools.
2. Click the Pool menu option on the right side of the page and select Add Zvol
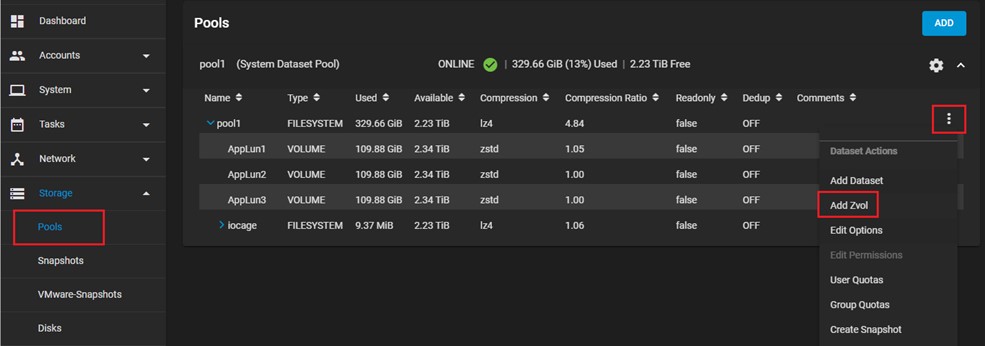
3. Specify a Name, Size, and Compression Level for the Volume. (It is recommended to set Deduplication to Off for best performance.)

Repeat the steps above to create additional volumes.
For example, you may wish to create three volumes to later be able to enable RAID storage on your x360Recover appliance.
4. Next, go to Sharing -> Block Shares (iSCSI) and select Extents from the top menu.
Click Add to add a new Extent (volume).
5. Configure the properties of the disk volume.
Provide a name for the disk.
Specify ‘Device’ as the type of disk and select the Zvolume you created in the previous step.
6. Set a logical block size. (Logical block size should not be smaller than physical disk block size of your storage disks. For example, if your TrueNAS server is using 4K advanced format drives, the minimum block size should be 4096 bytes.)
Optional: Set the LUN RPM speed. Some systems use this to profile expected IO performance.
7. Click Submit to save the Extent.
Repeat to create additional iSCSI disk volumes.

Create iSCSI Disk Targets
The first step to creating an iSCSI target is to create an Authentication Group.
1. From the Sharing -> Block Shares (iSCSI) page, select Authorized Access from the top menu.
2. Click Add to add a new access group.
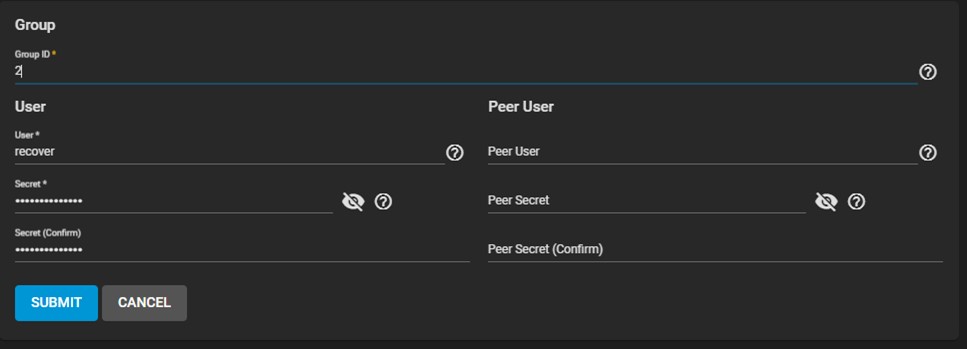
3. Provide a Group ID, User (username) and Secret (password).
Note: You can leave Peer User and Peer Secret blank unless you want to configure mutual authentication, where both the server and the initiator log in to one another. Mutual authentication is beyond the scope of this document.
4. Click Submit to save the access group.
5. Next, create one portal for each physical network adapter to be used for iSCSI traffic.
Creating multiple portals will allow for multiple paths to each disk volume.
Note: Each portal should be bound to a separate network interface to provide a separate physical path for network traffic associated with this connection.
6. From the Sharing -> Block Shares (iSCSI) page, select Portals and click Add.
Provide a description and select one of the configured IP addresses.
Note: When selecting IP address, it is possible to select multiple adapters. Rather than selecting multiple adapters for one portal, we recommend creating one portal for each network adapter. This ensures that traffic handled by each portal is bound to a unique network path for load balancing and fault tolerance.
A note about iSCSI authentication: It is possible, but not recommended, to specify an authentication method and authentication group for a portal. Specifying authentication for the portal implies that the iSCSI initiator must support authentication for iSCSI target discovery. Not all iSCSI Initiator software supports this option, specifically including x360Recover, so leave authentication method and group unconfigured here.
7. Repeat the above steps to create one portal for each network adapter (and IP address) you wish to use for iSCSI traffic.
8. Next, create an Initiator Group, which defines the specific iSCSI Initiator clients that we will provide services for.
Note: You may select to Allow All Initiators, but this is not recommended as best practice. Typically, you will define a network or specific IP address(es) from which you wish to allow iSCSI connections.
Type in an authorized network in CIDR format and click ‘+’ to add it to the list of allowed initiators.
For example, you may enter 192.168.90.0/24 to allow connections from the entire 192.168.90.1-254 network, or 192,168,90,10/32 to allow connections from a single host, etc.
You may add as many entries as you like.
Be sure to add entries for each IP address or network that the x360Recover appliance will use to connect to the iSCSI target server.

9. Now, create a target for each portal address created earlier.
From the Sharing -> Block Shares (iSCSI) page, select Targets and click Add.
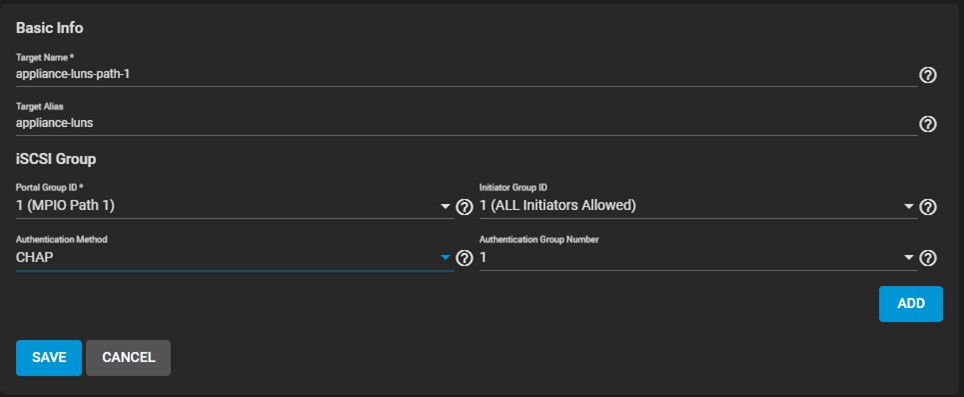
Provide a Unique Target name, and optionally enter a Target Alias.
Select the Portal Group that will serve this target.
Select CHAP for the authentication method, the Initiator Group (containing the list of allowed iSCSI Initiator client machines) and the Authentication Group Number containing the username and password connecting Initiators will use to authenticate.
Click Save.
10. Finally, map disk volumes to targets to provide access to iSCSI LUNs to connecting clients.
Each disk volume (Extent) must be mapped to each target from which it will be accessible.
To provide multiple paths to a volume, each extent must be mapped to more than one target.
From the Sharing -> Block Shares (iSCSI) page, select Associated Targets and click Add.
Select to map a target and extent. You may optionally specify a specific LUN (SCSI Disk Logical Unit Number) for the volume or accept the default autonumbering.

Repeat the above steps until each extent has been mapped to each target, like so:

Now that you have configured a multipath iSCSI disk source, proceed to configuration of your vault or appliance. See Configuring x360Recover Multipath iSCSI Storage