
Overview
In x360Cloud, you can choose to create and configure organizations in Microsoft 365 and also in Google Workspace.
This article will walk you through how to create and configure these types of organizations - and we've also included the steps to create a new organization-level account (if needed).
Choose your system
a. Create an organization in Microsoft 365
When you have an x360Cloud reseller account, you can log in to the x360 portal and create an organization to protect Microsoft 365 accounts.
- Note: If you need to create an organization for a Google Workspace account, please visit Create an organization in Google Workspace
To log in to your x360Cloud reseller account:
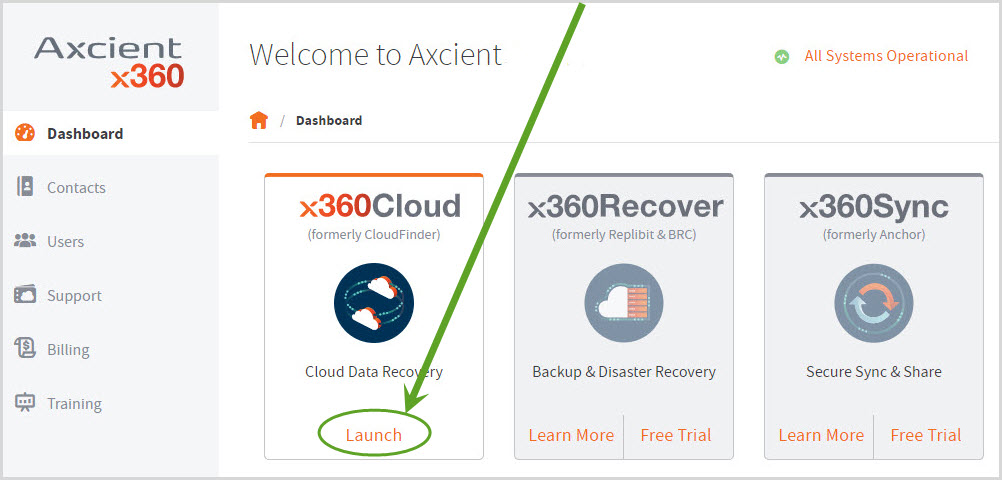
STEP 1: Launch x360Cloud
In the x360 Portal, find the x360Cloud product card and click the Launch link.

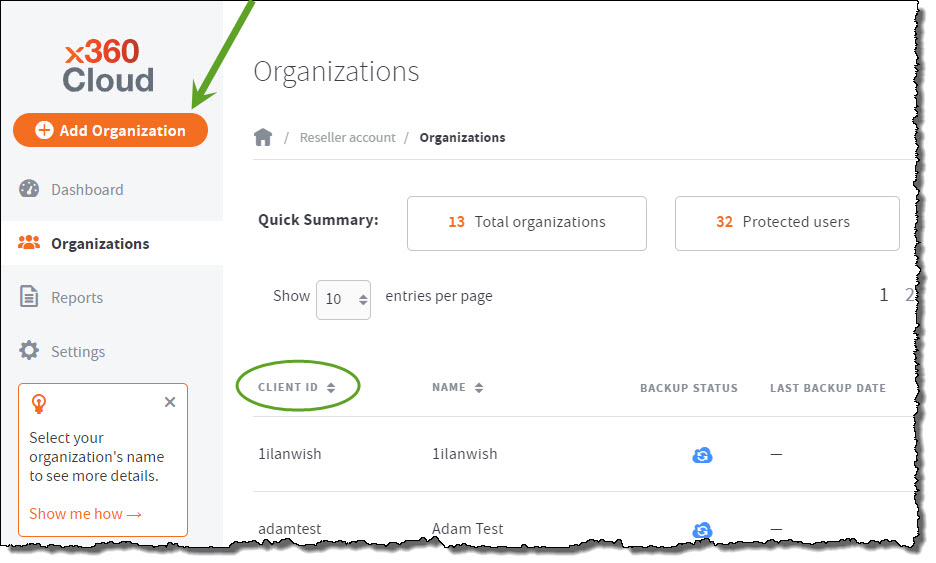
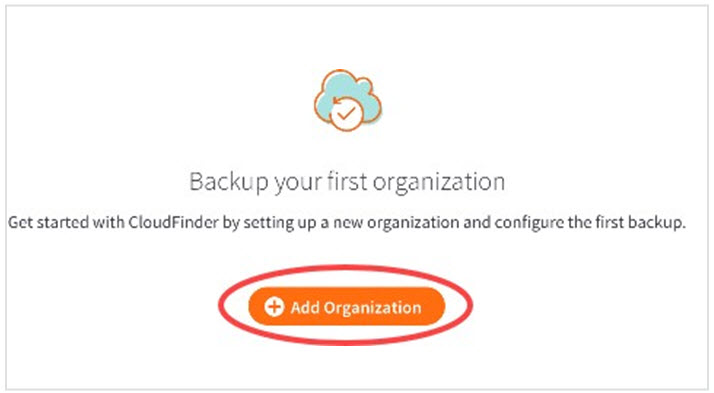
STEP 2: Add an organization
If this is the first time you are accessing the x360Cloud Reseller Portal, you will be directed to the Back Up Your First Organization page.
Click the Add Organization button.

Note: If this is not your first organization, click the Add Organization button located at the top of the left-hand navigation bar.
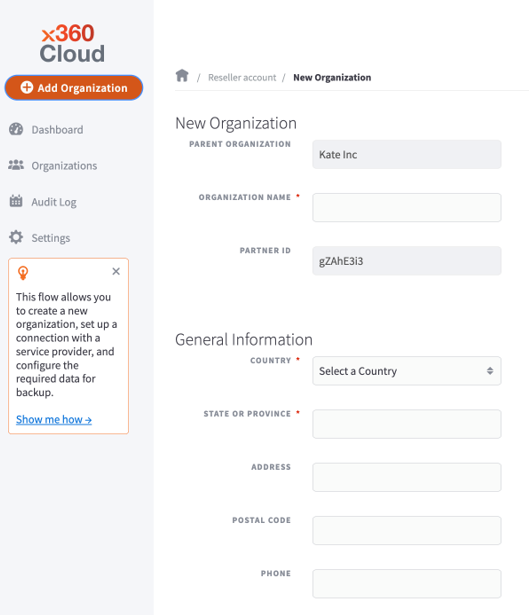
STEP 3: Enter organization information
In the New Organization page, enter all required information about the new organization.
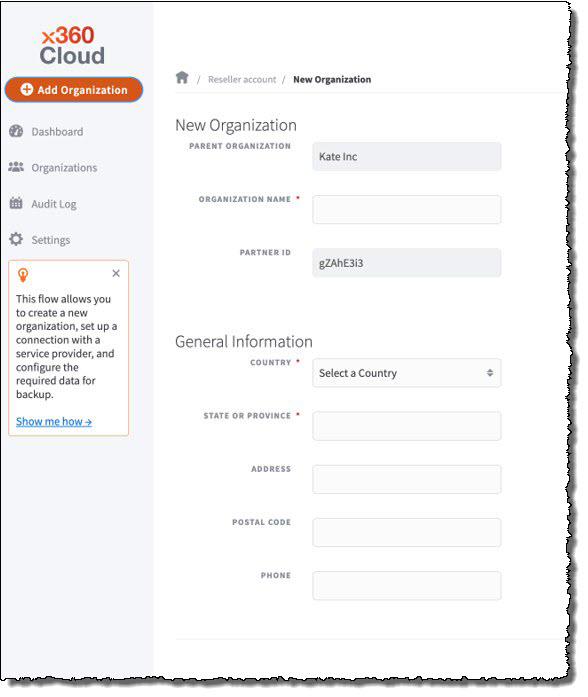
- In the New Organization section, enter descriptive information about the new organization, including:
- In the read-only Parent Organization field, you can view the name of the parent organization under which this new organization will be created. The parent organization is typically the name of your reseller account.
- In the Organization Name field, enter the name of the new organization.
- In the read-only Parent ID field, you can view the ID of the parent organization. The parent organization is typically your reseller account.
- In the General Information section, enter contact details for the new organization, including:
- In the Country drop-down menu, select the organization's country.
- In the State or Province drop-down menu, select the organization's state or province.
- In the Address field, enter the street number and street name of the new organization
- In the Postal Code field, enter the zip code of the new organization.
- In the Phone field, enter the phone number of the new organization.
Click the Submit button when you are finished.
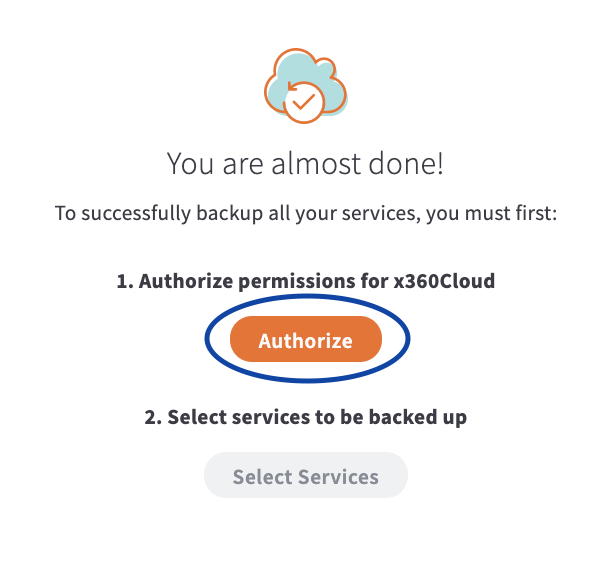
STEP 4: Authorize Office 365
On the next page, click the Authorize button.

STEP 5: Select the service to be protected
Select Microsoft 365 as the service you wish to protect for this organization:
STEP 6: Sign in to your Microsoft 365 account
Sign in to your Microsoft 365 account.
In the Sign In field, enter the email address of a Global Administrator user associated with the Microsoft 365 account and click the Next button.
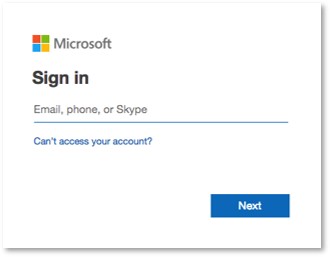
In the Enter Password field, enter the Microsoft 365 account password and click the Sign In button.

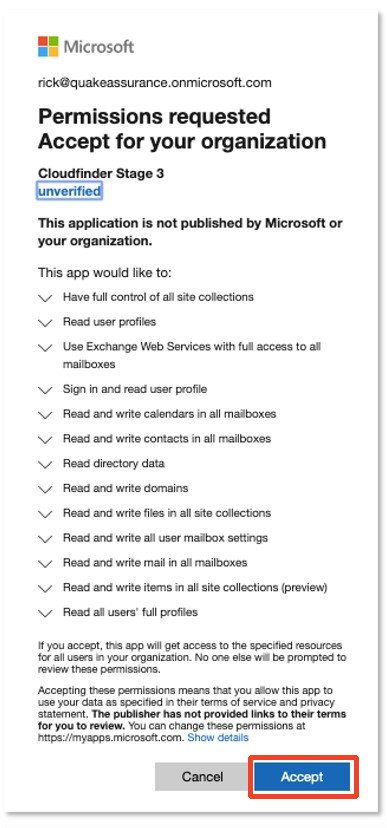
Click the Accept button to authorize access to Microsoft 365 data.
When you are finished authorizing your Microsoft 365 account, click the Go to x360Cloud button.
STEP 7: Select services and enter a SharePoint URL
On the next screen, click the Select Services button.
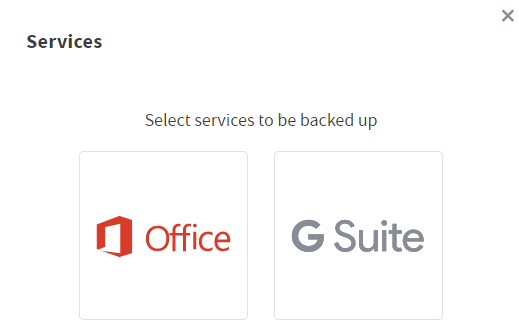
In the Select services to be backed up pop-up window, check the services you want to backup.

Click the Save button.
Finish up
Finally, return to your Reseller Dashboard and go to the Settings page.
Specify if you want to automatically add all new Microsoft 365 users (and SharePoint sites).
You can also configure other settings for the newly-created organization as needed.
Deleteb. Create an organization in Google Workspace
When you have an x360Cloud reseller account, you can log in to the x360 portal and create an organization to protect Google Workspace accounts.
Note: If you need to create an organization for a Microsoft 365 account, please click here:
Log in and create an organization
To log in to your x360Cloud reseller account:
STEP 1: Launch x360Cloud
In the x360 Portal, find the x360Cloud product card and click the Launch link:
STEP 2: Add an organization
If this is the first time you are accessing the x360Cloud Reseller Portal, you will be directed to the Back Up Your First Organization page.
Click the Add Organization button.
NOTE: If this is not your first organization, click the Add Organization button located at the top of the left-hand navigation bar.
STEP 3: Enter organization information
On the New Organization page, enter all required information about the new organization, as outlined below.
- In the New Organization section, enter descriptive information about the new organization, including:
- In the read-only Parent Organization field, you can view the name of the parent organization under which this new organization will be created. The parent organization is typically the name of your reseller account.
- In the Organization Name field, enter the name of the new organization.
- In the read-only Parent ID field, you can view the ID of the parent organization. The parent organization is typically your reseller account.
- In the General Information section, enter contact details for the new organization, including:
- In the Country drop-down menu, select the organization's country.
- In the State or Province drop-down menu, select the organization's state or province.
- In the Address field, enter the street number and street name of the new organization
- In the Postal Code field, enter the organization's postal code .
- In the Phone field, enter the phone number of the new organization.
Click the Submit button when you are finished.
STEP 4: Authorize Google Workspace
On the next page, click the Authorize button.
STEP 5: Select service to be protected
Select Google Workspace (also referred to as G Suite) as the service you wish to protect for this organization:
STEP 6: Sign in to Google Workspace
To install the x360Cloud application, sign in to your Google Workspace account.
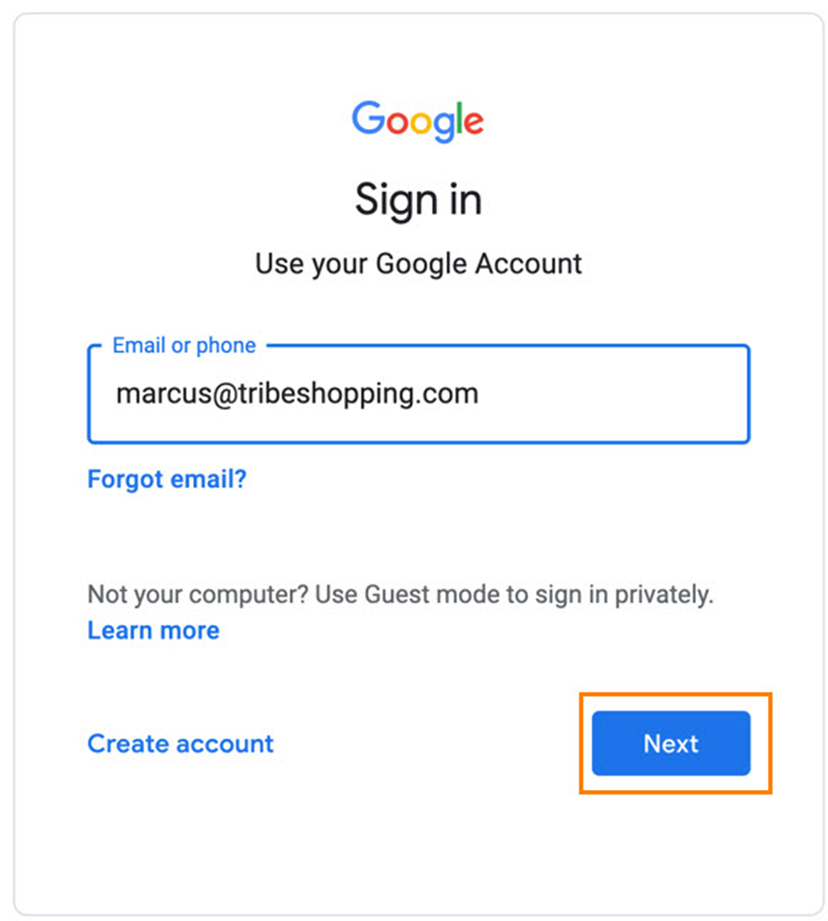
In the Email or phone field, enter the email address of a Super Admin associated with all organizational units of your Google Workspace account and click the Next button.
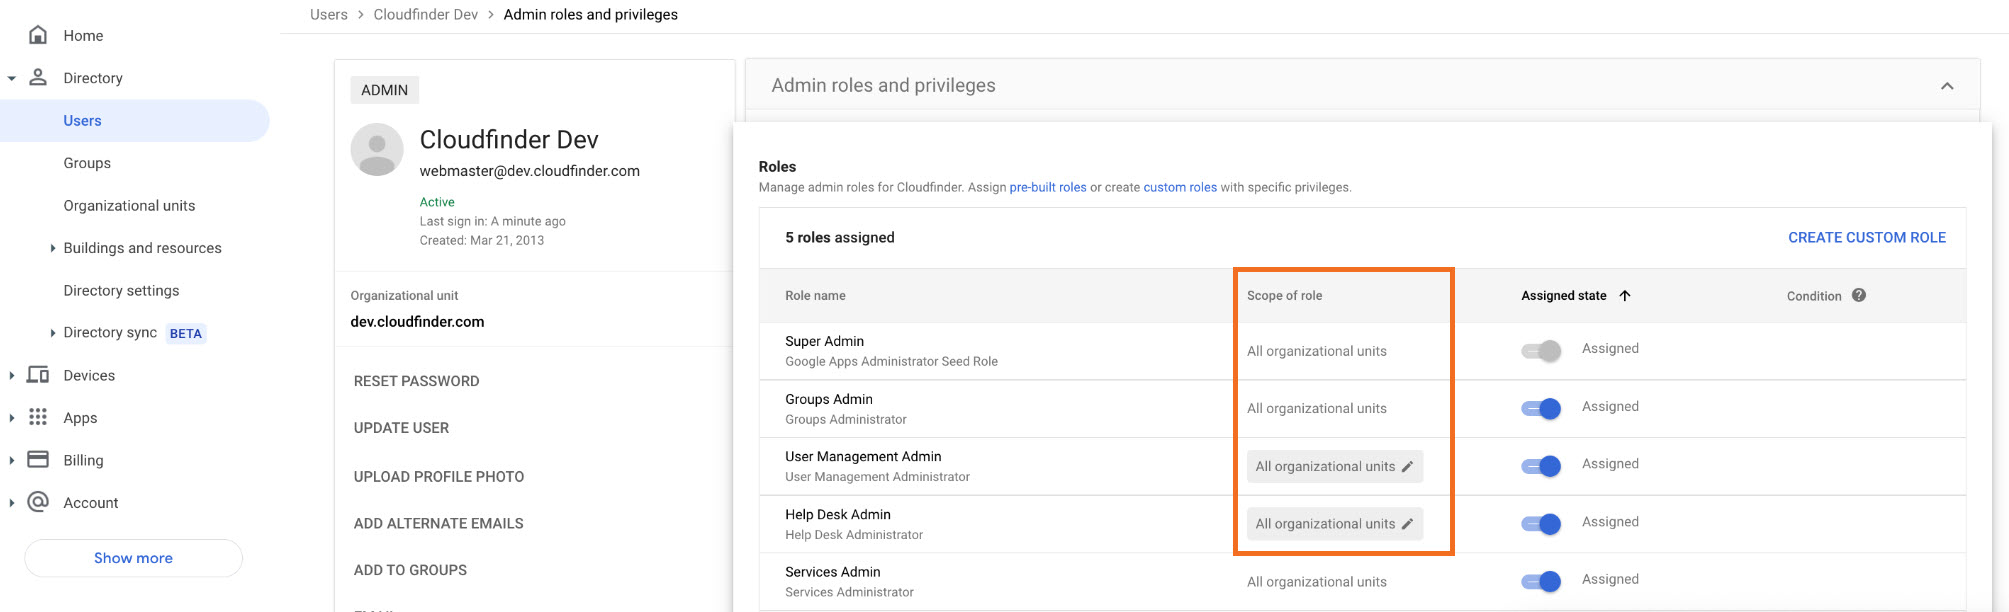
Note: You must enter the email address of a Super Admin whose scope of role includes all organizational units, as shown below. If not, the application will still install successfully, but will only apply to limited organizational units and only those limited units will be backed up.
Enter the Google Workspace account password and click Next.
STEP 7: Install the x360Cloud App2 Google Workspace Marketplace application
- For full instructions, please review Install x360Cloud App2 Google Workspace Marketplace application
STEP 8: Log in and add the provider
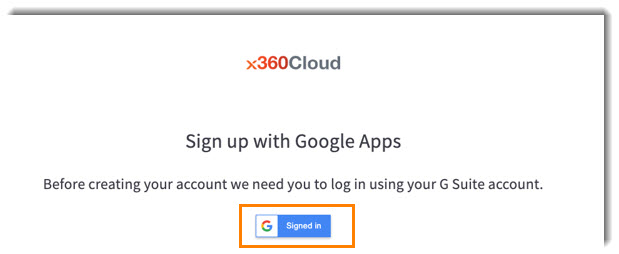
1. Log in to your Google Workspace account by clicking the Signed In link:
2. From the drop down menu, select the organization you wish to add the Google Workspace provider to.
Then click the Add Provider button.
STEP 9: Select services
Click the Select Services button:

In the Select services to be backed up pop-up window, check the services you wish to backup.
Please note: To protect shared drives, the registered Google Workspace admin user must be a manager of the shared drive. When you select a shared drive service to be backed up, the system will automatically add/modify the shared drive member list to include the registered Google Workspace admin user as a manager.
Click the Save button when you have completed your selections.
Finish up
Finally, on your reseller portal dashboard, go to the Settings page and specify if you want to automatically add all new Google Workspace users (and shared drives).

You can also configure other settings for the new organization on the Settings page, as needed.
DeleteNeed a new organization-level account?
You can also create new organization-level user accounts, as needed.
Create new organization-level user accounts
1. Navigate to the Settings page of the organization you want to create a new user for and switch to the Users tab.
2. Click the + icon (located to the right of the breadcrumbs) to open the Create User form.
3. Fill in the Create User form and click the Create button at the bottom of the page when done.
Note: The user you create will have organization administrative permissions only to this selected organization.
4. A confirmation message will show creation status.
5. The new user will be now be displayed in the user list:
6. The new user will receive an email with instructions to set their password in order to register.
The link to the password reset form (sent in the email) will be valid for 7 days after the new user is created. After the new password is set, the newly-created organization admin user will be redirected to the x360Cloud login page and will able to log in to the x360Cloud system.
Note: This new user account in the x360Cloud system is not the same as a new Axcient x360 Portal account.
This new organization-level user account in the x360Cloud system is not able to log in to the Axcient x360 Partner Portal.
Configure organization settings
After you configure your organization, you will be redirected to the organization's Settings page, where you can configure additional settings for your client.
For example, you can:
- Update service settings,
- Update general settings, including content visibility settings, and
- Create organization-level user accounts for your clients.
1. While still in the organization's Settings page, update service settings.
For example, if you are working with a Microsoft 365 account, you can update the following settings:
- In the read-only Current backup section, you can view current backup statistics for the organization's account.
- In the Enable services to backup section, use the toggles to turn on and off Microsoft 365 service connectors to be backed up.
- In the User filter settings section, click the External checkbox to skip external user accounts from the backup process.
- In the New users section, you can automatically back up new user accounts and new Share-Point sites:
- Click the Automatically Add New Microsoft 365 Users toggle to automatically back up all new user accounts.
- Click the Automatically Add New Microsoft 365 SharePoint Sites toggle to automatically back up all new SharePoint sites.

2. Alternatively, if you are working with a Google Workspace account, you can update the following settings:
- In the read-only Current backup section, you can view current backup statistics for the organization's account.
- In the Enable services to backup section, use the toggles to turn on and off Google Workspace service connectors to be backed up.
- In the New users section, you can automatically back up new user accounts and new Shared Drives:
- Click the Automatically Back Up New Google Workspace Users toggle to automatically back up all new user accounts.
- Click the Automatically Back Up New Google Workspace Shared Drives toggle to automatically back up all new Shared Drives.

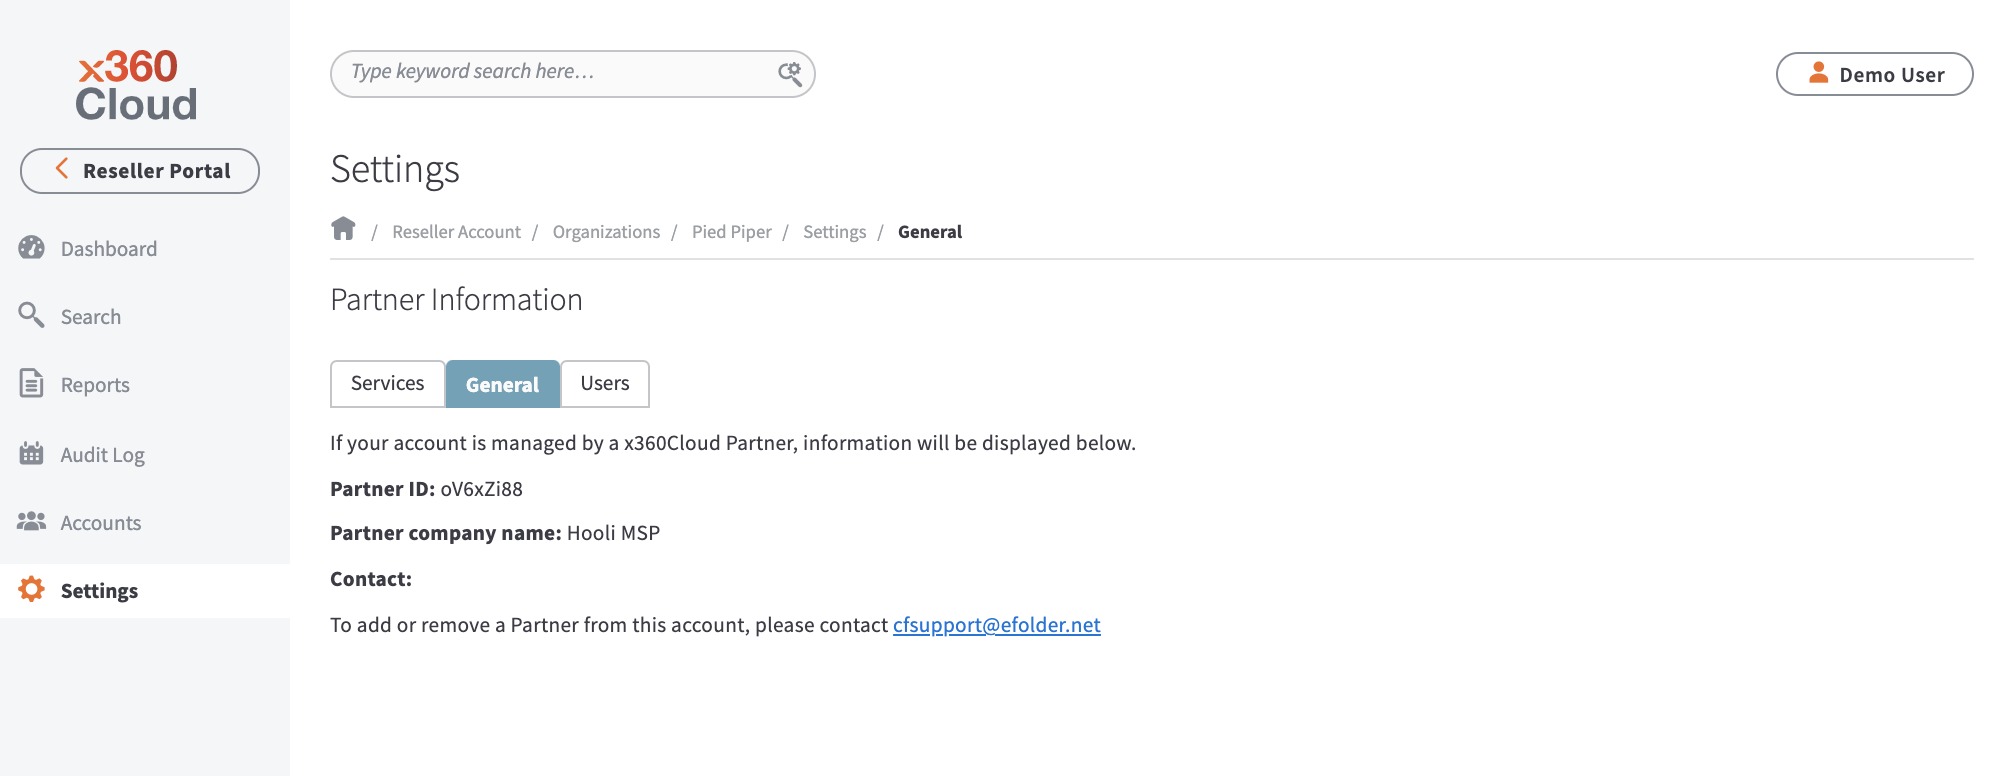
3. Click the General tab to view and modify additional preferences.
- In the Partner Information section, you can view x360Cloud partner information, including partner ID, company name, and contact information.
4. Click the Users tab to view existing organization-level user accounts.
a. Optionally, to create a new organization-level user account, click the Create New User button.

b. Enter information about the new user, including:
- First name,
- Last name, and
- Email address.
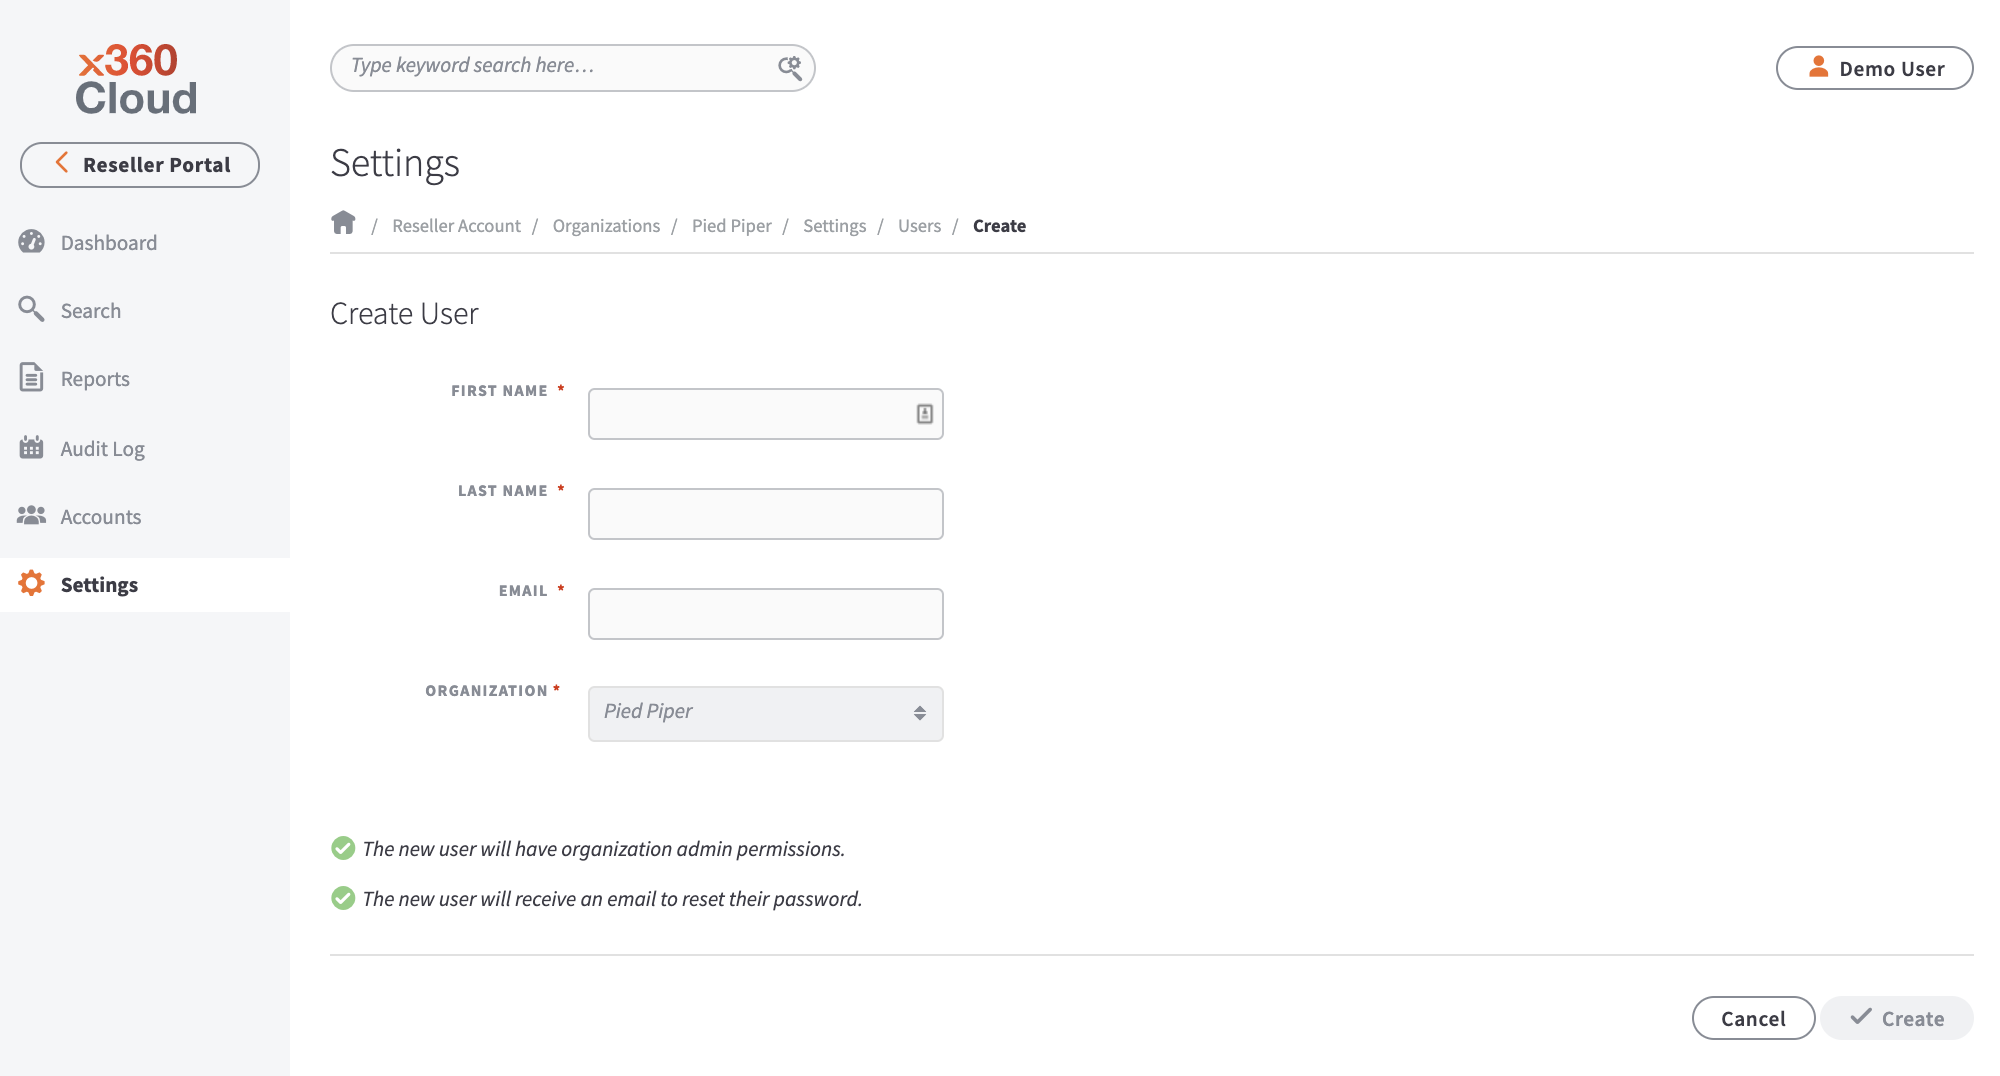
c. Click the Save button when you are finished. The new user will receive an email with instructions on how to log in and configure a password.
Delete
Please refer to How to set up the internal NFR organization in x360Cloud |
- Return to the 360Cloud Essential User Guide
SUPPORT | 720-204-4500 | 800-352-0248
- Contact Axcient Support at https://partner.axcient.com/login or call 800-352-0248
- Have you tried our Support chat for quick questions?
- Free certification courses are available in the Axcient x360Portal under Training
- Subscribe to Axcient Status page for updates and scheduled maintenance
1725