
OSX Installation Instructions
Summary
The Mac based software is a command line only file based backup utility. It will run on an Intel based MAC. At this time all setup and configuration of the software will have to be done via the command line. There is no built in scheduling mechanism so you will have to use launchd or another Mac scheduling utility to schedule the backups. The installation will include a lauchd template to allow you to easily modify and setup a schedule. Sudo is used to run a given command as root. If you would like to log in as root you can simply issue the command 'sudo su' will switch users on the command line to the root user so you do not have to continue using sudo at the beginning of each command.
Install Software
- Once the software is downloaded from the portal open Terminal and find the download location.
- Unzip the installation package using the unzip command followed by the name of the zip file you just downloaded
- unzip setup-onlinebackup-backup-cmdline-osx-x86-3.7.1.zip
- This creates a new directory in the download folder. Use the command cd to go to that directory
- cd onlinebackup-backup-cmdline-osx-x86-3.7.1 4.
- Run the install.sh command as root using sudo. By default it will install the software in /var. If you want to install to a different directory specify that after the install.sh on the command line as show in d.ii If you install in the users directory you do not need to use the root.
- sudo ./install.sh - installs to /var as root
- ./install.sh /Users/johndoe/software/onlinebackup -installs to user directory with out root permissions
- cd to the installation directory (/var/onlinebackup)
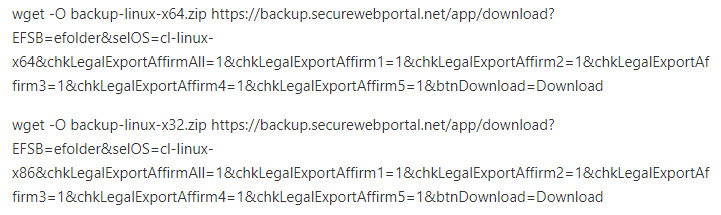
If there is no GUI you can use the following commands to wget the software
Configure credentials and passphrase
There are two methods for doing things. You can either edit the config file directly using command line text editor such as vim/nano or you can use command line switches to specify the username/password/passphrase.
- Method 1: Editing the onlinebackup.config file
- Open the file with a command line text editor. Vim is installed if you know it. Nano is easier to use if you don't have experience with command line text editors
- sudo nano onlinebackup.conf
- Scroll down using the arrow keys until you get to the section Remote Account Credentials
- You should be able to find the Username and Password fields after the server port. Enter in the username and password you created in the portal
- Scroll down a little farther and you fill the PassPhrase section. Put in the passphrase where it prompts you to.
- IMPORTANT: Passphrase recovery is not supported with the Mac or linux clients. If you forget your passphrase you will not be able to recover your data so make sure you document it somewhere.
- Save and close the document. In nano ctrl-o saves and ctrl-x exits.
- Open the file with a command line text editor. Vim is installed if you know it. Nano is easier to use if you don't have experience with command line text editors
- Method 2: Commandline Switches
- You can also add the username password and passphrase using the onlinebackup command. Some people find this faster it also causes these values to not be stored in plain text in the config file.
- Set Username
- sudo onlinebackup set Account username=test
- Password
- sudo onlinebackup set Account password=testpassword
- Passphrase
- sudo onlinebackup set Account passphrase=thisisthetestpassphrase
- IMPORTANT: Passphrase recovery is not supported with the Mac or linux clients. If you forget your passphrase you will not be able to recover your data so make sure you documents it somewhere.
- You can also set all 3 with the same command
- sudo onlinebackup set Account username=test password=testpassword passphrase=thisisthetestpassphrase
Configure Backup Set
Configuring backup sets involves adding folder and policy configurations to the configuration file. They can be added anywhere but it is recommended to add them right above the Remote Account Credentials section.
The Folder List Information section gives a pretty good overview of what you need. Each folder you want to back up requires a folder entry and if you want to exclude specific files you need a policy.
- Open the onlinebackup.config file with a commandline text editor.
- sudo nano onlinebackup.config
- ctrl-o saves; ctrl-x exits
- sudo nano onlinebackup.config
- Example of folder policy to backup user jdoe's folder but exclude jpegs and mp3s.
- [Folder.johndoe]
path=/Users/jdoe
policy=johndoe-excludes
[Policy.johndoe-excludes]
rule1=include *.*
rule2= exclude *.mp3
rule3= exclude *.jpg
rule4= exclude personal\ --nooverride - Folder definitions have to start with [Folder and [Policy definitions have to start with Policy. The text after the '.' is just a name you define for that folder or policy and then close the line with ].
- In the Folder definition the path= is the folder you want to backup.
- The policy= line points to the policy you have defined that you want to use on that path. The first rule of the Policy should always start with include *.* or exclude *.*.
- Rule 2 and 3 are excluding all mp3's and jpeg files.
- Rule 4 is excluding the folder /Users/jdoe/personal. The --nooverride option will tell the onlinebackup software to not even scan the directory. This is helpful for directories with large amounts of files or corrupt files that you don't need to backup and are just causing errors.
- For more help with the configuration file use the following command
- sudo onlinebackup help config
-
Note: If the path has spaces, there is no need to use the escape "\" in the configuration.
- Example: The system has a path you want to backup that looks like:
- /Volumes/Disk 1/MyData
- Terminal navigation would require using:
- /Volumes/Disk\ 1/MyData
- The .conf file would require:
- path=/Volumes/Disk 1/MyData
- Notice there is no "Disk\ 1"
- To check if the folder is seen in the backup you can run (example in terminal cli prompt):
- sudo onlinebackup isincluded /Volumes/Disk\ 1/MyData
- Example: The system has a path you want to backup that looks like:
- [Folder.johndoe]
Note: Because Pass Phrase recovery is not supported with the Mac or linux clients, in addition to recording the pass phrase elsewhere, one suggestion is to copy the .conf file when finished and/or to create a backup rule which will include the configuration file in the backup job.
IMPORTANT: Keep in mind, the "onlinebackup" references might need to change to match your branded software name.
- Example of folder policy to backup the configuration:
[Folder.backupconfiguration]
Path=/var/onlinebackup
Policy=include-config - Example of the policy rules to backup the configuration:
[Policy.include-config]
rule1=exclude *.*
rule2=include *.conf
Testing Backups
At this point you will want to test your backups before you setup scheduling. If you have any errors you can then fix them before moving forward.
- You run the backups by issuing the onlinebackup command. Then specifying where you want the backups to go to. The following command backups to our cloud the --foreground flag is great for testing because it causes the log file to scroll in real time alerting you to any issues. Use ctrl-c to halt the backup.
- sudo onlinebackup backup to remote --foreground
- If you want to check if the backups are running use the following command
- sudo onlinebackup status
- Log files are stored in /var/onlinebackup/Logs. You can use the following commands to view log files
- Open the whole log file to view. If it is a current job you will not see any new log entries while the files is open. Press 'q' to exit.
- sudo less Logs/Computer-Backup-2013_06_21-16_36_43.log.txt
- View the last few lines of a log file and have it continue to scroll any new entries. This is helpful if there is a job already running and you want to watch it. ctrl-c to exit
- sudo tail -f Logs/Computer-Backup-2013_06_21-16_36_43.log.txt
- Open the whole log file to view. If it is a current job you will not see any new log entries while the files is open. Press 'q' to exit.
Scheduling Backups
Note: launchd is only for OSX backups. See further down for Linux.
Backups need to be scheduled using OSX's launchd. This unfortunately to is command line only. There are some GUI options out there that you are welcome to use. Lingon is one that we have used and seems to work well. We have included a template for launchd and these instructions outline how to modify and use that template to set your schedule. If you use another product the command you will likely want to run for remote backups will be 'onlinebackup backup to remote --cron'.
- Check for the file /var/onlinebackup/net.securewebportal.backup.plist. If it doesn't exist run the following commands

- Type sudo nano /var/onlinebackup/net.securewebportal.backup.plist
- Change the first <string> in the ProgramArguments key to the location/name of your backup software
<key>ProgramArguments</key>
<array>
<string>/var/onlinebackup/onlinebackup</string>
<string>backup</string>
<string>--cron</string>
</array> - By default this file will send the backups to all configured locations. If you want to backup only to a remote location add <string>to</string> and <string>remote</string> between backup and --cron. It should look like the following.
<key>ProgramArguments</key>
<array>
<string>/var/onlinebackup/onlinebackup</string>
<string>backup</string>
<string>to</string>
<string>remote</string>
<string>--cron</string>
</array>
- Change the first <string> in the ProgramArguments key to the location/name of your backup software
- Modify the time when you want this to start
- Change the integer values for the for the Minute and Hour fields to have it run when you want it to. By default it is set to run at 7pm every day.
- Check the syntax using the following command
- plutil -lint /var/onlinebackup/net.securewebportal.backup.plist
- output should show: net.securewebportal.backup.plist: OK
- Copy the plist file to the appropriate directory.
- sudo cp net.securewebportal.backup.plist /Library/LaunchDaemons/.
- To run as root whether user is logged in or not
- /Library/LaunchDaemons
- To run as user who is currently logged
- /Library/LaunchAgents
- To run as specific users only when that user is logged in
- ~/Library/LaunchAgents
- To run as root whether user is logged in or not
- sudo cp net.securewebportal.backup.plist /Library/LaunchDaemons/.
- Load launchd script with the following command
- sudo launchctl load /Library/LaunchDaemons/net.securewebportal.backup.plist
- Test launchd script
- sudo launchctl start net.securewebportal.backup
- sudo onlinebackup status - if the script worked it should be running
- Check logs to make sure it ran properly.
Note: Linux still uses cron
A good guide we've found for cron can be found here: http://www.cyberciti.biz/faq/how-do-i-add-jobs-to-cron-under-linux-or-unix-oses/