Solution overview
Prepare for the worst-case scenario with the Axcient Continuity Cloud. Downtime of critical infrastructure can cost a business dearly. When disaster strikes, backups will not be enough to keep businesses operating smoothly. The Axcient Continuity Cloud allows bare-metal backup images stored in Axcient's storage cloud to be virtualized in the cloud in minutes or hours, versus days or weeks. These virtual servers can then be connected to the Internet, and existing LAN networks through a virtual firewall and router or VPN tunnels.
Note: To successfully deploy an x360Recover protected system on a CC Node, you will need a basic working knowledge of x360Recover Hyper-V, and Pfsense.
*** Before you can export a snap shot as a virtual machine on a CCNode, you first need to open a new ticket with x360Recover tech support requesting a CCNode and add to the ticket the vault name and customer name. A x360Recover tech will set up a CCNode and connect your vault to it. ***
Technical overview
The Axcient Continuity Cloud allows fast recovery from partial site or entire site failures. In the event of a server failure, (or the failure of an entire site), a local Axcient BDR Appliance can first be used to easily, quickly, and transparently virtualize the failed server(s) onsite. If the BDR has been destroyed or is otherwise unavailable, the Axcient Continuity Cloud can be activated to bring the failed infrastructure back up. Powerful virtual routing and firewalling features provide easy and, in certain configurations, fully transparent access to virtualized servers.
To begin using the Axcient Continuity Cloud:
- Submit a critical (highest priority) support ticket, including details of the resources needed (such as the number of servers, total RAM, disk space, and so forth), and the account(s) containing the data for the computers to be virtualized.
- Axcient will respond to these requests 24/7/365 and will provision one or more Continuity Cloud compute nodes for your dedicated use. Once provisioned, you will have full self-management capabilities of the resources on the compute node, and will be self-sufficient.

- Once you Agree to the Acceptable Use Terms, you are given RDP access to the compute node(s).
- After logging in to a compute node, you will have full access to self-configure the virtual router and virtual firewall, allowing the configuration of any needed VPNs and NAT/PAT policies.
- If you choose to virtualize a bare-metal backup image directly without any conversion process (only available for certain types of bare-metal backups, or where “hot standby” VMs have already been created automatically
- The VMs can be brought up with a variety of networking configurations.
- A test mode is available where the VMs are fully isolated on a virtual network.
- More common is the mode where VMs are bridged to a VLAN that is dedicated to and connected to all of a partner’s provisioned compute nodes.
- The virtual router and firewall control the flow of traffic to and from this internal, private VLAN to a VLAN dedicated to the external connectivity of the virtual network.
- All compute nodes are assigned several public IPv4 addresses (IPs are provisioned as requested, up to one public IP address per VM that needs to be virtualized).
- All traffic to these public IPs are automatically routed to the external VLAN dedicated to the partner’s compute node(s).
- The virtual router/firewall has full control over the entire network¾virtualized servers can be exposed in a DMZ, NAT/PAT can be used, IPsec VPN tunnels can be configured, and VPN connections can be passed through to virtualized servers.
- IPsec VPN tunnels are especially powerful for a partial-site failure situation where the customer site’s firewall is still operational and can form a VPN tunnel to the virtual router/firewall running in the cloud. In this situation, the internal IP addresses of the virtualized servers in the cloud can be the same as they were before, and thus users can transparently use the virtualized servers running in the cloud without any configuration changes. Additionally, any public services such as POP3 and OWA can be exposed through NAT/PAT policy rules. Partners then update the DNS records of their servers to point to the new public IP addresses, and these public services then become available again, just as before.
- When the original servers are ready to be recovered, the virtualized servers can take incremental backups, which will update the backed up data with the normal process. You can then download and restore these bare metal images or request a copy of the data on a USB drive or NAS device.
- Finally, you should submit a ticket to de-provision the cloud compute nodes, and the cloud compute nodes are then automatically wiped clean back to their original state so that they are ready for use by the next Partner.
Exporting a Protected System
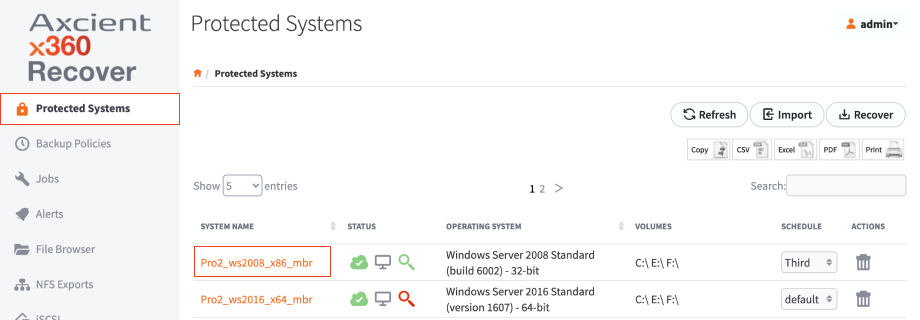
1. Log in to your x360Recover vault with the customer account, and navigate to the Protected Systems tab on the lefthand navigation.
2. Find the protected system that is needed to be recovered, and click on the appropriate System Name.
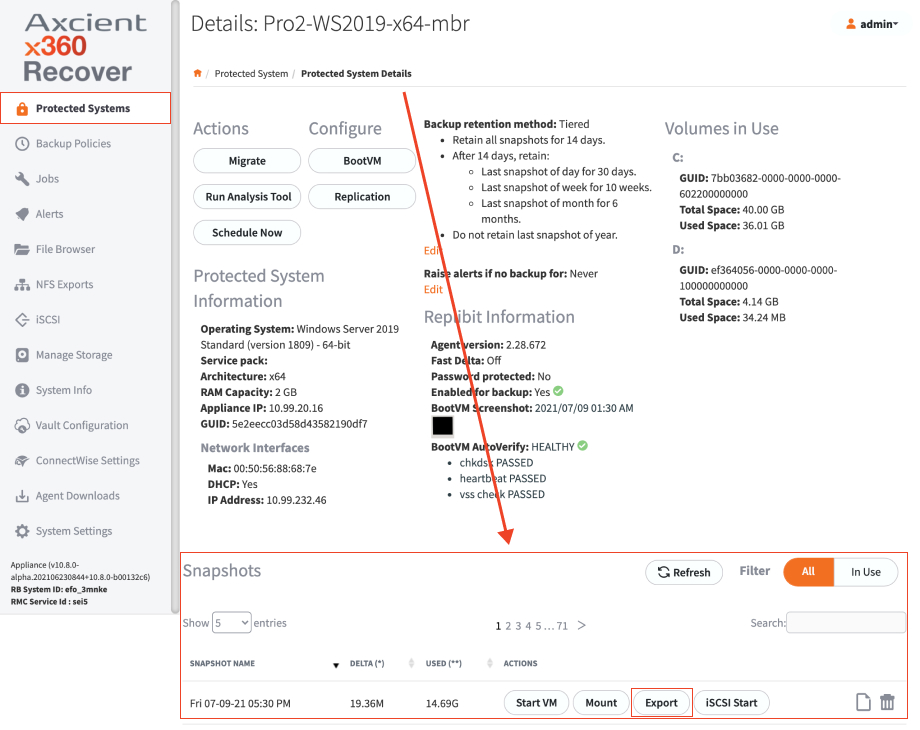
3. Locate the snapshot that you need to recover, and click on the Export button.
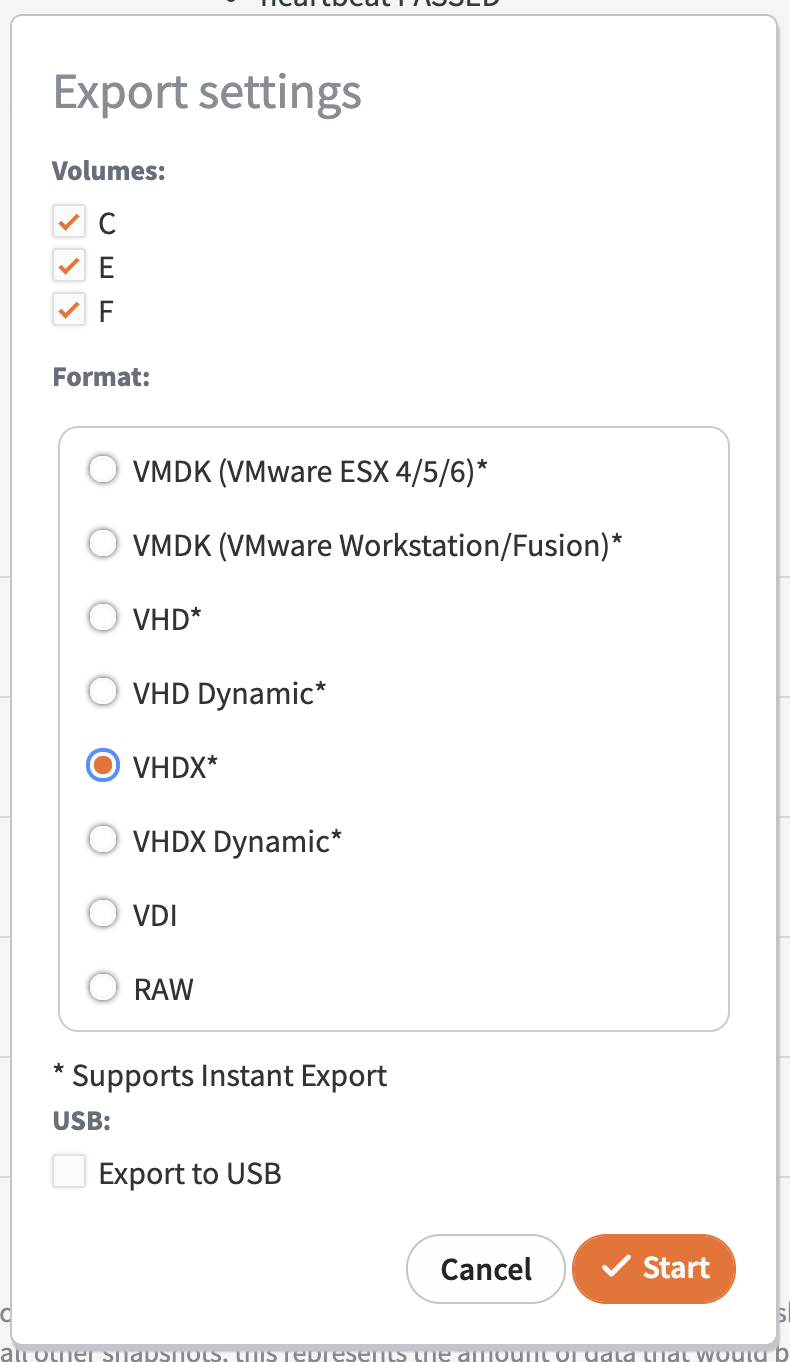
4. Click on the VHDX option, and then click Start.

5. To monitor the conversion process, select the Jobs menu under the Conversion tab.
When your conversion job is completed, you will see a checked Status column.
While you are waiting on the conversion job, connect to the CC Node using the credentials that were sent to you, and start setting up the network and firewall.
Virtual Firewall and Router Configuration
While the restore is running, configure the firewall on the Continuity Cloud node.
For help with this, please refer to the document Continuity Cloud Virtual Firewall Guide.
After the firewall policies are configured, you can resume with the next step.
Manage and Start VMs
Now that your virtual router and firewall policies and configured, you are ready to start your VMs.
Use the Hyper-V console to connect to the VMs and log in and reconfigure the network to use the proper LAN IP address.
Important Note
If you are virtualizing an SBS server or domain controller, the first time the server boots, when the Windows boot menu appears, you should immediately press F8 and choose Active Directory Restore Mode or Directory Services Restore Mode. After the server comes up, log in as the local Administrator (.\Administrator) using the Directory Services Restore Mode password; then, edit the settings for the network adapter to reset the static IP and the DNS server address. For SBS servers, the DNS server address will be the same as the static IP (or 127.0.0.1).
- Open the Hyper-V Management console.

2. Create a new VM.

3. Enter the name of system, and click Next.

4. Select the radio button that corresponds to the generation of your virtual machine:
- For BIOS systems, choose Generation 1.
- For UEFI systems, choose Generation 2.
Then select Next.

5. Enter the amount of memory, and click Next.

6. Select the network connection, and click Next.

7. Select Connect Virtual Hard Disk, and select the, Use an existing virtual hard disk radio button, and click on the Browse...button.

8. Navigate to x:\share to find the exported hard drive folder, highlight the drive, and click Open.

9. Click Next.

10. Verify the settings and select Finish.
 The VM is ready to boot. If you need to add additional virtual drives or any other system setting changes. right click on the VM and click Settings.
To power on the VM, double click the VM and select the power button. The following windows should display:


Cleaning up
- When you have finished with the Axcient Continuity Cloud, the best practice is to delete any of your data off of the X: drive (using Windows Explorer).
- Axcient will reinitialize the underlying RAID volumes when the node is reprovisioned, zeroing out all data on the volume.
- For especially sensitive data, you may want to securely erase all of the free space on the drive in a way that adheres to DoD standards.
- To do this, clear the recycle bin; then, open a command prompt and run the command “sdelete -c X:”—this will more securely erase any files you have deleted.
- Running sdelete may take 24-48 hours, so you should only run it if required by your security procedures.
- To ensure that you are no longer billed for the Axcient Continuity Cloud service, you submit a ticket indicating that you are finished with the node(s) that have been provisioned for you and please notify Axcient that you have done so.
- Once you have submitter this ticket to Axcient indicating that you are finished with the node, you will no longer have access to the machine. Axcient will wipe and reimage the machine from bare metal, so please make sure you have any data that you need before submitting a ticket indicating that you are finished with the nodes.
SUPPORT | 720-204-4500 | 800-352-0248
- Contact Axcient Support at https://partner.axcient.com/login or call 800-352-0248
- Have you tried our Support chat for quick questions?
- Free certification courses are available in the Axcient x360Portal under Training
- Subscribe to Axcient Status page for updates and scheduled maintenance
2028 | 2037