
Overview
There are a variety of options for exporting full disk images of a protected system. The best method for you depends on which x360Recover services you use and how much disk space is required.
This article walks through disk exports from the appliance or vault UI, or from x360Recover Manager.
NOTE: If you use a local cache repository, we recommend exporting from the x360Recover Recovery Center for a faster experience.
Learn more about the Recovery Center, including export methods.
|
Recovery Method |
Description |
| Export Snapshot |
Choose from a variety of formats to export a virtual disk image, then download the disk with an internet connection. |
| NFS Export |
After exporting a virtual disk image, share the disk on the network. |
| Request a Disk Shipment/USB |
Request a disk if a snapshot is too large to export and download. |
| Instant Cloud Recovery with Scale-Out Cloud |
Perform a near-instant export and recovery without needing to convert to VHDX or VMDK first. |
What is a instant disk export?
Traditionally, creating a virtual disk export required a length conversion process. The traditional process (a) required considerable amounts of time for larger volumes and also (b) consumed precious disk space on the appliance or vault in order to hold the virtual disk copies.
Now, the instant disk export leverages a backend driver process to present the existing backup data as a downloadable virtual disk file of the selected type. No extra storage is used on the backup server when exposing instant export disks for download. The volumes are presented in the same path as traditionally converted disk images (inside the exported VMs folder within File Browser.)
- All forms of VMDK for VMware and VHD/VHDX for Hyper-V are supported
- In release 10.10.0, we added support for VDI and RAW.
-
Read more about instant disk exports
Disk export formats
VMDK for ESXi disks
VMDK for ESXi disks are natively supported by ESXi hypervisor version 4+.
- VMDK for Workstation disk exports are natively supported by any version of VMware Workstation (or Fusion on Mac.)
- VMDK for Workstation disk exports are dynamic or thin disks, meaning that they are only populated with non-zero in-use data from the virtual machine disk volume.
Unlike other virtual disk formats, this type of export is comprised of two separate files for each virtual disk:
- The first file is a small text file with the form <PS UUID>.vmdk that contains the virtual disk definition parameters understood by ESXi.
- The second file (called the flat file) is a raw disk image that contains the actual volume data and is named with the form <PS UUID>_flat.vmdk.
ESXi disk exports are static or thick disks, meaning that they are fully populated to the entire raw size of the virtual machine disk volume.
VHD disks
VHD disks are natively supported for Hyper-V Generation 1 virtual machines.
- VHD disks have a maximum size limit of 2TB. Disks larger than 2TB cannot be exported to VHD format. Note that this is a limitation of the legacy virtual disk format, and not a limitation of the instant export process or the conversion process.
There are two options available for exporting a VHD disk:
|
VHD Dynamic [Recommended] A dynamic or thin disk will be generated. (A dynamic or thin disk is only populated with non-zero in-use data from the virtual machine disk volume.) We generally recommend that you select VHD Dynamic unless you specifically need a static disk. (This helps reduce downloaded disk volume size and speed up your recovery.) |
|
VHD A static or thick disk will be generated. (A static or thick disk is fully populated to the entire raw size of the virtual machine disk volume.) |
VHD for Azure disks
VHD for Azure disks are natively supported for Microsoft Azure virtual machines.
- VHD for Azure disks have a maximum size limit of 4TB. Disks larger than 4TB cannot be exported to VHD for Azure format. Note that this is a limitation of the virtual disk format itself, and not a limitation of the instant export process or the conversion process.
- VHD for Azure disks support static exports only.
VHDX disks
VHDX disks are natively supported for Hyper-V Generation 2 virtual machines.
- VHDX format for Hyper-V should be selected when exporting disks larger than 2TB.
There are two options available for exporting a VHDX disk:
|
VHDX Dynamic [Recommended] A dynamic or thin disk will be generated. (A dynamic or thin disk is only populated with non-zero in-use data from the virtual machine disk volume.) We generally recommend that you select VHDX Dynamic unless you specifically need a static disk. (This helps reduce downloaded disk volume size and speed up your recovery.) |
|
VHDX A static or thick disk will be generated. (A static or thick disk is fully populated to the entire raw size of the virtual machine disk volume.) |
VDI disks
- VDI disks support either dynamic or static exports.
- VDI disks are supported for VirtualBox virtual machines.
RAW disks
- RAW disks support static exports only.
- RAW disks are natively supported for QEMU, KVM, and other hypervisor virtual machines
QCOW2 disks
- QCOW2 disks support dynamic exports only
- QCOW2 disks are natively supported by QEMU, KVM, ProxMox, and other hypervisors for virtual machines
HOW - TO…
How to export from an a appliance or vault
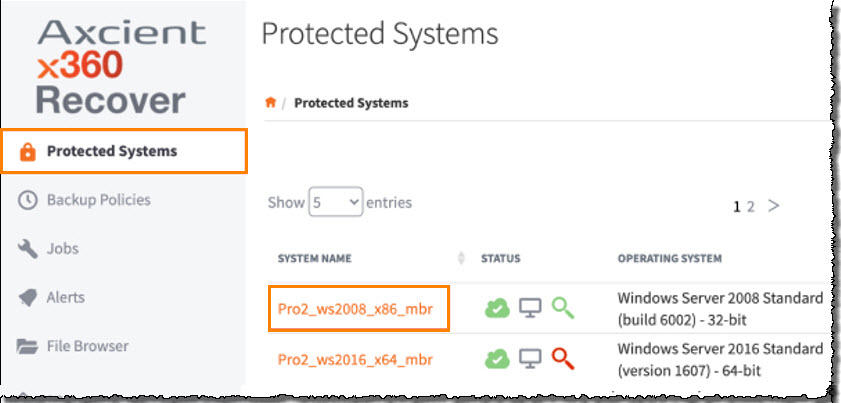
1. Log into an appliance or vault through x360Recover Manager. From the Protected Systems page, click into a protected system and scroll to the bottom of the page to view its snapshots. 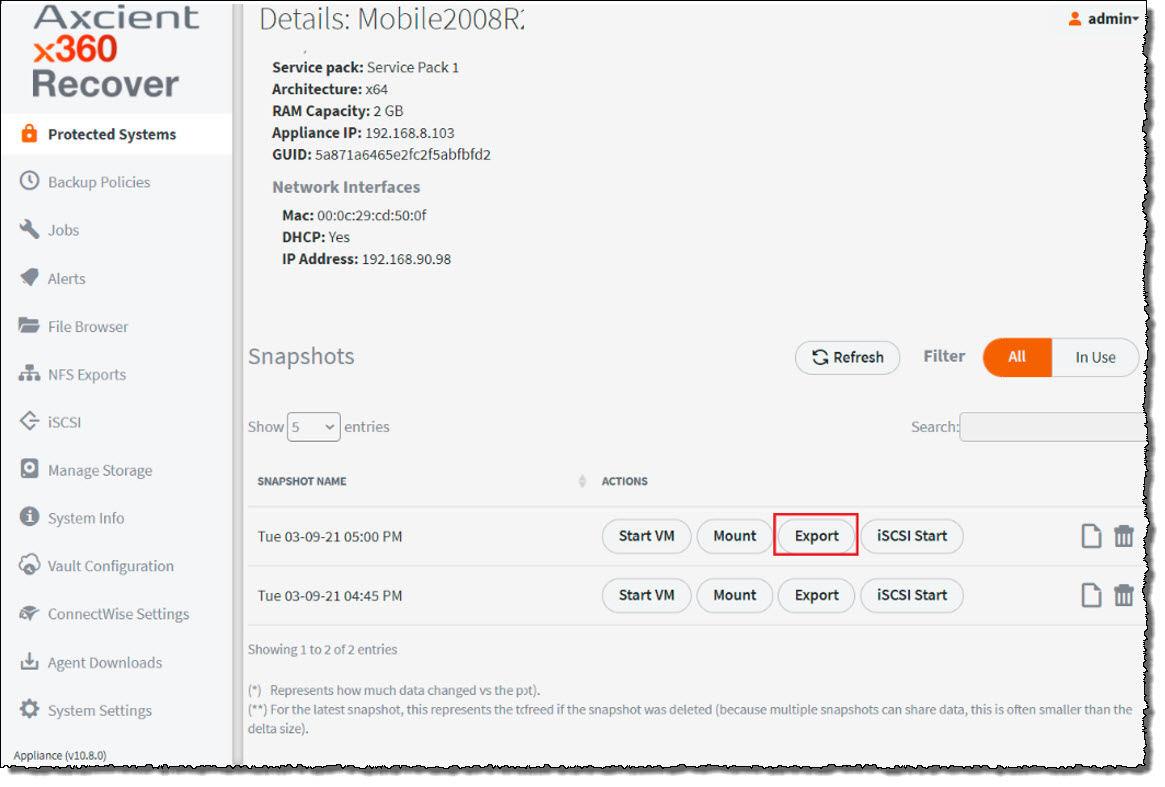
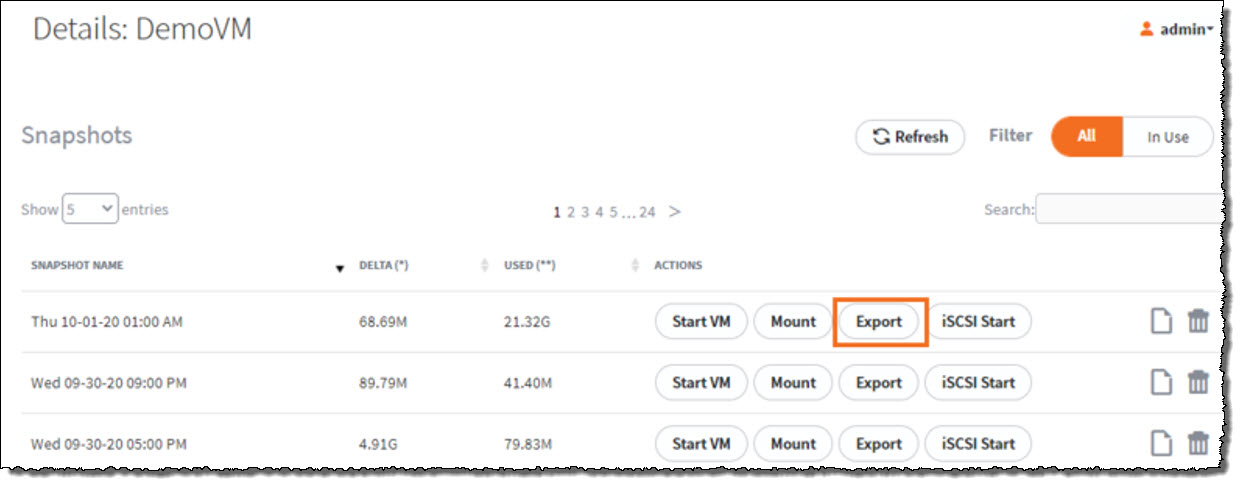
Click Export for the point-in-time snapshot you wish to recover.
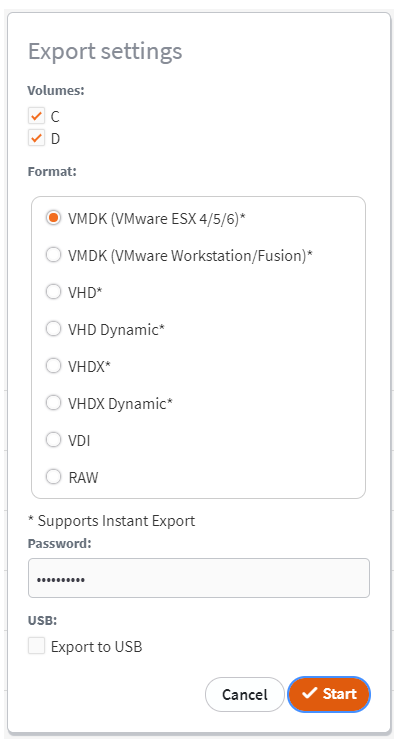
3. The Export settings window displays.

- Check the disk volumes you wish to recover.
- Select one of the supported instant export disk formats.
- Enter the encryption password if required.
- If you wish to copy the exported disks to an attached USB drive, check the Export to USB option, then select the target USB device.
- Note: This USB copy process may take longer to complete.
4. Click Start to begin the export.
Note on concurrent recoveries: If you are performing an export and a snapshot clone exists for the same recovery point from a previous live-mode iSCSI or startVM operation, the live-mode clone will automatically be selected in preference over the original, unmodified backup image.
How to export from x360Recover Manager
1. Within x360Recover Manager, navigate to a service (appliance), device, or vault's Details page. Click the Recovery Wizard button. 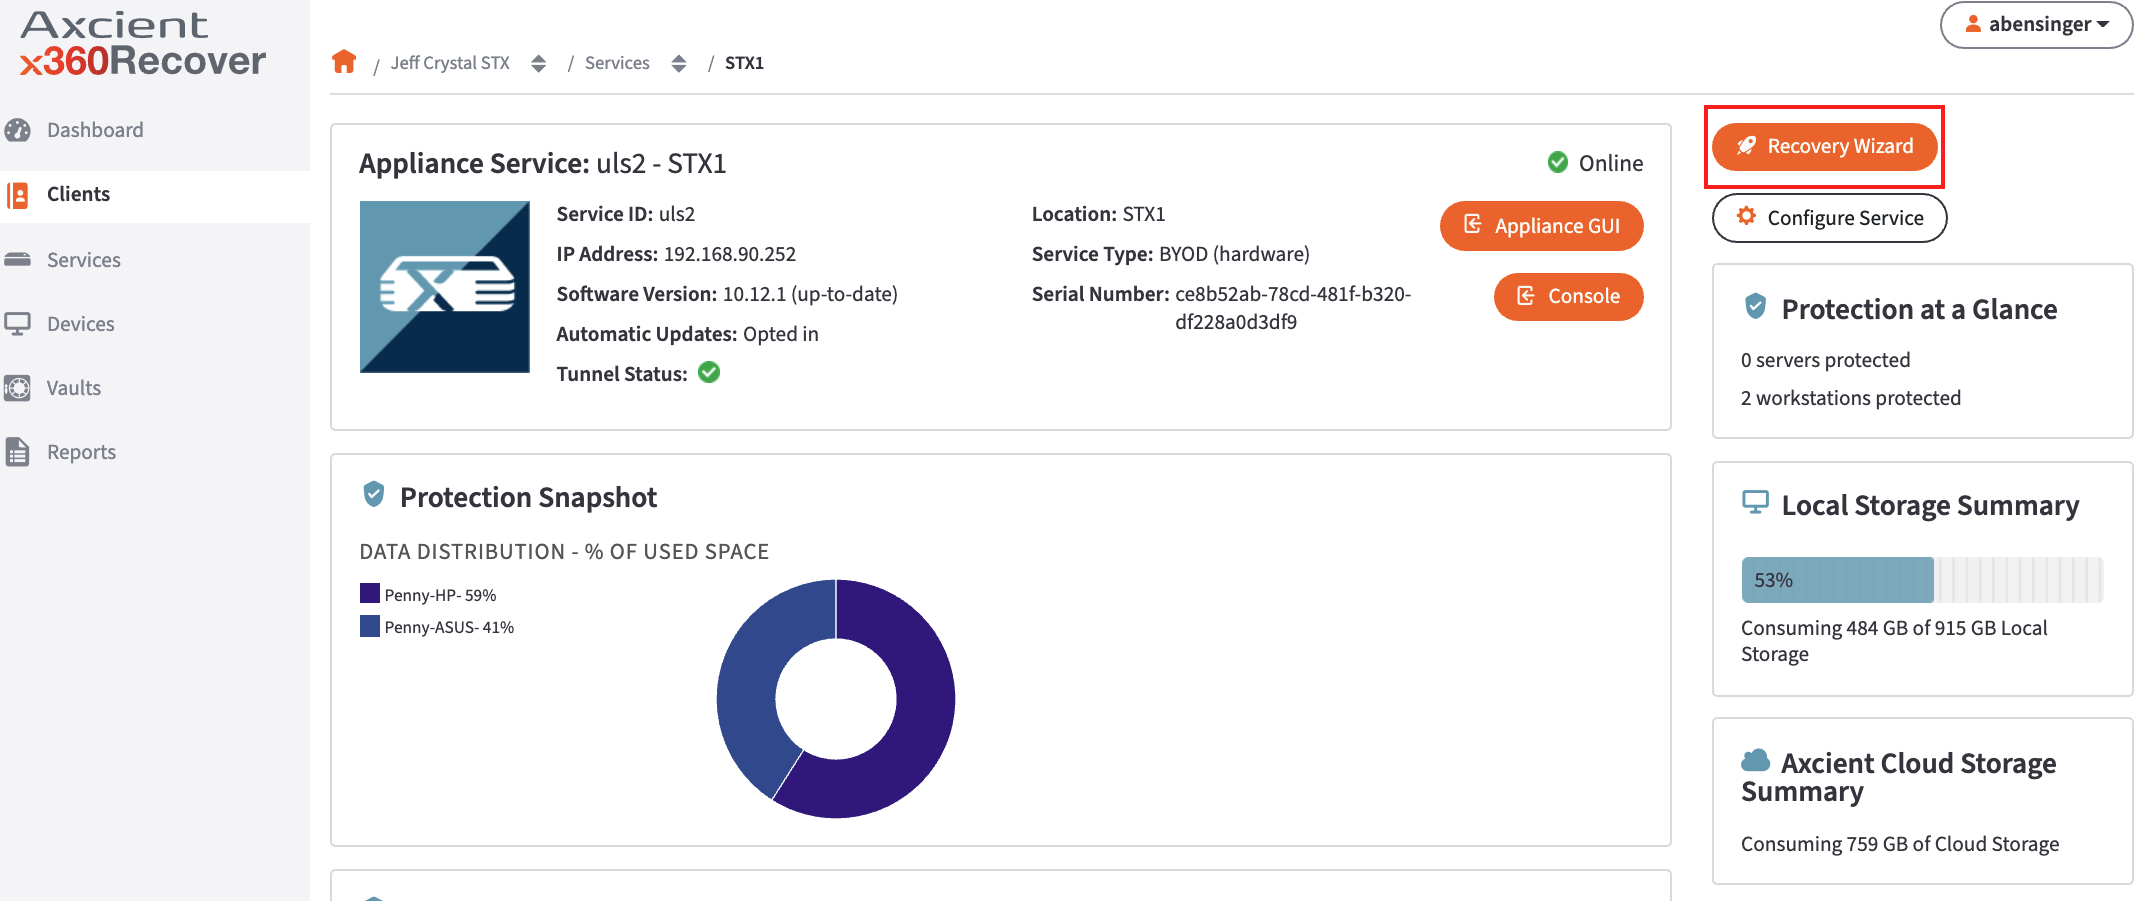
2. Click Make it Virtual. 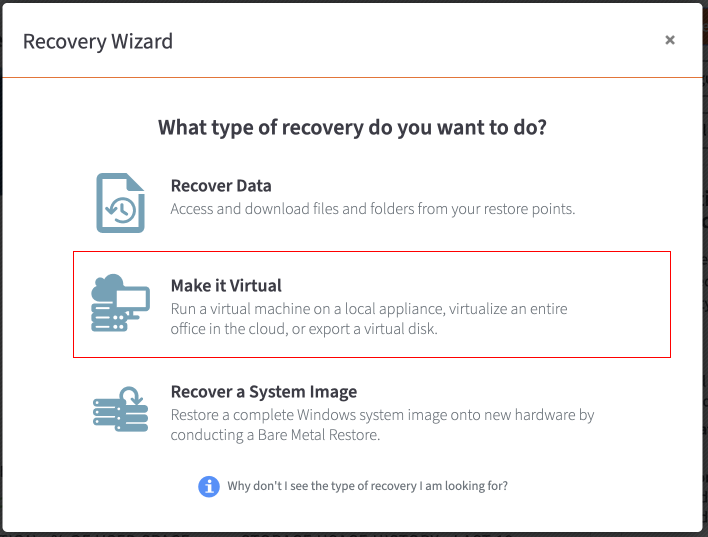 If this option is greyed out, it is not available for this appliance or vault. This may be because the device is connected, or...
3. Click Export to VMDK, Export to VHD, or Export to VHDX depending on the desired disk format. 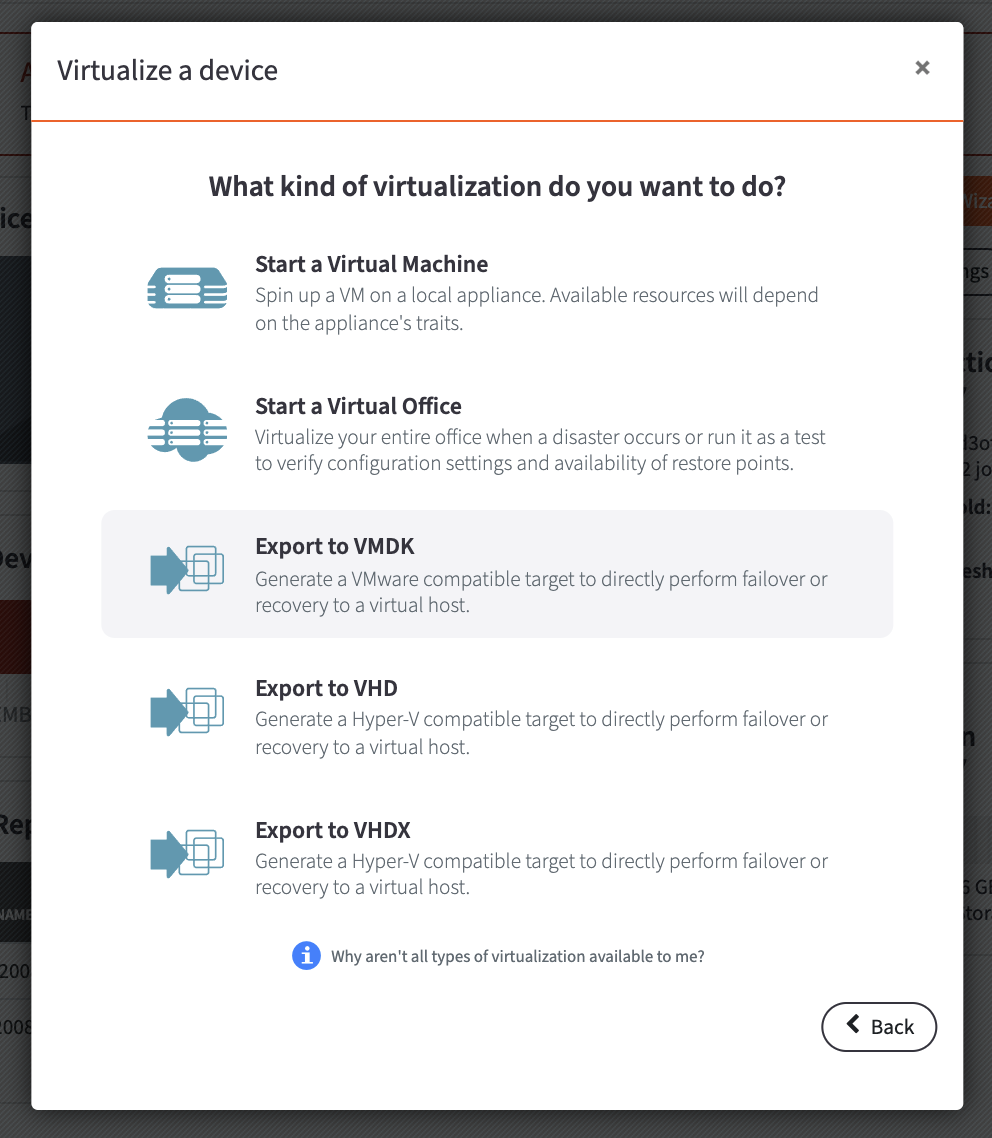
4. Choose Static (thick) or Dynamic (thin). 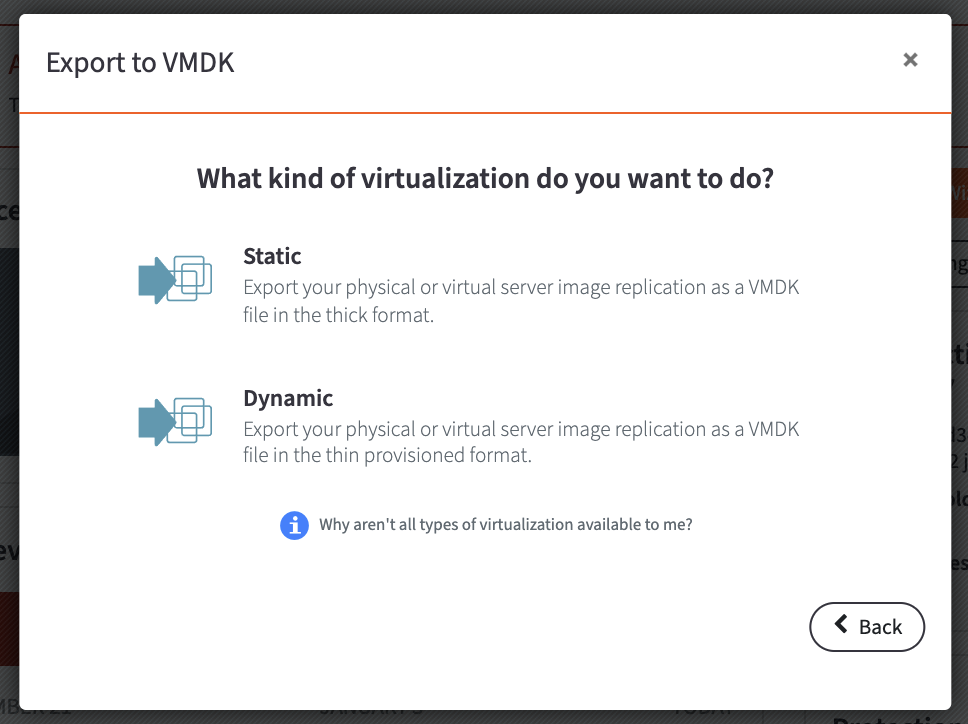
5. Your export is complete!
How to manage existing reports
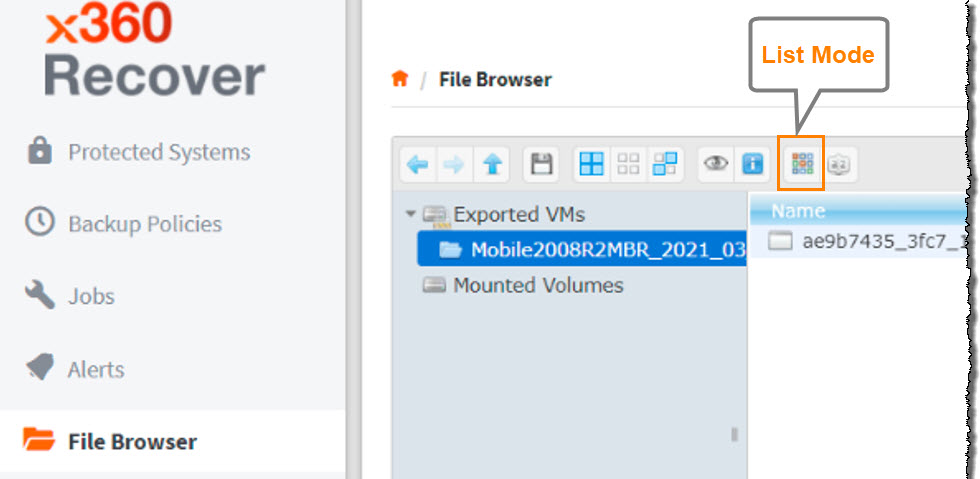
Once started, the selected virtual disks will be available within the File Browser tab for download.
NOTE: As virtual disk volume names are long, we recommend switching to List Mode in the File Browser to easily identify files for download.
Monitor the status of disk exports on the Jobs tab in the Conversions section. Progress will be displayed for any USB copies, and in the rare occurrence an instant export cannot be completed immediately.
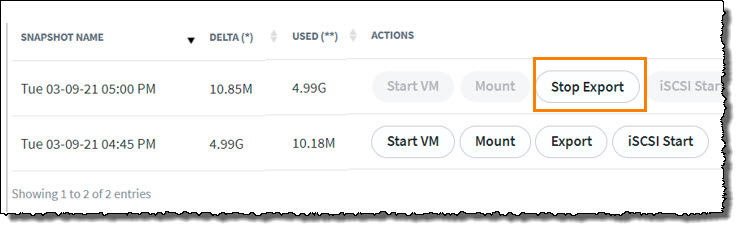
Instant disk exports are an active process, similar to starting a virtual machine or mounting a snapshot, and must be stopped to remove the virtual disks.
The Stop Export action becomes available only after an export is running and any copies to USB disks are complete. Use this action only after virtual disks have been recovered. Stop will immediately make the virtual disk unavailable in the File Browser and remove the export process from the backup server.
How to use NFS export tools
After exporting a virtual disk image, you can use the Network File System (NFS) exports tool to allow remote systems to connect to the appliance or vault and mount the export folder.
This is a two-step process:
Export a snapshot using the instructions above.
Use the NFS exports feature to share the exported virtual disk image(s) on the network.
How to enable and use NFS exports
1. Open any web browser and navigate to your appliance or vault web interface. If you are logging in to the vault, log in with the specific customer username and password.
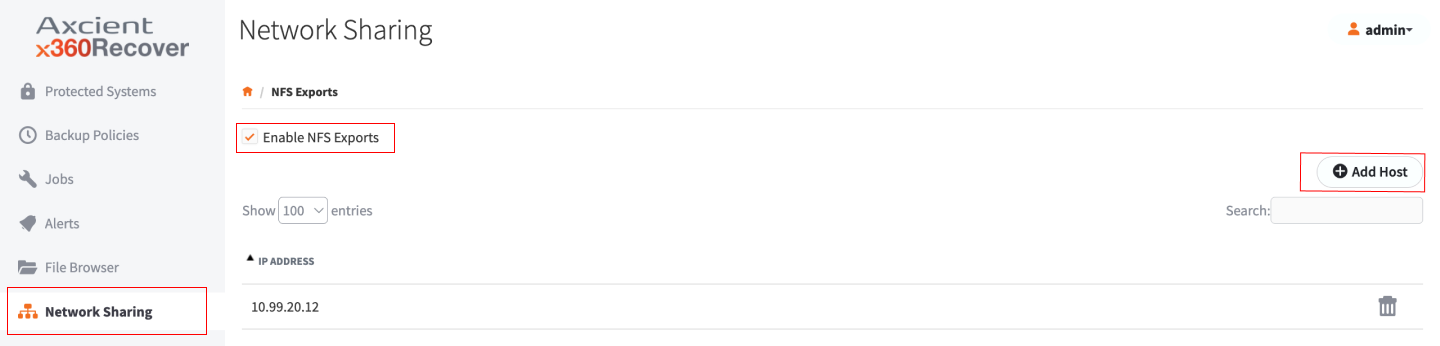
2. In the left-hand navigation menu, click the Network Sharing tab.
3. On the Network Sharing page, click the Enable NFS Exports checkbox.
4. With NFS Exports enabled, click the Add Host button.
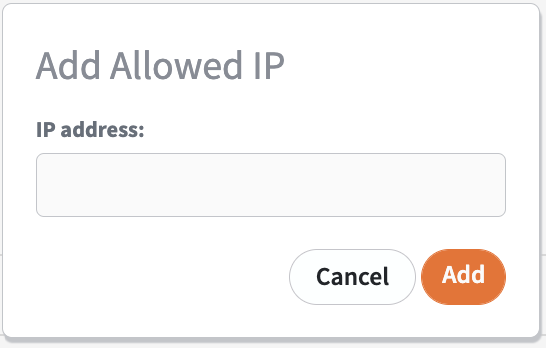
5. In the Add Allowed IP Address pop-up window, enter the IP address of the host.
Note: This is the IP address of the VMware or Hyper-V host that will be connecting to the appliance.
6. On the Hypervisor host, connect to the NFS folder using the IP address of the appliance and the shared folder path. Windows and Linux (Vmware) use different naming conventions for paths. Examples:
On an appliance, the full path for VMware is <IP address>/export/admin
For Windows, the path is \\<IP address>\export\admin
On a vault, the shared folder path for VMware is <IP Address>/export/<Client>
For Windows, the path is \\<IP Address>\export\<Client> where <Client> is the name of the customer whose data you are recovering. (You can view all available client names on the Clients page of the vault.)
Map a drive to an NFS share (Windows)
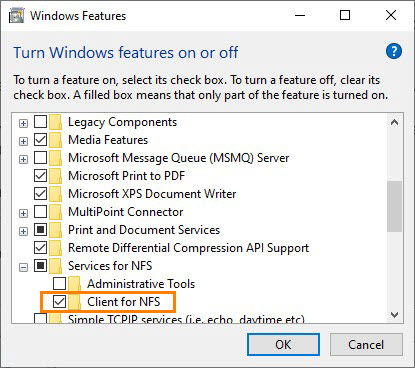
Note: To map an NFS share under Windows, make sure that the Client for NFS feature is installed, as shown below:
Windows:
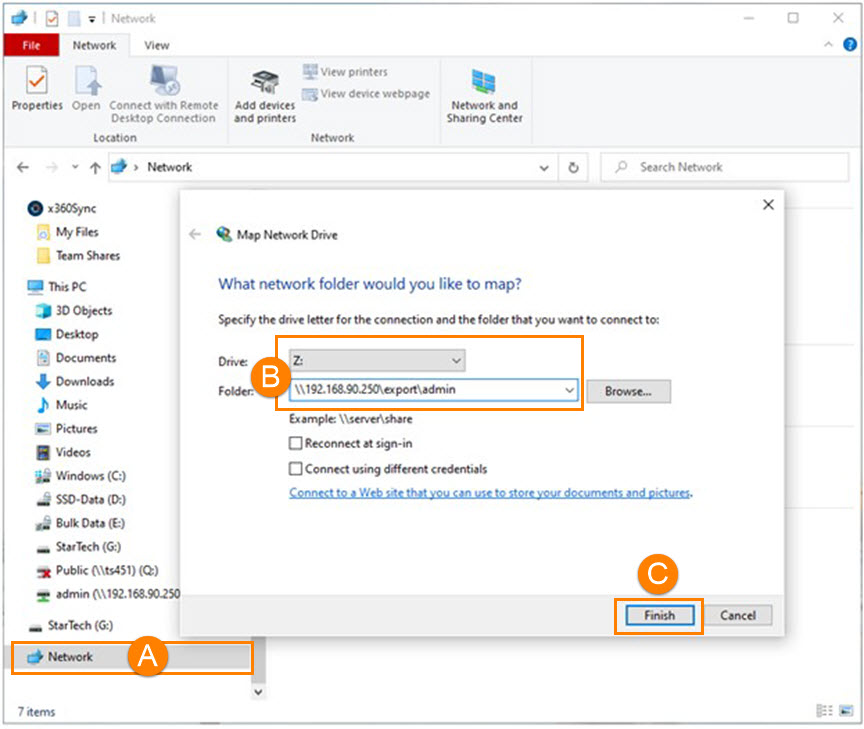
Map a drive to an NFS share as you would map a normal Windows file share:
A. Open File Explorer and select Network.
B. Right click to select Map Network Drive and then elect an available drive letter and enter the path.
C. Click Finish.
Map a drive to an NFS share (VMWare)
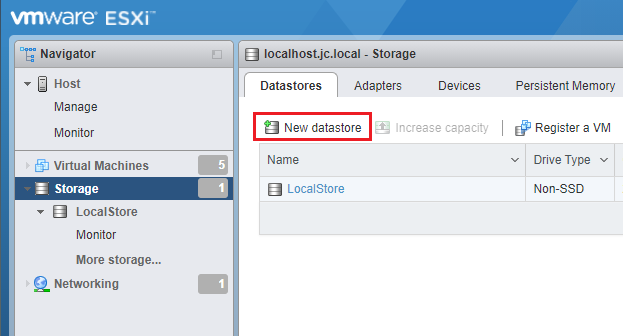
To map an NFS share under VMware, log in to the ESXi web console
1. Navigate to Storage and click New Datastore.
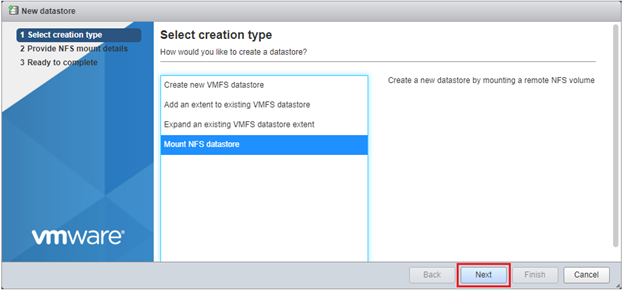
2. In the Select creation type window, select Mount NFS Datastore and click Next to continue.
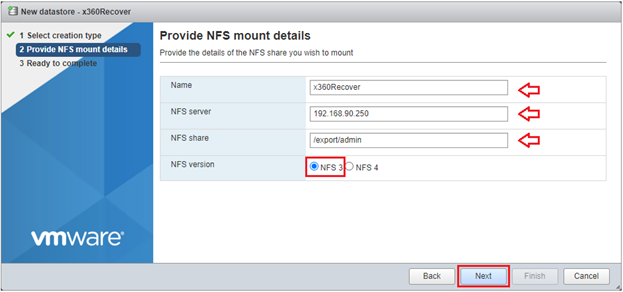
3. In the Provide NFS mount details window:
- Enter a Name
- Enter the IP address of the recover appliance in the NFS server field
- Enter the share path in the NFS share field
- For NFS version, select NFS 3
Click Next to continue.
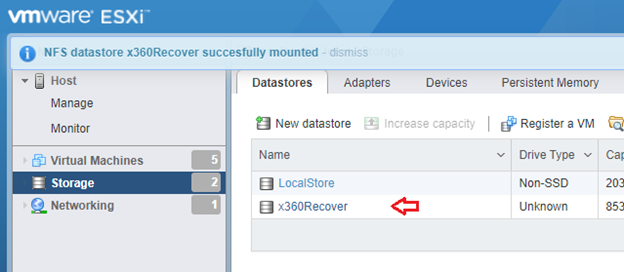
4. In the Ready to complete window, click Finish.
The recover device will be mounted as a datastore:
View exports in the mapped drive
After the drive is mapped, all exports for this protected system will be accessible under this NFS share.
Example:
1. Return to the appliance web interface.
2. In the left-hand navigation menu, click Protected Systems.
3. In the Protected Systems window, find a protected system and click the appropriate System Name.
5. In the Protected System Details page, click Export.
 6. In the Export Settings pop-up window, configure your preferred export settings and then click Start.
The export is now visible under the NFS share.
Remove a host from the access list
To remove a host from the access list, click the NFS Exports tab in the appliance or vault web interface and then click Delete.
Note: Exported virtual disks are currently read-only.
Request a disk shipment/USB
If a snapshot is too large to export and download, you can request a copy of your hosted data on a USB drive.
For complete details on the costs and procedures involved, please review How to request a copy of your hosted data on a USB drive
Perform cloud recovery
- Request access to the Continuity Cloud by opening a critical ticket with the Axcient Support team in the x360Portal.
- An Axcient Continuity Cloud node will be provisioned through Support (This has a 1-hour SLA).
- Export any snapshot on the cloud vault via ISCSI
- Connect it to the Continuity Cloud
- Instantly boot the virtual protected system image for testing or live disaster recovery.
Request an instant cloud recovery
With Scale-Out Cloud, perform a near-instant export and recovery without needing to convert to VHDX or VMDK first.
What is the Scale-Out Cloud?
The Axcient Scale-Out Cloud is a paradigm shift in our cloud storage architecture.
Previously, each vault in the Axcient Cloud was allocated a dedicated storage pool, restricting it to storing a limited number of endpoints and data (TB). Many partners would find themselves managing multiple vaults as their customer base grew, including the headache of migrating data between vaults to balance storage capacity. Replication performance was inconsistent and, in some cases, unacceptably slow due to the underlying architecture of the storage layer.
Scale-out Cloud delivers an entirely new and improved experience. All vaults configured to operate using Scale-Out Cloud distribute data evenly across the entire storage network transparently. New partners will receive a single cloud vault that can accommodate data and endpoints. Existing partner vaults will be converted to Scale-Out Cloud, and eventually the endpoints distributed onto multiple existing vaults will be consolidated down to a single vault instance.
Data for protected systems sent to the Scale-Out Cloud is delivered directly to the storage network and dynamically distributed across our entire cloud.
The new storage architecture has been implemented to provide consistent and highly performant replication speeds. (In our benchmark tests, replication speeds over the Internet from a single appliance have exceeded 1 Gbit/sec.)
Conversion of existing cloud vaults on a one-for-one basis will be completed with minimal downtime and with no anticipated involvement required from partners. Conversion and migration of cloud data will proceed throughout the remainder of 2019.
Partners will be notified individually with more information about the progress of their conversion once they are scheduled to start.
Once conversion and data migration to the new storage architecture is completed for a given partner, recovery of protected systems into the Axcient Continuity Cloud can be performed using iSCSI export of the disk images.
SUPPORT | 720-204-4500 | 800-352-0248
- Contact Axcient Support at https://partner.axcient.com/login or call 800-352-0248
- Free certification courses are available in the Axcient x360Portal under Training
- To learn more about Axcient products, sign up for a free one-on-one training
- Subscribe to the Axcient Status page for updates and scheduled maintenance
1422